invoke PHP Interactive shell
$ php -a php > echo 5+8; php > function addTwo($n) { return $n + 2;} echo(addTwo(5)); var_dump(addtwo(2)); The interactive shell also features tab completion for functions, constants, class names, variables, static method calls and class constants. Example Tab completion Pressing the tab key twice when there are multiple possible completions will result in a list of these completions: php > strp[TAB][TAB] strpbrk strpos strptime When there is only one possible completion, pressing tab once will complete the rest on the same line: php > strpt[TAB]ime( Completion will also work for names that have been defined during the current interactive shell session: php > $fooThisIsAReallyLongVariableName = 42; php > $foo[TAB]ThisIsAReallyLongVariableName The interactive shell stores your history which can be accessed using the up and down keys. The history is saved in the ~/.php_history file. As of PHP 5.4.0, the CLI SAPI provides the php.ini settings cli.pager and cli.prompt. The cli.pager setting allows an external program (such as less) to act as a pager for the output instead of being displayed directly on the screen. The cli.prompt setting makes it possible to change the php > prompt. In PHP 5.4.0 it was also made possible to set php.ini settings in the interactive shell using a shorthand notation. Example #3 Setting php.ini settings in the interactive shell The cli.prompt setting: php > #cli.prompt=hello world :> hello world :> Using backticks it is possible to have PHP code executed in the prompt: php > #cli.prompt=`echo date('H:i:s');` php > php > #cli.prompt=php > php > sleep(2); Setting the pager to less: php > #cli.pager=less php > phpinfo(); (output displayed in less) The cli.prompt setting supports a few escape sequences: cli.prompt escape sequences Sequence Description \e Used for adding colors to the prompt. An example could be \e[032m\v \e[031m\b \e[34m\> \e[0m \v The PHP version. \b Indicates which block PHP is in. For instance /* to indicate being inside a multi-line comment. The outer scope is denoted by php. \> Indicates the prompt character. By default this is >, but changes when the shell is inside an unterminated block or string. Possible characters are: ' " { ( > Note: Files included through auto_prepend_file and auto_append_file are parsed in this mode but with some restrictions - e.g. functions have to be defined before called. PHP commandline type 'h' or 'help' to see instructions & features Printing strings: php> echo 'hi'; Do some math: php> echo 1+2; Print some builtin variables: php> echo $_SERVER; Print contents of that array: php> print_r($_SERVER); Get a key of that array: php> echo $_SERVER['TERM']; Addition of a different kind: php> =2+2 Print the previous: php> = $_ Store a variable: php> $msg = "don't just sit there fancy pants, take the wheel"; An equation can be held open through newlines until it completes: php> =2+ ... 3+ ... 4+5 Define our own arrays: php> $derp = array(1,2,3); php> echo $derp Get the type of a variable: php> echo gettype(PHP_VERSION); For great justice, loops: php> $i = 0; while ($i < 3){$i++; echo "pinkie pie is best pony ";} Get yerself some info: php> phpinfo(); Explode parses the string on space into an array, print_r pretty prints it: php> function little_bad_girl(){ print_r(explode(" ", "oxy contin")); } php> little_bad_girl(); Foreach structure can be extended onto following lines. php> foreach (array(1,2,3) as $item) { ... echo $item; ... } Block comments are ignored: php> /* echo "hidden"; */ Read from a file: php> $section = file_get_contents('/home/el/myfile.txt'); php> echo $section; php> echo time(); Pure sweet truth: php> echo isset($_SERVER); Make an array, search for an item in it. php> $data = array(0, 1, 2); php> echo preg_grep("/1/", $data); php> print_r( preg_grep("/1/", $data)); php> print_r( preg_grep("/4/", $data));explode function split string by delimiter (comma, space, tab etc)
The PHP explode function splits a string by a delimiter string. It is the opposite of implode.change working directory
echo getcwd(); // Change directory function chdir("D:/wamp64/www/webscraping"); echo getcwd();PHP Programming
PHP ProgrammingExecute PHP Online
Test Php Functions Online Execute PHP OnlineBasic PHP
php tutorial ♦PHP Examples A PHP script can be placed anywhere in the document. A PHP script starts with ?>:PHP tutorials
tutorialspointPHPDatabase Queries
A query is a question or a request. SELECT LastName FROM Employees The query above selects all the data in the "LastName" column from the "Employees" table. PHP 5 and later can work with a MySQL database using: MySQLi extension (the "i" stands for improved) PDO (PHP Data Objects) PHP Connect to MySQL Before we can access data in the MySQL database, we need to be able to connect to the server:=> is the separator for associative arrays
double arrow operator, =>, is to set left side value = right side $age = array("Peter"=>"35", "Ben"=>"37", "Joe"=>"43"); The object operator, -> to access methods and properties of an object. $obj = new MyObject(); // Set a property in the $obj object called thisProperty $obj->thisProperty = 'Fred'; // Call a method of the $obj object named getProperty $obj->getProperty(); PHP Associative Arrays In an associative array, we can associate any key with each value. $prices = array( 'Tires'=>100, 'Oil'=>10, 'Spark Plugs'=>4 ); There are two ways to create an associative array: $age = array("Peter"=>"35", "Ben"=>"37", "Joe"=>"43"); or: $age['Peter'] = "35"; $age['Ben'] = "37"; $age['Joe'] = "43"; The syntax for accessing elements in an associative array is $arr['key']. The syntax for accessing properties of objects is $obj->prop. $anArray = array(0 => 100, "color" => "red"); echo array_keys($anArray); $anArray = array("blue", "red", "green", "blue", "blue"); print_r(array_keys($anArray, "blue")); $anArray = array("color" => array("blue", "red", "green"), "size" => array("small", "medium", "large")); print_r(array_keys($anArray));PHP Tutorial
♦PHP Tutorial for BeginnersPHPMySQL tutorial
♦PHPMySQL ♦w3 PHP mySQL php sql html css and javascript PHP - AJAX and MySQLphp-login-form
php_login_example php_mysql_login php-login-form github php-login-form php-mysql-login-system Create Login Script in PHP and MySql <input type="password" id="pwd" name="pwd" minlength="8">Online-Exam-System
Online-Exam-SystemPHP Samples
PHP Samples php examples . PHP examples Organized by topic PHP Examples Free Projects Latest Version of PHP MadePHP Desktop
PHP DesktopphpMyAdmin
phpMyAdmin is a free software tool written in PHP, intended to handle the administration of MySQL over the Web. phpMyAdmin supports a wide range of operations on MySQL and MariaDB. Frequently used operations (managing databases, tables, columns, relations, indexes, users, permissions, etc) can be performed via the user interface, while you still have the ability to directly execute any SQL statement. https://www.phpmyadmin.net/Web Scraping
Web Scraping with PHP PHP Web Scraping Libraries and Tools 用 php 來做 Web Scraping Scrape web content with PHP Guzzle: An Independent HTTP client, so no need to depend on cURL, SOAP or REST. Goutte: Built on Guzzle & some of Symfony components by Symfony developer. hQuery: A fast scraper with caching capabilities. high performance on scraping large docs. Requests: Famous for its user-friendly usage. Buzz: A lightweight client, ideal for beginners. ReactPHP: Async scraper, with comprehensive tutorials & examples PHP Simple HTML DOM Parser provides a very easy way to find, extract and modify the HTML elements of the dom. // Create DOM from URL or file $html = file_get_html('http://www.google.com/'); // Find all images foreach($html->find('img') as $element) echo $element->src . '<br>'; // Find all links foreach($html->find('a') as $element) echo $element->href . '<br>'; file_get_contents will load the response body into a string but file_get_html will load it into simple-html-dom $dom = file_get_html($url); $tables = $dom->find('table'); echo $tables[0]; echo $tables[1]; Alternatively you could use file_get_contents along with str_get_html: $dom = str_get_html(file_get_contents($url)); But that would be silly. Use simple_html_dom exampleDOM Parser Example
DOM Parser Exampleaccess php variables in javascript or jquery
access php variables in javascript or jquery the most simple way of passing PHP variables to JavaScript, can also use json_encode for more complex things like arrays:To pass JavaScript variables to PHP
JavaScript is the client side and PHP is the server side script language. The way to pass a JavaScript variable to PHP is through a request. Method 1: Use form element and GET/POST method to pass JavaScript variables to PHP. The form contents can be accessed through the GET and POST actions in PHP. Method 2: Using Cookies to store information: Client Side: Use Cookie to store the information, which is then requested in the PHP page. // Creating a cookie after the document is ready $(document).ready(function () { createCookie("gfg", "GeeksforGeeks", "10"); }); // Function to create the cookie function createCookie(name, value, days) { var expires; if (days) { var date = new Date(); date.setTime(date.getTime() + (days * 24 * 60 * 60 * 1000)); expires = "; expires=" + date.toGMTString(); } else { expires = ""; } document.cookie = escape(name) + "=" + escape(value) + expires + "; path=/"; } Server Side(PHP): On the server side, we request for the cookie by specifying the name gfg and extract the data to display it on the screen. echo $_COOKIE["gfg"];php regular expressions
php regular expressions PHP has two sets of regular expression functions: the ereg and preg functions. The preg functions support a modern full-featured regex syntax based on the PCRE library and are recommended for new code. The ereg functions are deprecated, but RegexBuddy still fully supports them so you can maintain existing code or convert your regular expressions from PHP’s ereg flavor to the preg flavor.phpadmin
username: root password: <blank>save output of a php file in a html
save output of a php file in a html filedaily logbook Tool
daily logbook date caption link to detail documents plannings: date caption link to detail documents Notes: html format, using php database retrive by ctrl+F to find, add toc new date no topPHP Multiple Choice
1000 php questions answers sample php code m-c quiz Create PHP script for Multiple Choice Questions simple php quiz building php simple quizmultiple choice questions
If the questions are numbered in a column other than id use that instead e.g. `SELECT `number`,` $sql = "SELECT `id`,`content`,`a`,`b`,`c`,`d` FROM quizzes ORDER BY rand() limit 5"; mysql_query($sql); echo '<form action="result.php" method="post"><div>'; while($data = mysql_fetch_array($result,MYSQL_NUM)){ echo <<<EOF $data[1] <input type="radio" name="option$data[0]" value="a">$data[2] <input type="radio" name="option$data[0]" value="b">$data[3] <input type="radio" name="option$data[0]" value="c">$data[4] <input type="radio" name="option$data[0]" value="d">$data[5] EOF; } echo '<input type="submit" value="Submit" /></div></form>'; To get the submitted answers your result.php should start like this: foreach $_POST as $key => $value){ if(substr($key,0,6) == 'option`){ $id = intval(substr($key,6)); $answers[$id] = $value; } } var_export($answers); Then look up question for each answer: foreach($answers as $id => $answer){ $sql = "SELECT .... WHERE `id` = $id"; //If non-numeric, add single quotes '$id' } Update This should be how your basic form will look: <form action="result.php" method="post"><div> <input type="radio" name="option1" value="a">Answer A ... <input type="radio" name="option5" value="a">Answer D <input type="submit" value="Submit" /></div></form> The <form> before the <input type="submit" /> The after the submit Most likely problem is an unclosed set of double quotes Make sure all double quotes are closed especially these: "result.php", including the name and value of each radio button. right click the form and choose "Inspect Element"functions-in-php
Function and Method listing functions-in-php php-101-built-in-functions most-popular-php-string-functions commonly-used-php-functions most-commonly-used-php-functionsPHP Libraries
24 Cool Php Libraries most popular php projects 15 PHP LibrariesPHP Server Browser communication
PHP Work With The Web Server And Browser Client to client socket with phpJavaScript cannot call the PHP function, even from Ajax.
What Ajax does, is ask for data that is outputted from a PHP file. Ajax will only fetch the string that was printed from PHP. ========= Client side do something likebind ajax call on your button click
when the button click it will trigger the ajax call. ======= $(document).ready(function() { // when button click it will trigger ajax call $("#button").click(function(){ $.ajax({ type: "GET", url: "name.php", data: { name: "John" }, success: function(data) { // on successfull return it will alert the data alert("Data saved: " + data); } }); }); }); <input type="button" id="button" value="Click me"> data will contain all the string that was printed from your PHP file. If you expect an array, you need to convert it into a JSON. ======= And in your name.php ====HTTP GET and POST Methods in PHP
php get-post What is HTTP? The Hypertext Transfer Protocol (HTTP) is designed to enable communications between clients and servers. There are two HTTP request methods: GET and POST GET – Requests data from a specified resource. POST – Submits data to be processed to a specified resource. The GET Method ==== In GET method the data is sent as URL parameters that are usually strings of name and value pairs separated by ampersands (&). In general, a URL with GET data will look like this: Example : http://www.example.com/action.php?name=Sam&weight=55 More than one parameter=value can be embedded in the URL by concatenating with ampersands (&). One can only send simple text data via GET method.Execute PHP function with onclick
Execute PHP function with onclick <a role="button" href="?action=removeday" class="debatebtn">Delete</a> where the action is caught and runs the removeday() function similar to if($action == 'removeday'){ removeday(); }. function removeday() { ... } PHP: It only runs by the server and responds to requests like clicking on a link (GET) or submitting a form (POST). HTML & JavaScript: It only runs in someone's browser (excluding NodeJS). <!DOCTYPE HTML> <html>PHP web scraping
I recommend you consider simple_html_dom for this. It will make it very easy. Here is a working example of how to pull the title, and first image. <?php require 'simple_html_dom.php'; $html = file_get_html('http://www.google.com/'); $title = $html->find('title', 0); $image = $html->find('img', 0); echo $title->plaintext."<br>\n"; echo $image->src;PHP Open File - fopen()
ExamplePHP Read File - fread()
The fread() function reads from an open file. The first parameter of fread() contains the name of the file to read from and the second parameter specifies the maximum number of bytes to read. The following PHP code reads the "webdictionary.txt" file to the end: fread($myfile,filesize("webdictionary.txt"));PHP Close File - fclose()
The fclose() function is used to close an open file. It's a good programming practice to close all files after you have finished with them. You don't want an open file running around on your server taking up resources! The fclose() requires the name of the file (or a variable that holds the filename) we want to close:PHP Read Single Line - fgets()
The fgets() function is used to read a single line from a file. The example below outputs the first line of the "webdictionary.txt" file: ExamplePHP Check End-Of-File - feof()
The feof() function checks if the "end-of-file" (EOF) has been reached. The feof() function is useful for looping through data of unknown length. The example below reads the "webdictionary.txt" file line by line, until end-of-file is reached: ExamplePHP Read Single Character - fgetc()
The fgetc() function is used to read a single character from a file. The example below reads the "webdictionary.txt" file character by character, until end-of-file is reached: ExamplePHP readfile() Function
Example Read a file:PHP file_get_contents() Function
?> preg_split() - Split string by a regular expression str_split() - Convert a string to an array mb_split() - Split multibyte string using regular expression str_word_count() - Return information about words used in a string strtok() - Tokenize string implode() - Join array elements with a stringPHP get user input
You can't take input in the middle of php execution since it finishes before the page is actually shown to the user. However, you can get input using HTML and receive that using php. Here's a really basic example:phpChart
canvasjs localhost sample bar.php localhost bar.phptwo-dimensional array
$cars = array ( array("Volvo",22,18), array("BMW",15,13), array("Saab",5,2), array("Land Rover",17,15) ); echo $cars[0][0].": In stock: ".$cars[0][1].", sold: ".$cars[0][2]; echo $cars[1][0].": In stock: ".$cars[1][1].", sold: ".$cars[1][2]; echo $cars[2][0].": In stock: ".$cars[2][1].", sold: ".$cars[2][2]; echo $cars[3][0].": In stock: ".$cars[3][1].", sold: ".$cars[3][2]; for ($row = 0; $row < 4; $row++) { echo "Row number $row "; echo "<ul>"; for ($col = 0; $col < 3; $col++) { echo "".$cars[$row][$col].""; } echo gettype($data) echo count($data); echo sizeof($data); print_r($data[1]); If you send a PHP array into a function that expects a string like: echo or print, then the PHP interpreter will convert your array to the literal string Array, throw this Notice and keep going. For example: php> print(array(1,2,3)) In this case, the function print dumps the literal string: Array to stdout and then logs the Notice to stderr and keeps going. when you echo an array, all it does is print Array and a notice. To print properly an array, you either loop through it and echo each element, or you can use print_r. Use json_encode to collapse the array to json string: $stuff = array(1,2,3); print json_encode($stuff); //Prints [1,2,3] Joining all the cells in the array together: $stuff = array(1,2,3); print implode(", ", $stuff); //prints 1, 2, 3 print join(',', $stuff); //prints 1, 2, 3 suppress the Notices: error_reporting(0); print(array(1,2,3)); //Prints 'Array' without a Notice.Filtering the Records
Filtering the Records PHP code selects all the rows from the persons table where first_name='john':PHP CRUD
PHP CRUDPHP MySQL Ajax Live Search
PHP MySQL Ajax Live Searchto retrieve data storage from page 1
// page1.php session_start(); echo 'Welcome to page #1'; $_SESSION['favcolor'] = 'green'; $_SESSION['animal'] = 'cat'; $_SESSION['time'] = time(); // page2.php session_start(); echo 'Welcome to page #2'; echo $_SESSION['favcolor']; echo $_SESSION['animal']; echo date('Y m d H:i:s', $_SESSION['time']);
error_reporting
error_reporting(0); 关闭所有PHP错误报告 error_reporting(E_ERROR | E_WARNING | E_PARSE); Report simple running errors error_reporting(-1); 报告所有 PHP 错误isset() Determine if a variable is declared and is different than NULL
check Undefined index with $_POST $var = ''; // This will evaluate to TRUE so the text will be printed. if (isset($var)) { echo "This var is set so I will print.";} // this time use var_dump to output the return value of isset(). $a = "test"; $b = "anothertest"; var_dump(isset($a)); // TRUE var_dump(isset($a, $b)); // TRUE unset ($a); var_dump(isset($a)); // FALSE var_dump(isset($a, $b)); // FALSE $foo = NULL; var_dump(isset($foo)); // FALSE If a variable has been unset with the unset() function, it is no longer considered to be set.PHP $_POST
PHP $_POST is a PHP super global variable which is used to collect form data after submitting an HTML form with method="post". $_POST is also widely used to pass variables. <form method="post" action="mysqli query() Function Perform query against a database
get and post method
<input type="text" name="lname"> <input type="submit" value="thisValue" name="sssubmit"> Submit will appends all form-data into the URL in name/value pairs form-data is all attributes with "name" inside formphp search and display result
Create a multidimensional array:
// A two-dimensional array: array of arrays $cars = array ( array("Volvo",100,96), array("BMW",60,59), array("Toyota",110,100)le quotes );Explode a txt file into multidimensional array
$theFIle = file_get_contents('EnglishWordList.txt'); $data = explode("\n", $theFIle); // Get each record, don't use sing echo gettype($data); $final_array = array(); foreach($data AS $row){ // Loop the exploded data, $data is array of arrays $final_array[] = explode('\t', $row); // Explode each row } print_r($final_array); $datarange = array_slice($final_array,1,6); // this is array of arrays echo "<br>"; foreach($datarange as $temp) { foreach($temp as $line) { echo $line . "\t"; } echo "<br>"; } unset($data[count($data) - 1]); // Clear the last empty element $csvFile = file('EnglishWordList.txt'); $data = []; foreach ($csvFile as $line) { $data[] = str_getcsv($line); } $csv = array_map('str_getcsv', file('EnglishWordList.txt'));json_encode()
The json_encode() function is used to encode a value to JSON format. json_decode() Accessing the Decoded Values $jsonobj = '{"Peter":35,"Ben":37,"Joe":43}'; $obj = json_decode($jsonobj); echo $obj->Peter; Looping Through the Values foreach($obj as $key => $value) { echo $key . " => " . $value . "<br>"; }PHP Date() Function
date(format,timestamp) Get a Date d - Represents the day of the month (01 to 31) m - Represents a month (01 to 12) Y - Represents a year (in four digits) l (lowercase 'L') - Represents the day of the week Other characters, like"/", ".", or "-" can also be inserted between the characters to add additional formatting. echo "Today is " . date("Y/m/d") . "<br>"; echo "Today is " . date("Y.m.d") . "<br>"; echo "Today is " . date("Y-m-d") . "<br>"; echo "Today is " . date("l");Automatic Copyright Year
Use the date() function to automatically update the copyright year on your website: © 2010-?>Get a Time
H - 24-hour format of an hour (00 to 23) h - 12-hour format of an hour with leading zeros (01 to 12) i - Minutes with leading zeros (00 to 59) s - Seconds with leading zeros (00 to 59) a - Lowercase Ante meridiem and Post meridiem (am or pm) echo "The time is " . date("h:i:sa"); Get Your Time Zone date_default_timezone_set("America/New_York"); echo "The time is " . date("h:i:sa"); Create a Date With mktime() mktime(hour, minute, second, month, day, year) $d=mktime(11, 14, 54, 8, 12, 2014); echo "Created date is " . date("Y-m-d h:i:sa", $d); Create a Date From a String With strtotime() $d=strtotime("10:30pm April 15 2014"); echo "Created date is " . date("Y-m-d h:i:sa", $d); The example below outputs the dates for the next six Saturdays: $startdate = strtotime("Saturday"); $enddate = strtotime("+6 weeks", $startdate); while ($startdate < $enddate) { echo date("M d", $startdate) . "<br>"; $startdate = strtotime("+1 week", $startdate); } The example below outputs the number of days until 4th of July: $d1=strtotime("July 04"); $d2=ceil(($d1-time())/60/60/24); echo "There are " . $d2 ." days until 4th of July.";PHP include and require Statements
require will produce a fatal error (E_COMPILE_ERROR) and stop the script include will only produce a warning (E_WARNING) and the script will continue The require statement is also used to include a file into the PHP code. However, there is one big difference between include and require; when a file is included with the include statement and PHP cannot find it, the script will continue to execute If we do the same example using the require statement, the echo statement will not be executed because the script execution dies after the require statement returned a fatal error:PHP Manipulating Files
PHP readfile() Function The readfile() function reads a file and writes it to the output buffer. echo readfile("webdictionary.txt"); PHP Open File - fopen() This function gives you more options than the readfile() function. $myfile = fopen("webdictionary.txt", "r") or die("Unable to open file!"); echo fread($myfile,filesize("webdictionary.txt")); fclose($myfile); The file may be opened in one of the following modes: Modes Description r Open a file for read only. File pointer starts at the beginning of the file w Open a file for write only. Erases the contents of the file or creates a new file if it doesn't exist. File pointer starts at the beginning of the file a Open a file for write only. The existing data in file is preserved. File pointer starts at the end of the file. Creates a new file if the file doesn't exist x Creates a new file for write only. Returns FALSE and an error if file already exists r+ Open a file for read/write. File pointer starts at the beginning of the file w+ Open a file for read/write. Erases the contents of the file or creates a new file if it doesn't exist. File pointer starts at the beginning of the file a+ Open a file for read/write. The existing data in file is preserved. File pointer starts at the end of the file. Creates a new file if the file doesn't exist x+ Creates a new file for read/write. Returns FALSE and an error if file already existsPHP Read File - fread()
The fread() function reads from an open file. The first parameter of fread() contains the name of the file to read from and the second parameter specifies the maximum number of bytes to read. fread($myfile,filesize("webdictionary.txt"));PHP Close File - fclose()
The fclose() function is used to close an open file. PHP Read Single Line - fgets() The fgets() function is used to read a single line from a file. $myfile = fopen("webdictionary.txt", "r") or die("Unable to open file!"); echo fgets($myfile); fclose($myfile); PHP Check End-Of-File - feof() The feof() function checks if the "end-of-file" (EOF) has been reached. $myfile = fopen("webdictionary.txt", "r") or die("Unable to open file!"); // Output one line until end-of-file while(!feof($myfile)) { echo fgets($myfile) . "<br>"; } fclose($myfile);PHP Read Single Character - fgetc()
The fgetc() function is used to read a single character from a file. $myfile = fopen("webdictionary.txt", "r") or die("Unable to open file!"); // Output one character until end-of-file while(!feof($myfile)) { echo fgetc($myfile); } fclose($myfile);PHP Create File - fopen()
The fopen() function is also used to create a file. Maybe a little confusing, but in PHP, a file is created using the same function used to open files. If you use fopen() on a file that does not exist, it will create it, given that the file is opened for writing (w) or appending (a). $myfile = fopen("testfile.txt", "w")PHP File Permissions
If you are having errors when trying to get this code to run, check that you have granted your PHP file access to write information to the hard drive. PHP Write to File - fwrite() The fwrite() function is used to write to a file. The first parameter of fwrite() contains the name of the file to write to and the second parameter is the string to be written. $myfile = fopen("newfile.txt", "w") or die("Unable to open file!"); $txt = "John Doe\n"; fwrite($myfile, $txt); $txt = "Jane Doe\n"; fwrite($myfile, $txt); fclose($myfile); PHP Overwriting Now that "newfile.txt" contains some data we can show what happens when we open an existing file for writing. All the existing data will be ERASED and we start with an empty file. $myfile = fopen("newfile.txt", "w") or die("Unable to open file!"); $txt = "Mickey Mouse\n"; fwrite($myfile, $txt); $txt = "Minnie Mouse\n"; fwrite($myfile, $txt); fclose($myfile);PHP File Upload
Configure The "php.ini" File First, ensure that PHP is configured to allow file uploads. In your "php.ini" file, search for the file_uploads directive, and set it to On: file_uploads = OnCreate The HTML Form
<form action="upload.php" method="post" enctype="multipart/form-data"> Select image to upload: <input type="file" name="fileToUpload" id="fileToUpload"> <input type="submit" value="Upload Image" name="submit"> </form> Some rules to follow for the HTML form above: Make sure that the form uses method="post" The form also needs the following attribute: enctype="multipart/form-data". It specifies which content-type to use when submitting the form Without the requirements above, the file upload will not work. Other things to notice: The type="file" attribute of the <input> tag shows the input field as a file-select control, with a "Browse" button next to the input control The form above sends data to a file called "upload.php", which we will create next. Create The Upload File PHP Script The "upload.php" file contains the code for uploading a file:Complete Upload File PHP Script
The complete "upload.php" file now looks like this:ob_start()
Think of ob_start() as saying "Start remembering everything that would normally be outputted, but don't quite do anything with it yet." PHP is an interpreted language thus each statement is executed one after another, therefore PHP tends to send HTML to browsers in chunks thus reducing performance. Using output buffering the generated HTML gets stored in a buffer or a string variable and is sent to the buffer to render after the execution of the last statement in the PHP script. But Output Buffering is not enabled by default. In order to enable the Output Buffering one must use the ob_start() function before any echoing any HTML content in a script. For example: ob_start(); echo("Hello there!"); //would normally get printed to the screen/output to browser $output = ob_get_contents(); ob_end_clean(); There are two other functions you typically pair it with: ob_get_contents(), which basically gives you whatever has been "saved" to the buffer since it was turned on with ob_start(), and then ob_end_clean() or ob_flush(), which either stops saving things and discards whatever was saved, or stops saving and outputs it all at once, respectively. For example:Scrape web content simple_html_dom.php
Introduction
There is a lot of data flowing everywhere. Not structured, not useful pieces of data moving here and there. Getting this data and structuring, processing can make it really expensive. There are companies making billions of dollars just (huh?) for scraping web content and showing in a nice form. Another reason for doing such things can be for example, lack of an API from a source website. In this case, it’s the only way to get data that you need to process. Today I will show you how to get web data using PHP and that it can be as easy as pie.Just do it
There are multiple scraping scripts ready to use. I can recommend one of them: PHP Simple HTML DOM Parser. It’s extremely easy to start with and initial cost is almost nothing, it’s open sourced also. First, download a library from an official site: https://sourceforge.net/project/showfiles.php?group_id=218559. You can use a composer version too, it’s here: https://github.com/sunra/php-simple-html-dom-parser. Let’s say that you have downloaded this file already. It’s just a one PHP file called simple_html_dom.php. Create a new PHP file called scraper.php and include mentioned library like this:The end
I have some advice if you want to make this kind of script be processing the same page all the time: set the user agent header to simulate a real web browser request make calls with a random delay to avoid blacklisting from a web server use PHP 7 try to optimize the script as much as possible You can use this script for production code but, to be honest, it’s not the most optimal approach. If you are not satisfied, code it by yourself :-). Nice documentation is located here: http://simplehtmldom.sourceforge.net/Web Scraping with PHP
Web Scraping Techniques
DOM Parsing With the help of web browsers, programs can access the dynamic content that the client-side scripts have created. One can parse web pages in the form of a DOM (Document Object Model) tree which is in a way a description of which programs can get access to which parts of the pages. To give you an example, an HTML or XML document is converted to DOM. What DOM does is that it articulates the structure of documents and how a document can be accessed. PHP provides DOM extension. Regular Expressions In this case, you define a pattern (or say “regular expressions”) that you want to match in a text string and then search in the text string for matches. It is used a lot in search engines. When one is exploring string information, regular expressions come into play. Regular expressions are a basic tool and can take care of your elementary needs.Web Scraping Using PHP
We will explore some PHP libraries which can be used to understand how to use the HTTP protocol as far as our PHP code is concerned, how we can steer clear of the built-in API wrappers and in its place, think of using something that is way more simple and easy to manage for web scraping. What we will try to do here is to write a straightforward scraper with the help of Simple HTML DOM library. It will be possible for you to see how to scrape the data you want using PHP and how the extracted data can be converted into xml file with the help of SimpleXMLElement library as shown below: 1. Simple HTML DOM An HTML DOM parser which is written is PHP5+ is useful because it allows you to access and use HTML in a convenient and comfortable way. It is PHP5+ compatible. It supports invalid HTML. You can use it to identify tags on a given HTML page with the help of selectors like jQuery. You can get the contents from HTML with a simple single line of code. 2. SimpleXMLElement SimpleXMLElement stands for an element in an XML document. It is nothing but just an extension that enables you to get XML data. What it does is that it converts an XML document into a data structure. It means that you can access and use it like a data structure.1. How to install Simple HTML Dom Parser:
To start with, download Simple HTML Dom Parser from this LINK. Next, extract zip file Simplehtmldom_1_5.zip and what you will have is a folder called “simple_dom”.2. How to Scrape data from website using PHP with Simple HTML DOM
Now we come to the application part of the process. Let’s get down to scraping the IMDB website to extract the review of the movie “Avengers: Infinity War”. You can get it here.Step 1: Create a new PHP file called scraper.php and include the library mentioned below:
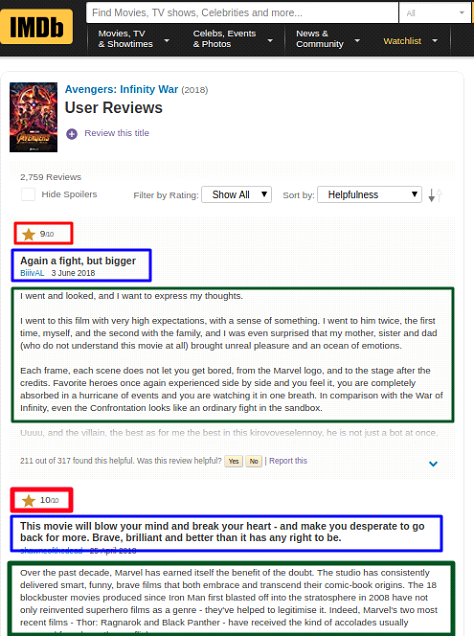
require_once ‘simple_html_dom.php’; To create a new PHP file, create a new folder called “simple_dom” and include “simple_html_dom.php” file at the top. Why movie reviews and rating matter is because these can be used to create the necessary database for sentiment analysis, text classification etc. Since there are countless reviews in a website like IMDB, it is not possible to get all the reviews by mere copy-paste. With the help of web scraping, you can get all the reviews in an automatic fashion and save it in xml file. Now, we will extract the following data from the website: Rating stars – The users’ rating stars of the film.
Title of reviews – The title of the users’ review. Review – The content of the review. Here’s how all these fields are arranged. Take a look at the screenshot:
Step 2: Extract the html returned content from the website.
What you need to do is use file_get_html function to get HTML page of the URL. URL = https://www.imdb.com/title/tt4154756/reviews?ref_=tt_ov_rt .require_once ‘simple_html_dom.php’;
//get html content from the site.
$dom = file_get_html(‘https://www.imdb.com/title/tt4154756/reviews?ref_=tt_ql_3‘, false);
Step 3: Scrape the fields of the reviews
Now the fun starts. We will make use of the HTML tag and scrape the data items mentioned earlier, like rating stars, title of the review and reviews with the help of Inspect element. This is how you can find out the class of the tag with the help of following step: Go to chrome browser => Open this url => do right click => inspect element NOTE: If you don’t use chrome browser, go through this article Next, we will scrape the requisite information from HTML based on css selectors like class, id etc. Now let’s get the css class for title, reviews and rating stars. All you got to do is right click on title and select “Inspect” or “Inspect Element”.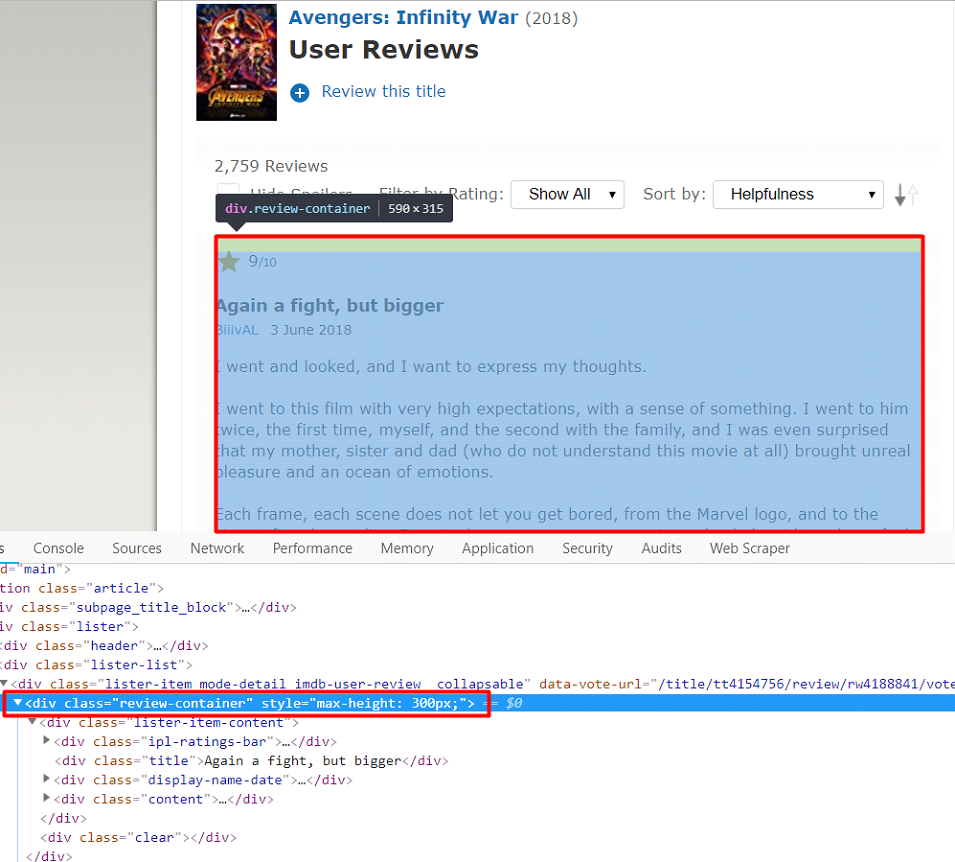 As you can see, the css class “review-container” is applied to all <div> tags which contain titles, rating stars and reviews of users.
This will be useful in the process of filtering the field from the rest of the other content in the response object:
Next, we will scrape all those fields with the help of that class and a for each loop, as is shown below:
//collect all user’s reviews into an array
$answer = array();
if(!empty($dom)) {
$divClass = $title = ”;$i = 0;
foreach($dom->find(“.review-container”) as $divClass) {
//title
foreach($divClass->find(“.title”) as $title ) {
$answer[$i][‘title’] = $title->plaintext;
}
//ipl-ratings-bar
foreach($divClass->find(“.ipl-ratings-bar”) as $ipl_ratings_bar ) {
$answer[$i][‘rate’] = trim($ipl_ratings_bar->plaintext);
}
//content
foreach($divClass->find(‘div[class=text show-more__control]’) as $desc) {
$text = html_entity_decode($desc->plaintext);
$text = preg_replace(‘/\'/’, “‘”, $text);
$answer[$i][‘content’] = html_entity_decode($text);
}
$i++;
}
}
print_r($answer); exit;
I used for each loop to get all the data I want and save it to “$answer” array.
Next, I will print that array and review the output.
As you can see, the css class “review-container” is applied to all <div> tags which contain titles, rating stars and reviews of users.
This will be useful in the process of filtering the field from the rest of the other content in the response object:
Next, we will scrape all those fields with the help of that class and a for each loop, as is shown below:
//collect all user’s reviews into an array
$answer = array();
if(!empty($dom)) {
$divClass = $title = ”;$i = 0;
foreach($dom->find(“.review-container”) as $divClass) {
//title
foreach($divClass->find(“.title”) as $title ) {
$answer[$i][‘title’] = $title->plaintext;
}
//ipl-ratings-bar
foreach($divClass->find(“.ipl-ratings-bar”) as $ipl_ratings_bar ) {
$answer[$i][‘rate’] = trim($ipl_ratings_bar->plaintext);
}
//content
foreach($divClass->find(‘div[class=text show-more__control]’) as $desc) {
$text = html_entity_decode($desc->plaintext);
$text = preg_replace(‘/\'/’, “‘”, $text);
$answer[$i][‘content’] = html_entity_decode($text);
}
$i++;
}
}
print_r($answer); exit;
I used for each loop to get all the data I want and save it to “$answer” array.
Next, I will print that array and review the output.
Output:
As you can observe in the screenshot, we could scrape the title (title of review), rate (rating stars) and content (reviews) in array.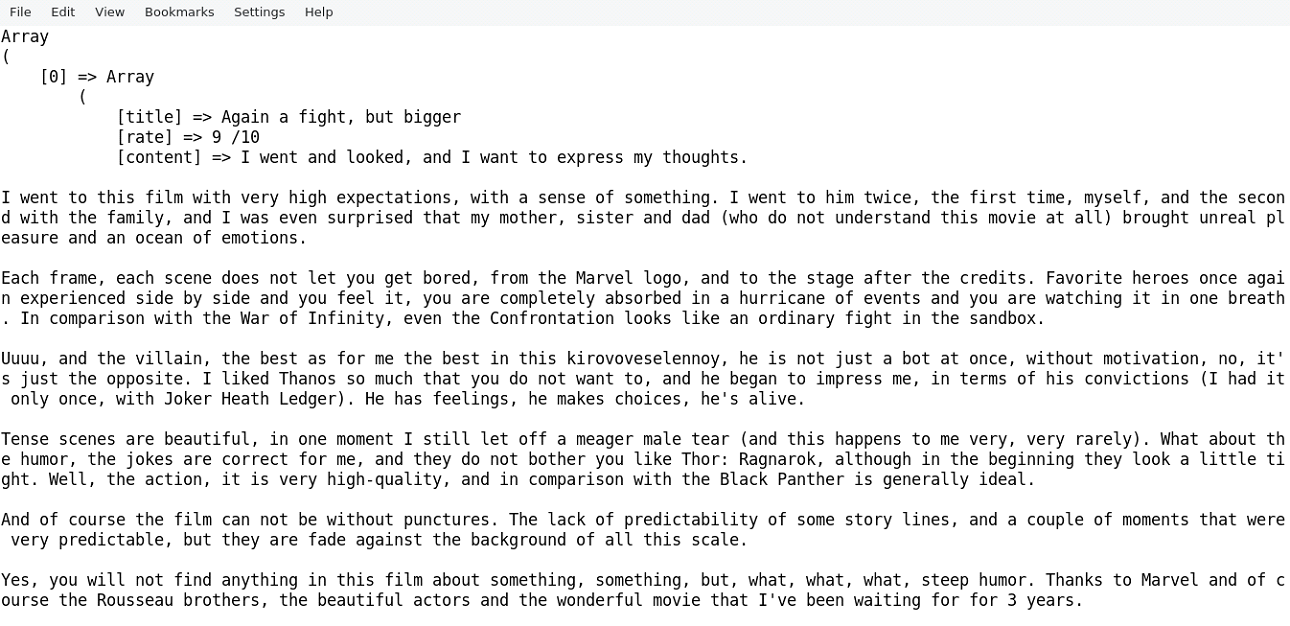
Step 4: Store data into xml file using “SimpleXMLElement”
The next step is to store the output in an xml file. So all we need to do is to convert “$answer” array into xml element. In order to do that, we will make use of “SimpleXMLElement” built-in class to convert PHP array into xml element. //function definition to convert array to xml function array_to_xml($array, &$xml_user_info) { foreach($array as $key => $value) { if(is_array($value)) { $subnode = $xml_user_info->addChild(“Review$key”); foreach ($value as $k=>$v) { $xml_user_info->addChild(“$k”, $v); } }else { $xml_user_info->addChild(“$key”,htmlspecialchars(“$value”)); } } return $xml_user_info->asXML(); } //creating object of SimpleXMLElement $xml_user_info = new SimpleXMLElement(“<?xml version=\”1.0\”Step 5: Create an xml file and write xml content to xml file
Next I created a file called “AvengersMovieReview.xml” and stored “$xmlContent” into this file. // Create a xml file $my_file = ‘AvengersMovieReview.xml’; $handle = fopen($my_file, ‘w’) or die(‘Cannot open file: ‘.$my_file); //success and error message based on xml creation if(fwrite($handle, $xmlContent)) { echo ‘XML file have been generated successfully.’; } else{ echo ‘XML file generation error.’; }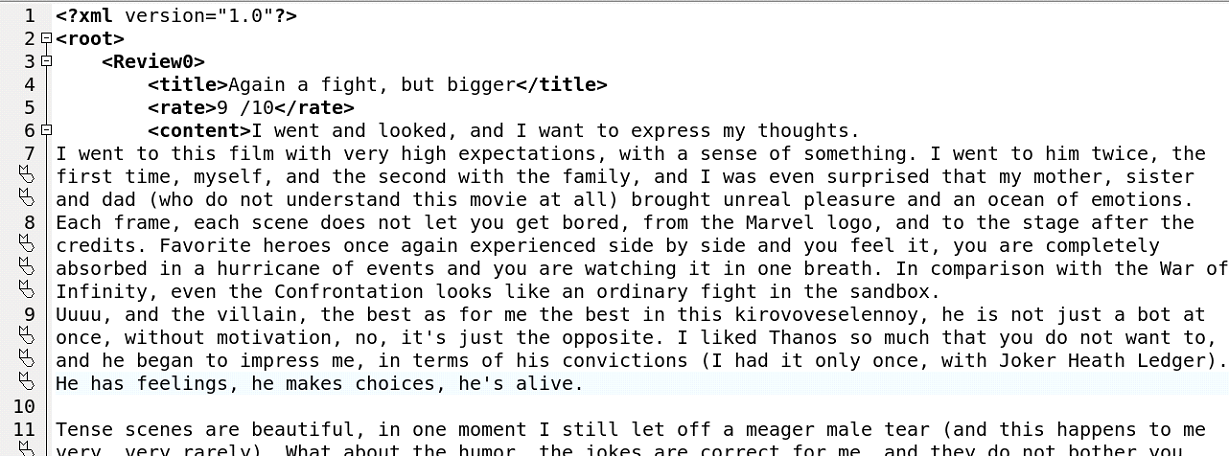 And we completed scraping the data that we needed.
Wasn’t it easy to scrape the web data using PHP?
The last bit that you should know: here’s the explanation for Linux basis regarding how to schedule and run this task in the background at regular breaks and in an automatic fashion with the help of Crontab command.
And we completed scraping the data that we needed.
Wasn’t it easy to scrape the web data using PHP?
The last bit that you should know: here’s the explanation for Linux basis regarding how to schedule and run this task in the background at regular breaks and in an automatic fashion with the help of Crontab command.
Automating Script Using Crontab
As you would know, Linux server can help you in automatize certain functions and completing the tasks which otherwise require human intervention. As far as Linux servers are concerned, cron utility is something that people prefer in order to automate the way scripts run. For your needs of large data on a daily basis, it can be useful. Cron is something works well on Linux and Unix environments that take care of scheduled commands which are also called cron jobs configured by the crontab command. As regards a Linux pc, you can use this script to run it at a specified time of the day with the help of the command “crontab-e”. If you wish to access more information on crontab, read it here: https://www.tutorialspoint.com/unix_commands/crontab.htm If you’re a PHP expert and our article has been helpful, you may also like another resource to help you in your career. Our friends at Toptal wrote a PHP hiring guide that has interview prep questions to help you out.Conclusion
Web scraping has turned into a compulsion for businesses. If you want to carry out market research, you need data. If you want to devise your sales strategy, you need data. If you want to generate leads for your business, you need data. In all possible crucial aspects of business strategy and operation, web scraping can enormously contribute by automating extraction of data. If you want to scrape large amounts of data for your specific needs, you may encounter the following challenges: You may get blocked. You may find it difficult to scrape data from a dynamic website You may be stuck up dealing with pages scrolling on and on. Thank heavens, there is a highly efficient and reliable web scraping service like PROWEBSCRAPER to tackle all these challenges and provide you the data you want.Socket Programming in PHP
Sockets are used for interprocess communication. Interprocess communication is generally based on client-server model. In this case, client-server are the applications that interact with each other. Interaction between client and server requires a connection. Socket programming is responsible for establishing that connection between applications to interact.Using the Code
Aim: Develop a client to send a string message to server and server to return reverse of the same message to client.PHP SERVER
Step 1: Set variables such as "host" and "port"
$host = "127.0.0.1"; $port = 5353; // No Timeout set_time_limit(0); Port number can be any positive integer between 1024 -65535.Step 2: Create Socket
$socket = socket_create(AF_INET, SOCK_STREAM, 0) or die("Could not create socket\n");Step 3: Bind the socket to port and host
Here the created socket resource is bound to IP address and port number. $result = socket_bind($socket, $host, $port) or die("Could not bind to socket\n");Step 4: Start listening to the socket
After getting bound with IP and port server waits for the client to connect. Till then it keeps on waiting. $result = socket_listen($socket, 3) or die("Could not set up socket listener\n");Step 5: Accept incoming connection
This function accepts incoming connection request on the created socket. After accepting the connection from client socket, this function returns another socket resource that is actually responsible for communication with the corresponding client socket. Here “$spawn” is that socket resource which is responsible for communication with client socket. $spawn = socket_accept($socket) or die("Could not accept incoming connection\n"); So far, we have prepared our server socket but the script doesn't actually do anything. Keeping to our aforesaid aim, we will read message from client socket and then send back reverse of the received message to the client socket again.Step 6: Read the message from the Client socket
$input = socket_read($spawn, 1024) or die("Could not read input\n");Step 7: Reverse the message
$output = strrev($input) . "\n";Step 8: Send message to the client socket
socket_write($spawn, $output, strlen ($output)) or die("Could not write output\n");Close the socket
socket_close($spawn); socket_close($socket); This completes with the server. Now we will learn to create PHP client.PHP CLIENT
The first two steps are the same as in the server.Step 1: Set variables such as "host" and "port"
$host = "127.0.0.1"; $port = 5353; // No Timeout set_time_limit(0); Note: Here the port and host should be same as defined in server.Step 2: Create Socket
$socket = socket_create(AF_INET, SOCK_STREAM, 0) or die("Could not create socket\n");Step 3: Connect to the server
$result = socket_connect($socket, $host, $port) or die("Could not connect toserver\n"); Here unlike server, client socket is not bound with port and host. Instead it connects to server socket, waiting to accept the connection from client socket. Connection of client socket to server socket is established in this step.Step 4: Write to server socket
socket_write($socket, $message, strlen($message)) or die("Could not send data to server\n"); In this step, client socket data is sent to the server socket.Step 5: Read the response from the server
$result = socket_read ($socket, 1024) or die("Could not read server response\n"); echo "Reply From Server :".$result;Step 6: Close the socket
socket_close($socket);Complete Code
SERVER (server.php)
// set some variables $host = "127.0.0.1"; $port = 25003; // don't timeout! set_time_limit(0); // create socket $socket = socket_create(AF_INET, SOCK_STREAM, 0) or die("Could not create socket\n"); // bind socket to port $result = socket_bind($socket, $host, $port) or die("Could not bind to socket\n"); // start listening for connections $result = socket_listen($socket, 3) or die("Could not set up socket listener\n"); // accept incoming connections // spawn another socket to handle communication $spawn = socket_accept($socket) or die("Could not accept incoming connection\n"); // read client input $input = socket_read($spawn, 1024) or die("Could not read input\n"); // clean up input string $input = trim($input); echo "Client Message : ".$input; // reverse client input and send back $output = strrev($input) . "\n"; socket_write($spawn, $output, strlen ($output)) or die("Could not write output\n"); // close sockets socket_close($spawn); socket_close($socket);CLIENT (client.php)
$host = "127.0.0.1"; $port = 25003; $message = "Hello Server"; echo "Message To server :".$message; // create socket $socket = socket_create(AF_INET, SOCK_STREAM, 0) or die("Could not create socket\n"); // connect to server $result = socket_connect($socket, $host, $port) or die("Could not connect to server\n"); // send string to server socket_write($socket, $message, strlen($message)) or die("Could not send data to server\n"); // get server response $result = socket_read ($socket, 1024) or die("Could not read server response\n"); echo "Reply From Server :".$result; // close socket socket_close($socket); After creating the above files (server.php and client.php), do as follows:-
Copy these files in www directory (in case of WAMP), located at C:\wamp.
Open your web browser and type localhost in the address bar.
Browse server.php first followed by client.php.
PHP client server communication
usa a form as client and the server is welcome.php: A Simple HTML Form <html><body> <form action="welcome.php" method="post"> <!--- the replying page is welcome.php---> Name: <input type="text" name="name"><br> E-mail: <input type="text" name="email"><br> <input type="submit"> </form> </body></html> welcome.php: Welcome$_PHP_SELF
$_PHP_SELF variable contains the name of self script in which it is being called.htmlspecialchars() function
The htmlspecialchars() function converts special characters to HTML entities. This means that it will replace HTML characters like < and > with < and >. This prevents attackers from exploiting the code by injecting HTML or Javascript code (Cross-site Scripting attacks) in forms.submit a form
<form action="/action_page.php" onsubmit="myFunction()"> Enter name: <input type="text" name="fname"> <input type="submit" value="Submit"> </form> <script> function myFunction() { alert("The form was submitted"); } </script> In HTML: <element onsubmit="myScript"> In JavaScript: object.onsubmit = function(){myScript}; In JavaScript, using the addEventListener() method: object.addEventListener("submit", myScript); submit a form using javascript document.getElementById("form1").submit(); or document.forms["name of your form"].submit(); or function placeOrder(form){ form.submit(); }echo input value in same page
<form action="the-same-page.php"> ... your code... <input type="submit"> </form>PHP Form Validation Example
submit form to itself in the same page
Use ?: <form action="?" method="post"> It will send the user back to the same page. Leave action attribute blank. The form will automatically submit itself in the same page. <form action=""> Using php be sure to use: action="PHP 5’s Standard Library
Much of the buzz surrounding PHP5 has focused on its new object-oriented syntax and capabilities, and comparisons with Java. While all that was going on, the promisingly named "Standard PHP Library" (SPL) extension quietly made its way into the core PHP 5 distribution. Although work is still in progress, the Standard PHP Library's current offering significantly increases the chances of getting PHP developers to agree on something (thereby increasing the chances of code re-use). It may also make your cunningly constructed class interface very easy for other people to use, as the SPL extension makes it possible to "overload" basic PHP syntax and make objects look like normal PHP arrays. In this tutorial, I'll introduce the functionality available with the SPL extension and PHP5 with just enough examples to get you started. Be warned: PHP5's syntax will be used. If you need to catch up, try SitePoint's PHP5 review. Today's iterations: Introducing the SPL: what's it all about? Looping the Loop: did someone say Iterator? Iterations foreach of us: the "wow" factor Admiring the Tree: a short tour of SPL classes and interfaces Objects as Arrays: easier for your web page designer The Big Deal: why you gotta like it Don't for get to download all the code included in this article for your own use.Introducing the SPL
The "Standard PHP Library" is a PHP extension developed by Marcus Boerger which (as the manual says) "is a collection of interfaces and classes that are meant to solve standard problems." As part of the core distribution of PHP5, it should be "always on". If you've been around the block with PHP4, you'll know there are a few areas in which wheels are perpetually re-invented by almost every new PHP project. Standardizing some of the fundamentals is a good way to get PHP developers singing from the same sheet, and increases the chances of our being able to re-use code from Project X in Project Y. Today the SPL extension addresses a single subset of problems: Iterators. What makes the SPL Iterator implementation interesting is not only that it defines a standard for everyone to use in PHP5, but also that it "overloads" certain parts of PHP syntax such as the foreach construct and basic array syntax, making it easier to work with objects of your classes.Looping the Loop
to loop through a MySQL query: // Fetch the "aggregate structure" $result = mysql_query("SELECT * FROM users"); // Iterate over the structure while ( $row = mysql_fetch_array($result) ) { // do stuff with the row here } To read the contents of a directory, you might use: // Fetch the "aggregate structure" $dh = opendir('/home/harryf/files'); // Iterate over the structure while ( $file = readdir($dh) ) { // do stuff with the file here } And to read the contents of a file, you might use: // Fetch the "aggregate structure" $fh = fopen("/home/hfuecks/files/results.txt", "r"); // Iterate over the structure while (!feof($fh)) { $line = fgets($fh); // do stuff with the line here } A glance at the above examples shows that they're very similar. Although each one works with a different type of resource, and uses PHP functions specific to that resource, the mantra is simple: "fetch resource; loop over contents". If it was somehow possible to "abstract out" the specific PHP functions from the above examples and use some kind of generic interface instead, it might be possible to make the job of looping over the data look the same, irrespective of the type of resource that was being used. With no requirement to modify the loop for a different data source, it may be possible for the code in which the loop appears (perhaps a function that generated an HTML list) to be reused elsewhere. That's where an Iterator comes in. The Iterator defines an abstract interface for use by your code. Specific implementations of the Iterator take care of each different type of structure with which you want to work, without the code that uses the Iterator having to care about the details. That's the basic theory of Iterators. If you're interested to know more, you'll find starting points at the C2 Wiki and Wikipedia. More thoughts from me can be found at phpPatterns on the Iterator Pattern and in The PHP Anthology – Volume II, Applications.Iterations foreach of Us
So what's so exciting about the SPL Iterators? Well, if you've written more than a line or two of PHP, you've probably run into the foreach construct, which is used to make easy work of looping through an array: // A list of colors $colors = array ( 'red', 'green', 'blue', ); foreach ( $colors as $color ) { echo $color.'<br>'; } Wouldn't it be nice if all loops where that easy, irrespective of whatever it was that you were looping over? How about this?Iteration with SPL
Now that your appetite is whet, you first need to be warned that the PHP manual currently lacks the capabilities needed to fully document the SPL extension. It's geared primarily to documenting native functions, and lacks a clear means to fully describe something like an in-built class; interfaces fail even to get a mention. Instead, you'll need to look at the generated documentation Marcus maintains, and trawl the source under CVS. Be aware also that the SPL extension is a moving target that's being actively developed and expanded. The code in this tutorial was tested under PHP 5.0.1, but if you're reading at a significantly distant point in the future, you may find parts of this code outdated. The SPL extension defines a hierarchy of classes and interfaces. Some of these will already be loaded in your PHP5 installation (see what get_declared_classes() turns up). They correspond the interface and class definitions defined here and here (the PHP files found here should disappear eventually, once Marcus has time to implement them in C). Some of classes found in the examples directory (with the .inc extension) also form part of the hierarchy, but are not loaded by default; if you wish to use them, you'll need to make sure copies for inclusion are located somewhere in your PHP include path. More examples of the classes' use can be found with the tests while independent examples can be found at http://www.wiki.cc/php/PHP5#Iterators. Although the number of classes and interfaces in the hierarchy may be daunting at first, don't panic! Basic use of the iterators requires only a single interface. If you're new to the idea of interfaces, have a look at this discussion of interfaces on SitePoint. I'll summarize the purpose of all the pre-loaded classes and interfaces later in this tutorial, for you to browse at your leisure. Once you start to grasp what's on offer, you'll realize that Marcus has done an amazing job of addressing the most common, loop-related problems that recur in PHP. Life will get easier… Let's return to the DirectoryReader example. How was it that I was able to iterate over my DirectoryReader object using foreach? The magic comes from the class I extended from, DirectoryIterator, which implements an interface called Iterator that's defined by the SPL extension. Any class I write that implements the Iterator interface can be used in a foreach loop (note that this article explains how this works from the point of view of PHP internals). The Iterator interface is defined as follows: interface Iterator extends Traversable { /** * Rewind the Iterator to the first element. * Similar to the reset() function for arrays in PHP * @return void */ function rewind(); /** * Return the current element. * Similar to the current() function for arrays in PHP * @return mixed current element from the collection */ function current(); /** * Return the identifying key of the current element. * Similar to the key() function for arrays in PHP * @return mixed either an integer or a string */ function key(); /** * Move forward to next element. * Similar to the next() function for arrays in PHP * @return void */ function next(); /** * Check if there is a current element after calls to rewind() or next(). * Used to check if we've iterated to the end of the collection * @return boolean FALSE if there's nothing more to iterate over */ function valid(); } Note that the SPL extension registers the Traversable interface from which Iterator inherits with the Zend Engine to allow the use of foreach. The Traversable interface is not meant to be implemented directly in PHP, but by other built-in PHP classes (currently, the SimpleXML extension does this; the SQLite extension probably should do this but, right now, it talks directly to the Zend API). To implement this interface, your class must provide all of the methods defined above. To show you how this works, I'll start by re-inventing the wheel and implementing an Iterator for native PHP arrays. Obviously, this is a pointless exercise, but it helps us understand how it works without getting lost in specific details. To begin, I define a class to manage the iteration: /** * An iterator for native PHP arrays, re-inventing the wheel * * Notice the "implements Iterator" - important! */ class ArrayReloaded implements Iterator { /** * A native PHP array to iterate over */ private $array = array(); /** * A switch to keep track of the end of the array */ private $valid = FALSE; /** * Constructor * @param array native PHP array to iterate over */ function __construct($array) { $this->array = $array; } /** * Return the array "pointer" to the first element * PHP's reset() returns false if the array has no elements */ function rewind(){ $this->valid = (FALSE !== reset($this->array)); } /** * Return the current array element */ function current(){ return current($this->array); } /** * Return the key of the current array element */ function key(){ return key($this->array); } /** * Move forward by one * PHP's next() returns false if there are no more elements */ function next(){ $this->valid = (FALSE !== next($this->array)); } /** * Is the current element valid? */ function valid(){ return $this->valid; } } Filename: arrayreloaded.php Notice the "implements Iterator" at the start. This says I'm agreeing to abide by the Iterator "contract" and will provide all the required methods. The class then provides implementations of each method, performing the necessary work using PHP's native array functions (the comments explain the detail). There are a couple of points of the Iterator's design that are worth being aware of when you write your own. The current() and key() Iterator methods could be called multiple times within a single iteration of the loop, so you need to be careful that calling them doesn't modify the state of the Iterator. That's not a problem in this case, but when working with files, for example, the temptation may be to use fgets() inside the current() method, which would advance the file pointer. Otherwise, remember the valid() method should indicate whether the current element is valid, not the next element. What this means is that, when looping over the Iterator, we'll actually advance one element beyond the end of the collection and only discover the fact when valid() is called. Typically, it will be the next() and rewind() methods that actually move the Iterator and take care of tracking whether the current element is valid or not. I can now use this class as follows: // Create iterator object $colors = new ArrayReloaded(array ('red','green','blue',)); // Iterate away! foreach ( $colors as $color ) { echo $color."<br>"; } It's very easy to use! Behind the scenes, the foreach construct calls the methods I defined, beginning with rewind(). Then, so long as valid() returns TRUE, it calls current() to populate the $color variable, and next() to move the Iterator forward one element. As is typical with foreach, I can also populate another variable with the value returned from the key() method: // Display the keys as well foreach ( $colors as $key => $color ) { echo "$key: $color<br>"; } Of course, nothing requires me to use foreach. I could call the methods directly from my code, like so: // Reset the iterator - foreach does this automatically $colors->rewind(); // Loop while valid while ( $colors->valid() ) { echo $colors->key().": ".$colors->current()."<br>"; $colors->next(); } This example should help you see what foreach actually does to your object. Note that the crude benchmarks I've performed suggest that calling the methods directly is faster than using foreach, because the latter introduces another layer of redirection that must be resolved at runtime by PHP.Admiring the Tree
Now you've seen how to write a basic Iterator, it's worth summarizing the interfaces and classes offered internally by the SPL extension, so that you know what their jobs are. This list may change in future, but it summarizes what's on offer right now. Interfaces Traversable: as mentioned above, this is an Iterator interface for PHP internals. Unless you're writing an extension, ignore this. Iterator: as you've seen, this defines the basic methods to iterate forward through a collection. IteratorAggregate: if you would rather implement the Iterator separately from your "collection" object, implementing Iterator Aggregate will allow you to delegate the work of iteration to a separate class, while still enabling you to use the collection inside a foreach loop. RecursiveIterator: this defines methods to allow iteration over hierarchical data structures. SeekableIterator: this defines a method to search the collection that the Iterator is managing. ArrayAccess: here's another magic interface with a special meaning for the Zend engine. Implementing this allows you to treat your object like an array with normal PHP array syntax (more on this below). Classes ArrayIterator: this Iterator can manage both native PHP arrays and the public properties of an object (more on this shortly). ArrayObject: this unifies arrays and objects, allowing you to iterate over them and use array syntax to access the contents. See "Objects as Arrays" below (we'll grow our own class with similar behaviour). FilterIterator: this is an abstract class that can be extended to filter the elements that are being iterated over (perhaps removing unwanted elements for a search). ParentIterator: when using a ResursiveIterator, the ParentIterator allows you to filter out elements that do not have children. If, for example, you have a CMS in which documents can be placed anywhere under a tree of categories, the ParentIterator would allow you to recurse the tree but display only the "category nodes", omitting the documents that appear under each category. LimitIterator: this class allows you to specify a range of elements to Iterator over, starting with a key offset and specifying a number of elements to access from that point. The concept is the same as the LIMIT clause in MySQL. CachingIterator: this manages another Iterator (which you pass to its constructor). It allows you to check whether the inner Iterator has more elements, using the hasNext() method, before actually advancing with the next() method. Personally, I'm not 100% sure about the name; perhaps LookAheadIterator would be more accurate? CachingRecursiveIterator: this is largely the same as the CachingIterator, but allows iteration over hierarchical data structures. DirectoryIterator: to iterate over a directory in a file system, this Iterator provides a bunch of useful methods like isFile() and isDot() that save a lot of hassle. RecursiveDirectoryIterator: this class allows iteration over a directory structure so that you can descend into subdirectories. SimpleXMLIterator: this makes SimpleXML even simpler! Currently, the best examples can be found with the SPL tests — see the files beginning "sxe_*" RecursiveIteratorIterator: this helps you do cool stuff like "flatten" a hierarchical data structure so that you can loop through it with a single foreach statement, while still preserving knowledge of the hierarchy. This class could be very useful for rendering tree menus, for example. To see it in action, try using the DirectoryTreeIterator (which extends RecursiveIteratorIterator), like so: $DirTree = new DirectoryTreeIterator('/some/directory'); foreach ($DirTree as $node) { echo "$noden"; } That summarizes the core classes and interfaces that the SPL extension defines today.Objects as Arrays
You've already seen how implementing the Iterator interface allows you to "overload" the foreach construct. The SPL extension has some more surprises in store, though, beginning with the ArrayAccess interface. Implementing this interface with a class allows you treat objects of that class as arrays from the perspective of PHP syntax. Here's an example: /** * A class that can be used like an array */ class Article implements ArrayAccess { public $title; public $author; public $category; function __construct($title,$author,$category) { $this->title = $title; $this->author = $author; $this->category = $category; } /** * Defined by ArrayAccess interface * Set a value given it's key e.g. $A['title'] = 'foo'; * @param mixed key (string or integer) * @param mixed value * @return void */ function offsetSet($key, $value) { if ( array_key_exists($key,get_object_vars($this)) ) { $this->{$key} = $value; } } /** * Defined by ArrayAccess interface * Return a value given it's key e.g. echo $A['title']; * @param mixed key (string or integer) * @return mixed value */ function offsetGet($key) { if ( array_key_exists($key,get_object_vars($this)) ) { return $this->{$key}; } } /** * Defined by ArrayAccess interface * Unset a value by it's key e.g. unset($A['title']); * @param mixed key (string or integer) * @return void */ function offsetUnset($key) { if ( array_key_exists($key,get_object_vars($this)) ) { unset($this->{$key}); } } /** * Defined by ArrayAccess interface * Check value exists, given it's key e.g. isset($A['title']) * @param mixed key (string or integer) * @return boolean */ function offsetExists($offset) { return array_key_exists($offset,get_object_vars($this)); } } Filename: arrayaccess1.php The four methods that begin with "offset" are defined by the ArrayAccess interface that I'm implementing. Note that I've used a couple of PHP runtime tricks to make life easier, such as checking that object variables have been defined by introspection: function offsetSet($key, $value) { if ( array_key_exists($key,get_object_vars($this)) ) { I've also referenced them indirectly, using a variable that holds their names: $this->{$key} = $value; This example gets interesting when you see how this class can now be used: // Create the object $A = new Article('SPL Rocks','Joe Bloggs', 'PHP'); // Check what it looks like echo 'Initial State:<pre>'; print_r($A); echo '</pre>'; // Change the title using array syntax $A['title'] = 'SPL _really_ rocks'; // Try setting a non existent property (ignored) $A['not found'] = 1; // Unset the author field unset($A['author']); // Check what it looks like again echo 'Final State:<pre>'; print_r($A); echo '</pre>'; Apart from the first line, in which I create the object, the code is valid syntax for a native PHP array. Here's the output: Initial State: Article Object ( [title] => SPL Rocks [author] => Joe Bloggs [category] => PHP ) Final State: Article Object ( [title] => SPL _really_ rocks [category] => PHP ) Note that I could add logic to manipulate the data as it's being read by modifying the offsetGet() method as follows: function offsetGet($key) { if ( array_key_exists($key,get_object_vars($this)) ) { return strtolower($this->{$key}); } } This would convert all values to lower-case. To make the object iterable, using foreach or otherwise, I can now take advantage of the SPL's ArrayIterator class, combined with the IteratorAggregate interface. As I mentioned before, the IteratorAggregate interface is used when you don't want to embed the Iterator logic in the object that contains the data over which you want to iterate. This can be a useful way to keep this logic divided but, more interestingly, it allows you to re-use existing iterators. To begin, I modify the first line of the Article class to declare the interface implementation: class Article implements ArrayAccess, IteratorAggregate { Now, I need to add one extra method: getIterator(), which returns the object used for iteration: /** * Defined by IteratorAggregate interface * Returns an iterator for for this object, for use with foreach * @return ArrayIterator */ function getIterator() { return new ArrayIterator($this); } With that done, I can loop through the properties defined in the class: $A = new Article('SPL Rocks','Joe Bloggs', 'PHP'); // Loop (getIterator will be called automatically) echo 'Looping with foreach:<pre>'; foreach ( $A as $field => $value ) { echo "$field : $value<br>"; } echo '</pre>'; // Get the size of the iterator (see how many properties are left) echo "Object has ".sizeof($A->getIterator())." elements"; Filename: arrayaccess2.php Here's what it displays: $A = new Article('SPL Rocks','Joe Bloggs', 'PHP'); // Loop (getIterator will be called automatically) echo 'Looping with foreach:<pre>'; foreach ( $A as $field => $value ) { echo "$field : $value<br>"; } echo '</pre>'; // Get the size of the iterator (see how many properties are left) echo "Object has ".count($A->getIterator())." elements"; This gives me: Looping with foreach: title : SPL Rocks author : Joe Bloggs category : PHP Object has 3 elements Notice that I was also able to use the count function on the object to find out how many elements it has. This could allow me to use other loop constructs without needing to call the Iterator methods: $size = count($A); for($i = 0; $i < $size; $i++ ) { echo $A[$i]."n"; } What doesn't (yet) work is the application of PHP's array functions to the object (you'll get complaints about it not being an array). However, so long as you're not doing type checking with something like is_array(), you should be able to reuse any part of your own code that was written to expect an array.Big Deal
Assuming we all agree to use the classes and interfaces provided by the SPL, projects can begin to converge on them. For example, consider HTML_TreeMenu, a PEAR library designed to enable the generation of Javascript-based tree menus in HTML. Here's an example of what's required to draw a tree from a directory structure with HTML_TreeMenu today: require_once 'HTML/TreeMenu.php'; $map_dir = 'c:/windows'; $menu = new HTML_TreeMenu('menuLayer', 'images', '_self'); $menu->addItem(recurseDir($map_dir)); function &recurseDir($path) { if (!$dir = opendir($path)) { return false; } $files = array(); $node = &new HTML_TreeNode(basename($path), basename($path), 'folder.gif'); while (($file = readdir($dir)) !== false) { if ($file != '.' && $file != '..') { if (@is_dir("$path/$file")) { $addnode = &recurseDir("$path/$file"); } else { $addnode = &new HTML_TreeNode($file, $file, 'document2.png'); } $node->addItem($addnode); } } closedir($dir); return $node; } echo $menu->printMenu(); In other words, it's left to us to prepare the data in the correct order and build the tree. Instead, HTML_Treemenu could provide a mechanism by which we could register the data structure, then leave it to do the iterating for us. The above example might be reduced to: require_once 'HTML/TreeMenu.php'; $map_dir = 'c:/windows'; $menu = new HTML_TreeMenu('menuLayer', 'images', '_self'); // Register the tree data structure $menu->registerTree(new new RecursiveDirectoryIterator($map_dir); echo $menu->printMenu(); If there isn't a RecursiveIterator on hand that suits your problem, you could always implement your own, leaving HTML_Treemenu to take advantage of type hints to make sure you're giving it what it needs.Symfony Console Component
Symfony Console Component Command line interface (CLI) is one of the core elements of major PHP frameworks including Laravel, Symfony, CodeIgniter and others. This library provides easy to understand command line interface in Symfony. Its integration in the application is also quite simple and is precisely made to build testable command line interfaces. Composer Command: composer require symfony/consoleImplementation
First you need to create a PHP script and define console like this:Symfony Finder Component
Symfony Finder Component Developers often find difficulties while locating desired files and folders within the project. Using this Finder component, developers can easily find files and directories within the project. It provides different attributes (name, file size, modification time, extension etc.) to find the related files or directories. Moreover, it has an intuitive interface which helps users to find the desired resources. Composer Command: composer require symfony/finderImplementation
Let’s suppose you need to find all files and folders in the root directory. You can do it as: You can also find files in FTP and user defined streamsPsr/log
Psr/log If you want to find all the interfaces, classes, traits etc. related to PS-3, this PHP logging library helps you finding all those resources with just a few clicks. The library isn’t a logger itself, but is an interface that forms a logging system. This PHP logging library comes up with full documentation, so that developers can easily work with it. Composer Command: composer require psr/logImplementation
You can use the logger for logging like below code snippet:Monolog
Monolog It is necessary to save the logs to particular files or folders. Saving them at a certain place often seems to be a difficult job, but using this PHP logging library you can easily save your logs to the defined locations. Monolog helps you to send you logs to defined files, sockets, inboxes, databases and other web services. It uses a PSR-3 interface which allows you to type-hint logs against your own libraries in order to keep maximum interoperability. Composer Command: composer require monolog/monologImplementation
The basic usage to log error and warning with PSR log can be defined as:
Get Your PHP Deployment Ebook Now
Enter your email address below and get the download link. <form role="form" class="inline_subs_form"> <input type="email" class="gbl-email form-control" name="inline_subs_email" placeholder="Email Address" required> <input type="hidden" value="insert tag" /> <label for="inline_subs_checkbox_consent" class="cw-ebk-chkbox checkbox_consent_sidebar"> <input type="checkbox" required name="inline_subs_checkbox_consent" class=""> I agree to the Cloudways <a href="https://www.cloudways.com/en/terms.php">Terms of Service</a> & <a href="https://www.cloudways.com/en/terms.php#privacy">Privacy Policy</a> </label> <a href="javascript:void(0);" class="btn cw-glb-btn">click here</a> </form>Thank You
Your Ebook is on its Way to Your Inbox.Guzzle
Guzzle Guzzle works as a particular PHP client for sending HTTP requests to the web servers. Using this library, developers can easily send HTTP requests to integrate with the web services. The library provides a simple interface for building query strings, POST requests, HTTP cookies and other attributes. It also allows developers to send both synchronous and asynchronous requests from the same interface. Composer Command: composer require guzzlehttp/guzzleImplementation
Previously we have written some articles consuming Cloudways API in Guzzle. Let me show the example usage of Guzzle api to get authentication and then run different methods to get servers and applications. You can read the complete article here. Let’s look at the example:Assert
Assert Using the Assert library, developers can easily test the input and output of the methods within minutes. It’s a simple PHP library that reduces the need of extensive coding in web applications. The integration of the library within the project is also quite easy, as it provides complete documentation for the integration. It features some built-in error messages by default, which you can later change according to custom error requirements. Composer Command: composer require webmozart/assertSymfony/translation
Symfony/translation This translation package is really handy for the developers who want to build multilingual apps supported by various languages. It is the growing demand of the modern world to build a multilingual product, and using this library developers can easily create desired projects with different languages. The library comes up with complete documentation and is easy to work with. Composer Command: composer require symfony/translationImplementation
You need to define the locale in constructor class to translate pages automatically. use Symfony\Component\Translation\Translator; $translator = new Translator('fr_FR');PHPUnit
PHPUnit PHPUnit is perhaps the best PHP library for performing unit testing in PHP web applications. It is used to test application’s code for possible errors and bugs. While performing the unit testing with PHPUnit, developers can resolve various application bugs that may arise during the run-time execution. Hence, the library is vital to assess the cores of application and fixing it timely with the required solutions. Composer Command: composer require phpunit/phpunitPHP-code-coverage
PHP-code-coverage If you want to measure how much source code of a program is executed during a particular test, this library helps you out in measuring that degree of code. The library provides you collection and rendering functionality of the executed PHP code, so that you can get a better idea about the tested chunk of code and how to resolve the errors in it. Composer Command: composer require phpunit/php-code-coverageSwiftmailer
Swiftmailer Swiftmailer is a feature-rich PHP email library primarily built to ease out mailing operation in any web application. The library provides advanced object-oriented-approach combined with multitude of mailing features to send emails over the web. The most significant feature of Swiftmailer is that it protects the mails from header injection attacks without removing the request data content, which is what makes it a very efficient mailing system. Composer Command: composer require swiftmailer/swiftmailerImplementation
The basic usage of swiftmailer for sending emails is: require_once '/path/to/vendor/autoload.php'; // Create the Transport $transport = (new Swift_SmtpTransport('smtp.example.org', 25)) ->setUsername('your username') ->setPassword('your password'); // Create the Mailer using your created Transport $mailer = new Swift_Mailer($transport); // Create a message $message = (new Swift_Message('Wonderful Subject')) ->setFrom(['john@doe.com' => 'John Doe']) ->setTo(['receiver@domain.org', 'other@domain.org' => 'A name']) ->setBody('Here is the message itself'); // Send the message $result = $mailer->send($message);Email-validator
Email-validator Email-validator is a specialized PHP validation library used to validate emails via number of chosen validation features. The library provides multiple types of validation for emails including RFC Validation, NoRFCWarningsValidation, SpoofCheckValidation and others. The library also provides DNS validation feature through which you can validate and spam out emails with the DNS verification. Composer Command: composer require egulias/email-validatorImplementation
You need to define the validation strategy or method to follow in the code. Right now you have 6 type of available validations which you can see in official documentation: The basic usage is as follows: use Egulias\EmailValidator\EmailValidator; use Egulias\EmailValidator\Validation\RFCValidation; $validator = new EmailValidator(); $validator->isValid("example@example.com", new RFCValidation()); //truePHP dotenv
PHP dotenv This library helps developers to export environment variables from .env to getenv(), $_ENV and $_SERVER. The library is recently upgraded to the latest version V3, which now supports multiline variables as well. The library also allows developers to choose which part of the environment they want to read and modify according to the needs of application. Composer commands: composer require vlucas/phpdotenvImplementation
First you need to create a .env file on the root level of your directory. Next add variable and values in it like this: S3_BUCKET="devbucket" SECRET_KEY="abc123" Now load the .env file in application like this: $dotenv = Dotenv\Dotenv::create(__DIR__); $dotenv->load(); Now you can access the variables created in env file with these three methods. You can use any one of them. $s3_bucket = getenv('S3_BUCKET'); $s3_bucket = $_ENV['S3_BUCKET']; $s3_bucket = $_SERVER['S3_BUCKET'];Symfony Filesystem Component
Symfony Filesystem Component This Filesystem library provides basic utilities for the filesystem. Using this library, developers can easily create directories, files and much more in just a few steps. It also allows you to change the edit rights of the file and create a symlink with it. To install the library, you just have to use composer for the installation which is a quite straight forward process. Composer Command: composer require symfony/filesystemTwig
Twig Twig is a fast, efficient and secure templating engine for PHP. It compiles templates to simple PHP code which is easily understandable to the developers. This reduces the overhead of complex backend code, and gives application a boost in performance. Moreover, it is also super-customizable, as it allows you to define your own tags, filters and custom DSL according to the needs of application. Composer Command: composer require twig/twigFaker
Faker Faker is a handy PHP library that allows developers to generate dummy content for the web applications. Whether you want to fill up application database with mock data, or want to create sample XML documents, Faker does the job for you with good looking testing data. It supports all PHP 5+ versions and requires easy composer installation just once. Composer command: composer require fzaninotto/fakerImplementation
You need to use Faker\Factory::create() to create and initialize fake generator which can generate data by accessing properties.AWS SDK for PHP
AWS SDK for PHP This particular AWS library allows developers to use Amazon Web Services in PHP applications. Using this AWS SDK, you can build desired web applications associated with Amazon S3, Glacier, DynamoDB and other Amazon services. Simply install this SDK using composer or download a zip file, all the Amazon services come pre-configured in it and are ready to be deployed with your PHP application.But, since you are on Cloudways, you won’t gonna need this library for your PHP applications. As Cloudways provides PHP website hosting on completely managed AWS services for its deployed applications combined with the integrated stack of optimized web tools. Composer Command: composer require aws/aws-sdk-php
Implementation
First you need to initialize the sdk by including vendor files and then you can create different use cases like may be you want to upload files. Let’s see how you can do this.PHPseclib
PHPseclib Transferring files from one server to another always remains a risky process, because hackers can intervene in between the route and can steal confidential information. To fortify this process, PHPSeclib provides a fully secure data transmission between the servers using SFTP protocol. This PHP SFTP library is compatible with all the latest versions of PHP and is easy to integrate in web applications. Composer Command: composer require phpseclib/phpseclibLaravel Tinker
Laravel Tinker Laravel Tinker is a powerful Laravel package built to give users the ease to interact with Laravel applications directly from command line. It is perfect to use with Eloquent ORM to manage jobs, events and more. It is a built in artisan tool and can be easily accessed using the Tinker artisan command in composer. Composer Command: composer require laravel/tinkerPredis
Predis Predis is a Redis client for PHP applications. It is a very effective caching tool precisely made to reduce the overhead of caching in web applications. You can use it for clustering, master slave replication setups, transparent key prefixing and many more optimization operations. It also supports different custom connection classes for providing different network and protocol backends. Composer Command: composer require predis/predisImplementation
For implementing predis in your PHP project you first need to load the library in the project. // Prepend a base path if Predis is not available in your "include_path". require 'Predis/Autoloader.php'; Predis\Autoloader::register(); Now create a client connection like this: $client = new Predis\Client(); $client->set('foo', 'bar'); $value = $client->get('foo');PHP AMQP Library
php-amqplib is a library purely designed for PHP. It is compatible with every framework of PHP and is fully featured for RabbitMQ client. A number of OS are being supported by RabbitMQ, and has several official client libraries available, one of them is php-amqplib. It is a message-oriented middleware whose main features are: Queuing and Orientation. Composer Command: composer require php-amqplib/php-amqplibImplementation
Laravel-Permission Library
This library is for Laravel 5.8 and for later versions. This package allows you to manage user’s role and permissions in a database. Composer command: composer require spatie/laravel-permissionImplementation
You can manually add the service provider in your config/app.php file: 'providers' => [ // ... Spatie\Permission\PermissionServiceProvider::class, ]; You must publish the migration with: php artisan vendor:publish --provider="Spatie\Permission\PermissionServiceProvider" --tag="migrations"Twill Library
Twill is an open source CMS toolkit for Laravel. It provides author to create, curate and personalize command in the digital workflows. It also allows publishers to design and take control without restricting anything. It also gives the freedom to produce a powerful admin without undermining developer’s controls with the configuration. Composer command: composer global require yanhaoli/create-twill-app:"1.0.*" create-twill-app new blogOAuth 2.0
OAuth is an open standard for access delegation. It gives access to user information on other websites but without revealing the password. A lightweight and powerful OAuth 2.0 library is built for the users to authenticate and authorize the client of application and protect its API. Composer command: composer require league/oauth2-serverImplementation
The examples here demonstrate its usage with the Slim Framework. Slim is not a requirement to use this library, you just need something that generates PSR7-compatible HTTP requests and responses. The client will redirect the user to an authorization endpoint. $app->get('/authorize', function (ServerRequestInterface $request, ResponseInterface $response) use ($server) { try { $authRequest = $server->validateAuthorizationRequest($request); $authRequest->setUser(new UserEntity()); // an instance of UserEntityInterface $authRequest->setAuthorizationApproved(true); return $server->completeAuthorizationRequest($authRequest, $response); } catch (OAuthServerException $exception) { return $exception->generateHttpResponse($response); } catch (\Exception $exception) { $body = new Stream(fopen('php://temp', 'r+')); $body->write($exception->getMessage()); return $response->withStatus(500)->withBody($body); } });Laravel Backup
This package creates a backup of your application. A zip file of backup is created containing all the files in the specified directories. Any file system is supported by the backup package, and it can also create multiple backup in different file systems at once. It also notifies you via mail, slack or other notification provider if something goes wrong. Composer command: composer require spatie/laravel-backupImplementation
To publish the config file to config/backup.php run: php artisan vendor:publish --provider="Spatie\Backup\BackupServiceProvider"PHP Rector
This package instantly upgrade and refactor the PHP code. It renames classes, namespaces & constants, and upgrades PHP 5.3 to PHP 7.4 easily. It also migrates projects from Nette to Symfony, and turns static Laravel to Dependency Injection. It is used with almost every PHP framework i.e. Laravel, Symfony, CakePHP, PHPUnit and much more. Composer command: composer require rector/rectorImplementation
When the library is first implemented, you can execute a dry run and then permanently change your code through the following commands. #see the diff first vendor/bin/rector process src --dry-run # if it's ok, apply vendor/bin/rector process srcLighthouse
GraphQL is a query language for the APIs. It fulfills the queries on your existing data and gives an extensive understanding of the data in APIs. It also gives the client the power to specify the needs, and evolves the API overtime. Composer command: composer require nuwave/lighthouseImplementation
By the following artisan command, you can get the default Lighthouse Schema: php artisan vendor:publish --provider="Nuwave\Lighthouse\LighthouseServiceProvider" --tag=schemaLaravel Admin LTE
This library provides an easy integration of AdminLTE with Laravel 5 or later versions. Composer command: composer require jeroennoten/laravel-adminlteImplementation
Swagger PHP library
Swagger is a library that helps to generate an interactive documentation for restful API using phpdoc annotations. It is compatible with OpenAPI 3.0, as it extracts code & existing annotations using a CLI interface. Composer command: composer require zircote/swagger-phpImplementation
/** * @OA\Info(title="My First API", version="0.1") */ /** * @OA\Get( * path="/api/resource.json", * @OA\Response(response="200", description="An example resource") * ) */Laravel/Passport MongoDB
It is a service provider that helps to add support for Laravel Passport and MongoDB. Composer command: composer require jenssegers/mongodbStripe-PHP
Stripe-PHP Stripe is a popular e-payment platform used to conduct online transactions over the web. This package is specially made for PHP ecommerce applications to interact with the Stripe API. This library provides a fast, efficient access to the Stripe API and makes end-to-end connection secure between the platforms. The library includes predefined set of API classes which are compatible with most of Stripe versions. Composer Command: composer require stripe/stripe-phpOmnipay
Omnipay This payment processing PHP library allows fast connection to Omnipay web services. It deploys a very smooth web API that is fully unit-tested, advanced and comes with full documentation to ease out the configuration process. The package itself uses the powerful PHP-HTTP library to make HTTP requests, so that all the transactions becomes secure and reliable. Composer Command: composer require league/omnipayLaravel Cashier
Laravel Cashier Laravel Cashier provides a simple and easy-to-use interface for Stripe’s subscription billing services. All the boilerplate billing services come pre-coded in the library, so that you don’t have to worry for the complex configuration of payment billing. Using Laravel Cashier, you can easily handle coupons, discount codes, swapping subscription, invoices and other operations. Composer Command: composer require laravel/cashierSylius
Sylius If you want to integrate Sylius with your PHP application, this library will help you in building the secure web connection. It is built with strong API structure to connect web applications safely with the Sylius ecommerce platform. Just navigate to composer and install the Sylius library, all the payment settings come pre configured in it, so that developers aren’t required to do extra work. Composer Command: composer create-project sylius/syliusLaravel Aimeos
Laravel Aimeos Aimeos is one of the most used ecommerce packages for Laravel. It provides advanced ecommerce functionalities to the existing Laravel application. It is a composer based extension having compatibility with all the Laravel 5+ versions. It integrates the core online store components into the Laravel application and provides optimized ecommerce features for the applications. Composer Command: composer require aimeos/aimeos-laravelSpatie Image Optimizer
Spatie Image Optimizer Image optimization improves application’s performance and holds a great value in the sights of Google Bot. Spatie is a specialized PHP image optimization library for Laravel applications. It can easily optimize PNGs, JPGs, SVGs and GIFs according to the required needs. This PHP image library comes pre-configured with multiple image optimization tools including JpegOptim, Optipng, Pngquant2, SVGO and Gifsicle. The interface is quite simple and is easy to work with even for beginners. Composer Command: composer require spatie/image-optimizerElastica
Elastica Elasticsearch is a popular full-text search system widely used by most of the PHP developers all around the world. It allows fast data searching from the records stored in its database. This package is a PHP client for Elasticsearch, it provides pre-configured settings for Elasticsearch and gives fast data indexing for applications. It is compatible with all PHP 5+ versions and comes up with detailed installation documentation. Composer Command: composer require ruflin/elasticaIntervention/image
Intervention/image This is another great tool to handle image optimization in PHP applications. Using this PHP image library, you can easily customize images as you wish. It provides you an easy-to-use interface for creating, editing and composing images. To integrate with Laravel applications easily, the PHP image library includes ServiceProviders and Facades as they facilitate hassle-free package installation process. Composer Command: composer require predis/predisMinify
Minify Minification is one of the most important aspects of optimizing CSS and JavaScript files. It helps reducing the overhead programming patterns of the file and optimizes it according to the standards of web performance. This library helps developers to minify their CSS and JavaScripting files. It removes the white spaces, strip comments and other unnoticed attributes from the code, making it light and simple to execute. It combines statements, small assets in CSS files and minifies few coding structures according to best standards. Composer Command: composer require matthiasmullie/minifySwap
Swap Swap is a handy PHP library for working with currency exchange rates. It allows you to retrieve those exchange rates from the popular currency platforms like Fixer, currencylayer and others. It is one of the most used libraries for working with exchange rates, as it is also integrated with other libraries and has simple configuration pattern to work with. Composer Command: composer require florianv/swapTcpdf
Tcpdf This PHP PDF library helps you generate high quality PDF documents. It supports all standard and custom page formats, making it simple for the users to work with PDF documents. The package provides several advanced formatting features including automatic page header and footer management, annotations, links, multiple columns (if needed), text rendering and various other features. In short, it’s a fine tool to work and manage PDF documents on the go. Composer Command: composer require tecnickcom/tcpdfCreate a MySQL Database Using MySQLi
PHP CRUD Create, edit, update and delete posts with MySQL database
PHP Simple CRUD Application Script id - int(11) name - varchar(100) address - varchar(100) Create a file called index.php and paste in it the following code: <body> <form method="post" action="server.php" > <div class="input-group"> <label>Name</label> <input type="text" name="name" value=""> </div> <div class="input-group"> <label>Address</label> <input type="text" name="address" value=""> </div> <div class="input-group"> <button class="btn" type="submit" name="save" >Save</button> </div> </form> </body> I usually like to separate my HTML code from my PHP code as much as possible. I consider that good practice. On that note, let's create another file called php_code.php where we implement all php functionalities like connecting to the database, query the database and the like. So open php_code.php and paste the following code in it:This code displays a confirmation message to tell the user that a new record has been created in the database.
To retrieve the database records and display them on the page, add this code immediately above the input form:
Also add a hidden field to hold the id of the record we will be updating so that it can be recognized in the database uniquely by it's id. This explains it better:
// newly added field
<input type="hidden" name="id" value="<?php echo $id; ?>"> ;
// modified form fields
<input type="text" name="name" value="<?php echo $name; ?>"> ;
<input type="text" name="address" value="<?php echo $address; ?>"> ;
Remember all of that is in the input <form>.
Now if we click on the edit button on a particular record from the database, the values will be filled in the form and we will be able to edit them. Since we are editing on the same form as when we are creating, we have to put a condition that determines the appropriate button to be displayed. For example, when editing, we display the update button on the form and when creating, we display the save button. We do this using the update variable which is boolean. When update is true, the update button is displayed and if false, the save button is displayed.
Replace your save button on the form like this:
<button class="btn" type="submit" name="save" >Save</button>
<?php if ($update == true): ?>
<button class="btn" type="submit" name="update" style="background: #556B2F;" >update</button>
<?php else: ?>
<button class="btn" type="submit" name="save" >Save</button>
<?php endif ?> <?php
class MySqlDrive
{
private $host = 'localhost';
private $user = 'root';
private $password = '';
private $db = 'codeigniter_crud';
private $db_handle;
public function __construct()
{
$this->db_handle = mysqli_connect($this->host, $this->user, $this->password, $this->db);
if(!$this->db_handle) die("Unable to connect to mysql: " . mysqli_error($this->db_handle));
if(!mysqli_select_db($this->db_handle, $this->db)) die ("Unable to connect to database: " . mysqli_error($this->db_handle));
}
public function db_connect()
{
return $this->db_handle;
}
public function excute_query($query)
{
$result = mysqli_query($this->db_handle, $query);
return !$result ? FALSE : TRUE;
}
public function insert($query)
{
return $this->excute_query($query);
}
public function read($query)
{
$result = mysqli_query($this->db_handle, $query);
$row = mysqli_num_rows($result);
$data = array();
if($row){
while ($row = mysqli_fetch_assoc($result))
{
$data = $row;
}
}
return $data;
}
}
?>
To use this class, you will need to supply correct values for
<li>$host: Database host, this is normally “localhost”.<li>$user: Database username.<li>$password: Database user’s password.<li>$name: Database name which you use to store ‘customers’ table.
<blockquote>
You have to main the serialization.
<?php
require('process.php');
$db_con = new MySqlDrive();
$query = "SELECT * FROM student";
// $result = $db_con->read($query);
$result = mysqli_query($db_con->db_connect(), $query);
// var_dump($result);
?>
<?php if(isset($_SESSION['message'])): ?>
<div>
<h3>
<?php echo $_SESSION['message']; ?>
</h3>
</div>
<?php endif ?>
<div class="row">
<table>
<thead>
<tr>
<th>Name</th>
<th>Phone</th>
<th>Roll</th>
<th>Action</th>
</tr>
</thead>
<tbody>
<?php while($row = $result->fetch_assoc()){ ?>
<tr>
<td><?php echo $row['name']; ?> </td>
<td><?php echo $row['phone']; ?> </td>
<td><?php echo $row['roll']; ?> </td>
<td>
<a href="index.php?edit=<?php echo $row['id']?> ">Edit</a>
<a href="process.php?delete=<?php echo $row['id']?> ">Delete</a>
</td>
</tr>
<?php } ?>
</tbody>
</table>
</div>
<br>
<form action="process.php" method="POST">
<label for="">Name</label>
<input type="text" value="<?php echo $name;?> " name="name">
<label for="">Phone<<label>
<input type="text" value="<?php echo $phone;?> " name="phone">
<label for="">Roll</label>
<input type="number" value="<?php echo $roll;?> " name="roll">
<input type="hidden" value="<?php echo $id;?> " name="id">
<?php if($update == true): ; ?>
<button type="submit" name="update">Update</button>
<?php else: ?>
<button type="submit" name="save">Submit</button>
<?php endif ;?>
</form>
<?php
require ('core/MySqlDrive.php');
$db_con = new MySqlDrive();
session_start();
$name = "";
$phone = "";
$roll = "";
$id = "";
$update = FALSE;
if(isset($_POST['save'])){
$name = $_POST['name'];
$phone = $_POST['phone'];
$roll = $_POST['roll'];
$query = "INSERT INTO student (name, phone, roll) VALUES ('$name', '$phone', '$roll')";
$db_con = new MySqlDrive();
$db_con->insert($query);
$_SESSION['message'] = "Record Has been saved!";
$_SESSION['msg_type'] = "success";
header('location: index.php');
}
if(isset($_GET['delete'])){
$id = $_GET['delete'];
$query = "DELETE FROM student WHERE id=$id";
$db_con->excute_query($query);
$_SESSION['message'] = "Record Has been deleted!";
$_SESSION['msg_type'] = "success";
header("location: index.php");
}
if(isset($_GET['edit'])){
$id = $_GET['edit'];
$query = "SELECT * FROM student WHERE id=$id";
$result = mysqli_query($db_con->db_connect(), $query);
if(mysqli_num_rows($result) == 1){
$row = $result->fetch_array();
$name = $row['name'];
$phone = $row['phone'];
$roll = $row['roll'];
$id = $row['id'];
$update = TRUE;
}
}
if(isset($_POST['update'])){
$id = $_POST['id'];
$name = $_POST['name'];
$query = "UPDATE student SET name='$name' WHERE id=$id";
$result = mysqli_query($db_con->db_connect(), $query) or die("Error: " . $mysqli->error);
header('location: index.php');
}
<?php
echo exec('getmac');
?>
In windows, If the user is using your script locally, it will be very simple :
<?php
// get all the informations about the client's network
$ipconfig = shell_exec ("ipconfig/all"));
// display those informations
echo $ipconfig;
/*
look for the value of "physical adress" and use substr() function to
retrieve the adress from this long string.
here in my case i'm using a french cmd.
you can change the numbers according adress mac position in the string.
*/
echo substr(shell_exec ("ipconfig/all"),1821,18);
?>
We can get MAC address in Ubuntu by this ways in php
$ipconfig = shell_exec ("ifconfig -a | grep -Po 'HWaddr \K.*$'");
// display mac address
echo $ipconfig;
Getting MAC Address Using PHP: (Tested in Ubuntu 18.04) - 2020 Update
Here's the Code:
<?php
$mac = shell_exec("ip link | awk '{print $2}'");
preg_match_all('/([a-z0-9]+):\s+((?:[0-9a-f]{2}:){5}[0-9a-f]{2})/i', $mac, $matches);
$output = array_combine($matches[1], $matches[2]);
$mac_address_values = json_encode($output, JSON_PRETTY_PRINT);
echo $mac_address_values
?>
Output:
{
"lo": "00:00:00:00:00:00",
"enp0s25": "00:21:cc:d4:2a:23",
"wlp3s0": "84:3a:4b:03:3c:3a",
"wwp0s20u4": "7a:e3:2a:de:66:09"
}
Example 1: This example illustrates how to get Client’s IP Address using $_SERVER[‘REMOTE_ADDR’].
filter_none
brightness_4
<?php
// PHP program to get IP address of client
$IP = $_SERVER['REMOTE_ADDR'];
// $IP stores the ip address of client
echo "Client's IP address is: $IP";
// Print the ip address of client
?>
Output:
Client's IP address is: ::1
Note: For an online IDE, it may show runtime error or it will not show any output because private domains don’t share their IP. For localhost, IP address is 127.0.0.1 that is a loopback address and so the client’s IP address is ::1.
How to get the MAC address of the connected client in PHP: The ‘exec()’ is a function which is used to run an external program in PHP. It returns the last line from the result of the command. To get the MAC address, pass the parameter ‘getmac’ which returns the MAC address of the client. ‘getmac’ is a CMD command to get the MAC address.
Example 2: This example get the MAC Address using exec() function.
filter_none
brightness_4
<?php
// PHP code to get the MAC address of Client
$MAC = exec('getmac');
// Storing 'getmac' value in $MAC
$MAC = strtok($MAC, ' ');
// Updating $MAC value using strtok function,
// strtok is used to split the string into tokens
// split character of strtok is defined as a space
// because getmac returns transport name after
// MAC address
echo "MAC address of client is: $MAC";
?>
Output:
MAC address of client is: 00-20-10-2A-03-0A
Note: This code will not work on online IDE, because ‘getmac’ is a CMD command. Try running it on localhost.
<?php
$a = 32;
echo var_dump($a) . "<br>";
$b = "Hello world!";
echo var_dump($b) . "<br>";
$c = 32.5;
echo var_dump($c) . "<br>";
$d = array("red", "green", "blue");
echo var_dump($d) . "<br>";
$e = array(32, "Hello world!", 32.5, array("red", "green", "blue"));
echo var_dump($e) . "<br>";
// Dump two variables
echo var_dump($a, $b) . "<br>";
?>
<?php
$message = "";
if(isset($_POST['SubmitButton'])){ //check if form was submitted
$input = $_POST['inputText']; //get input text
$message = "Success! You entered: ".$input;
}
?>
<form action="" method="post">
<input type="text" name="inputText"/>
<button type="submit" name="SubmitButton"/>submit</form>
</form>
<?php echo $message; ?>
CRUD with MySQL database
Step: 1 — Creating a sample Database table
CREATE TABLE `student` (`id` INT NOT NULL AUTO_INCREMENT PRIMARY KEY ,`name` VARCHAR( 100 ) NOT NULL ,`phone` VARCHAR( 100 ) NOT NULL ,`roll` INTEGER( 100 ) NOT NULL) ENGINE = INNODB;Step: 2— Connecting to Database
Create a PHP file “mysqldrive.php”; this file contains the code for Database handles all the stuff related to database connections, such as connecting and disconnecting with crud.Step: 3— Create html file for crud
<body>Step: 4— Create process file for crud
PHP Run SQL script
$command = "mysql --user={$vals['db_user']} --password='{$vals['db_pass']}' " . "-h {$vals['db_host']} -D {$vals['db_name']} < {$script_path}"; $output = shell_exec($command . '/shellexec.sql'); the shell_exec() route: shell_exec('mysql' . ' -u ' . $vals['db_user'] . ' -p ' . $vals['db_pass'] . ' -D ' . $vals['db_name']); $commands = file_get_contents($location); $this->_connection->multi_query($commands); One suggestion: // connect to db. if (mysql_query("SOURCE myfile.sql")) { echo "Hello Sonny"; }get the MAC and the IP address of a connected client
Server IP You can get the server IP address from $_SERVER['SERVER_ADDR']. Server MAC address For the MAC address, you could parse the output of netstat -ie in Linux, or ipconfig /all in Windows. Client IP address You can get the client IP from $_SERVER['REMOTE_ADDR'] Client MAC address The client MAC address will not be available to you except in one special circumstance: if the client is on the same ethernet segment as the server. So, if you are building some kind of LAN based system and your clients are on the same ethernet segment, then you could get the MAC address by parsing the output of arp -n (linux) or arp -a (windows). Edit: to get the output of an external command - one way is to use backticks, e.g. $ipAddress=$_SERVER['REMOTE_ADDR']; $macAddr=false; #run the external command, break output into lines $arp=`arp -a $ipAddress`; $lines=explode("\n", $arp); #look for the output line describing our IP address foreach($lines as $line) { $cols=preg_split('/\s+/', trim($line)); if ($cols[0]==$ipAddress) { $macAddr=$cols[1]; } } But what if the client isn't on a LAN? Well, you're out of luck unless you can have the client volunteer that information and transmit via other means. The MAC address of a client (in the sense of the computer that issued the HTTP request) is overwritten by every router between the client and the server. Client IP is conveniently provided to the script in $_SERVER['REMOTE_ADDR']. In some scenarios, particularly if your web server is behind a proxy (i.e. a caching proxy) $_SERVER['REMOTE ADDR'] will return the IP of the proxy, and there will be an extra value, often $_SERVER['HTTP_X_FORWARDED_FOR'], that contains the IP of the original request client. Sometimes, particularly when you're dealing with an anonymizing proxy that you don't control, the proxy won't return the real IP address, and all you can hope for is the IP address of the proxy. I don't think you can get MAC address in PHP, but you can get IP from $_SERVER['REMOTE_ADDR'] variable. For windows server I think u can use this:PHP var_dump() Function
Dump information about different variables: var_dump(var1, var2, ...);Most Commonly Used PHP Functions
array isset define empty assert file end count date ord print substr dir pos time exp key list log com each header is_a chr defined unset dl is_arraystrlen tan link tr_replace printf in_arraytrim die sprintf strpos reg_match pi delete explode min implode trtolower reg_replace exec intval ile_exists dirname tmlspecialchars stat sin current mail is_null rray_merge rigger_error pack eval unction_exists trtoupper sizeof rray_keys is_object /a> idate serialize /a> sort reset rray_key_exists s_numeric abs exit extract is_string /a> next max rand main settype fclose round fopen is_dir getopt ddslashes urlencode /a> fread md5 unlink fwrite copy get_class /a> hash split rray_shift lass_exists all_user_func basename rray_push prev glob array_pop /a> strstr gettext gettype is_file mktime join tripslashes floor ini_get ob_startflush nserialize rray_values reg_match_all constantgmdate chmod array_map /a> strrpos print_r strtotime /a> ethod_exists s_readable filesizemicrotime /a> rray_unique system is_int ysql_query tr_repeat unc_get_arg trip_tags ini_set rray_slice range fputs reg_quote getdate mkdir unc_get_args ucfirst xml_parse /a> rename strtr reg_split mt_rand ceil ersion_compare rray_diff rtrim url_setopt b_end_clean strftime s_writable ase64_encode urldecode /a> xtension_loaded ksort stristr error_log /a> realpath rray_search crypt ubstr_count is_bool onfiguration ftell readdir ar_export cos usage tmlentities feof rror_reportingpow setcookie /a> rray_reverse b_get_contents et_object_varsopendir umber_format stripos fgets hexdec getenv parse_url /a> s_resource compact strcmp filemtime /a> sha1 rray_unshift et_current_user strrchrPHP form that submits on same page
In order to stay on the same page on submit you can leave action empty (action="") into the form tag, or leave it out altogether.convert a string to a number in PHP?
There are a few ways to do so: Cast the strings to numeric primitive data types: $num = (int) "10"; $num = (double) "10.12"; // same as (float) "10.12"; Perform math operations on the strings: $num = "10" + 1; $num = floor("10.1"); Use intval() or floatval(): $num = intval("10"); $num = floatval("10.1"); Use settype().To reset post
foreach ($_POST as $key => $value) { $_POST[$key] = NULL; } Method 2:- unset($_POST); $_POST is just another variable, except it has (super)global scope. $_POST = array(); To prevent users from refreshing the page or pressing the back button and resubmitting the form I use the following neat little trick. if (!isset($_SESSION)) { session_start(); } if ($_SERVER['REQUEST_METHOD'] == 'POST') { $_SESSION['postdata'] = $_POST; unset($_POST); header("Location: ".$_SERVER['PHP_SELF']); exit; } The POST data is now in a session and users can refresh however much they want. It will no longer have effect on your code.file — Reads entire file into an array
file ( string $filename [, int $flags = 0 [, resource $context ]] ) : array You can use file_get_contents() to return the contents of a file as a string. // Get a file into an array. In this example we'll go through HTTP to get // the HTML source of a URL. $lines = file('http://www.example.com/'); // Loop through our array, show HTML source as HTML source; and line numbers too. foreach ($lines as $line_num => $line) { echo "Line #{$line_num} : " . htmlspecialchars($line) . "<br />\n"; } // Another example, let's get a web page into a string. // See also file_get_contents(). $html = implode('', file('http://www.example.com/')); // Using the optional flags parameter since PHP 5 $trimmed = file('somefile.txt', FILE_IGNORE_NEW_LINES | FILE_SKIP_EMPTY_LINES); See Also readfile() - Outputs a file fopen() - Opens file or URL fsockopen() - Open Internet or Unix domain socket connection popen() - Opens process file pointer file_get_contents() - Reads entire file into a string include - include stream_context_create() - Creates a stream contextPHP Loops
In PHP, we have the following loop types:while - loops through a block of code as long as the specified condition is truedo...while - loops through a block of code once, and then repeats the loop as long as the specified condition is truefor - loops through a block of code a specified number of timesforeach - loops through a block of code for each element in an array
The PHP while Loop
$x = 1;
while($x <= 5) {
echo "The number is: $x <br>";
$x++;
}
The PHP do...while Loop
$x = 1;
do {
echo "The number is: $x <br>";
$x++;
} while ($x <= 5);
The PHP for Loop
for ($x = 0; $x <= 10; $x++) {
echo "The number is: $x <br>";
}
The PHP foreach Loop
$colors = array("red", "green", "blue", "yellow");
foreach ($colors as $value) {
echo "$value <br>";
}
PHP Functions
PHP Built-in Functions
PHP has over 1000 built-in functions that can be called directly, from within a script, to perform a specific task.
PHP User Defined Functions
Besides the built-in PHP functions, it is possible to create your own functions.
A function is a block of statements that can be used repeatedly in a program.
A function will not execute automatically when a page loads.
A function will be executed by a call to the function.
Create a User Defined Function in PHP
A user-defined function declaration starts with the word function:
function functionName() {
code to be executed;
}
Note: A function name must start with a letter or an underscore. Function names are NOT case-sensitive.
<?php
function writeMsg() {
echo "Hello world!";
}
writeMsg(); // call the function
?>
PHP Function Arguments
Information can be passed to functions through arguments.
An argument is just like a variable.
Arguments are specified after the function name, inside the parentheses. You can add as many arguments as you want, just separate them with a comma.
function familyName($fname) {
echo "$fname Refsnes.<br>";
}
familyName("Jani");
familyName("Hege");
function familyName($fname, $year) {
echo "$fname Refsnes. Born in $year <br>";
}
familyName("Hege", "1975");
PHP is a Loosely Typed Language
PHP automatically associates a data type to the variable, depending on its value.
Since the data types are not set in a strict sense, you can do things like adding a string to an integer without causing an error.
In PHP 7, type declarations were added.
This gives us an option to specify the expected data type when declaring a function, and by adding the strict declaration, it will throw a "Fatal Error" if the data type mismatches.
function addNumbers(int $a, int $b) {
return $a + $b;
}
echo addNumbers(5, "5 days");
// since strict is NOT enabled "5 days" is changed to int(5), and it will return 10
To specify strict we need to set declare(strict_types=1);.
This must be on the very first line of the PHP file.
declare(strict_types=1); // strict requirement
function addNumbers(int $a, int $b) {
return $a + $b;
}
echo addNumbers(5, "5 days");
// since strict is enabled and "5 days" is not an integer, an error will be thrown
PHP Default Argument Value
declare(strict_types=1); // strict requirement
function setHeight(int $minheight = 50) {
echo "The height is : $minheight <br>";
}
setHeight(350);
setHeight(); // will use the default value of 50
setHeight(135);
setHeight(80);
PHP Functions - Returning values
declare(strict_types=1); // strict requirement
function sum(int $x, int $y) {
$z = $x + $y;
return $z;
}
echo "5 + 10 = " . sum(5, 10) . "<br>";
echo "7 + 13 = " . sum(7, 13) . "<br>";
echo "2 + 4 = " . sum(2, 4);
PHP Return Type Declarations
PHP 7 also supports Type Declarations for the return statement.
Like with the type declaration for function arguments, by enabling the strict requirement, it will throw a "Fatal Error" on a type mismatch.
To declare a type for the function return, add a colon ( : ) and the type right before the opening curly ( { )bracket when declaring the function.
declare(strict_types=1); // strict requirement
function addNumbers(float $a, float $b) : float {
return $a + $b;
}
echo addNumbers(1.2, 5.2);
You can specify a different return type, than the argument types, but make sure the return is the correct type:
declare(strict_types=1); // strict requirement
function addNumbers(float $a, float $b) : int {
return (int)($a + $b);
}
echo addNumbers(1.2, 5.2);
PHP Global Variables - Superglobals
Some predefined variables in PHP are "superglobals", which means that they are always accessible, regardless of scope - and you can access them from any function, class or file without having to do anything special.
The PHP superglobal variables are:
$GLOBALS
$_SERVER
$_REQUEST
$_POST
$_GET
$_FILES
$_ENV
$_COOKIE
$_SESSION
PHP $GLOBALS
PHP stores all global variables in an array called $GLOBALS[index].
The index holds the name of the variable.
The example below shows how to use the super global variable $GLOBALS:
$x = 75;
$y = 25;
function addition() {
$GLOBALS['z'] = $GLOBALS['x'] + $GLOBALS['y'];
}
addition();
echo $z;
PHP $_SERVER
$_SERVER is a PHP super global variable which holds information about headers, paths, and script locations.
The example below shows how to use some of the elements in $_SERVER:
echo $_SERVER['PHP_SELF'];
echo "<br>";
echo $_SERVER['SERVER_NAME'];
echo "<br>";
echo $_SERVER['HTTP_HOST'];
echo "<br>";
echo $_SERVER['HTTP_REFERER'];
echo "<br>";
echo $_SERVER['HTTP_USER_AGENT'];
echo "<br>";
echo $_SERVER['SCRIPT_NAME'];
The following table lists the most important elements that can go inside $_SERVER:
Element/Code Description
$_SERVER['PHP_SELF'] filename of the currently executing script
$_SERVER['GATEWAY_INTERFACE'] version of the Common Gateway Interface (CGI) the server is using
$_SERVER['SERVER_ADDR'] IP address of the host server
$_SERVER['SERVER_NAME'] name of the host server (such as www.w3schools.com)
$_SERVER['SERVER_SOFTWARE'] server identification string (such as Apache/2.2.24)
$_SERVER['SERVER_PROTOCOL'] name and revision of the information protocol (such as HTTP/1.1)
$_SERVER['REQUEST_METHOD'] request method used to access the page (such as POST)
$_SERVER['REQUEST_TIME'] timestamp of the start of the request (such as 1377687496)
$_SERVER['QUERY_STRING'] query string if the page is accessed via a query string
$_SERVER['HTTP_ACCEPT'] Accept header from the current request
$_SERVER['HTTP_ACCEPT_CHARSET'] Accept_Charset header from the current request (such as utf-8,ISO-8859-1)
$_SERVER['HTTP_HOST'] Host header from the current request
$_SERVER['HTTP_REFERER'] complete URL of the current page (not reliable because not all user-agents support it)
$_SERVER['HTTPS'] Is the script queried through a secure HTTP protocol
$_SERVER['REMOTE_ADDR'] IP address from where the user is viewing the current page
$_SERVER['REMOTE_HOST'] Host name from where the user is viewing the current page
$_SERVER['REMOTE_PORT'] port being used on the user's machine to communicate with the web server
$_SERVER['SCRIPT_FILENAME'] absolute pathname of the currently executing script
$_SERVER['SERVER_ADMIN'] value given to the SERVER_ADMIN directive in the web server configuration file (if your script runs on a virtual host, it will be the value defined for that virtual host) (such as someone@w3schools.com)
$_SERVER['SERVER_PORT'] port on the server machine being used by the web server for communication (such as 80)
$_SERVER['SERVER_SIGNATURE'] server version and virtual host name which are added to server-generated pages
$_SERVER['PATH_TRANSLATED'] file system based path to the current script
$_SERVER['SCRIPT_NAME'] path of the current script
$_SERVER['SCRIPT_URI'] URI of the current page
PHP $_REQUEST
PHP $_REQUEST is a PHP super global variable which is used to collect data after submitting an HTML form.
The example below shows a form with an input field and a submit button.
When a user submits the data by clicking on "Submit", the form data is sent to the file specified in the action attribute of the <form> tag.
In this example, we point to this file itself for processing form data.
If you wish to use another PHP file to process form data, replace that with the filename of your choice.
Then, we can use the super global variable $_REQUEST to collect the value of the input field:
<form method="post" action="<?php echo $_SERVER['PHP_SELF'];?> ">
Name: <input type="text" name="fname">
<input type="submit">
</form>
if ($_SERVER["REQUEST_METHOD"] == "POST") {
// collect value of input field
$name = $_REQUEST['fname'];
if (empty($name)) {
echo "Name is empty";
} else {
echo $name;
}
}
PHP $_POST
PHP $_POST is a PHP super global variable which is used to collect form data after submitting an HTML form with method="post".
$_POST is also widely used to pass variables.
<form method="post" action="<?php echo $_SERVER['PHP_SELF'];?> ">
Name: <input type="text" name="fname">
<input type="submit">
</form>
if ($_SERVER["REQUEST_METHOD"] == "POST") {
// collect value of input field
$name = $_POST['fname'];
if (empty($name)) {
echo "Name is empty";
} else {
echo $name;
}
}
PHP $_GET
PHP $_GET is a PHP super global variable which is used to collect form data after submitting an HTML form with method="get".
$_GET can also collect data sent in the URL.
<a href="test_get.php?subject=PHP&web=W3schools.com">Test $GET</a>
When a user clicks on the link "Test $GET", the parameters "subject" and "web" are sent to "test_get.php", and you can then access their values in "test_get.php" with $_GET.
The example below shows the code in "test_get.php":
echo "Study " . $_GET['subject'] . " at " . $_GET['web'];
Two steps to Load the data from database without page refresh
Make a HTML form to load the data
Connect to the database and send data
Step 1. Make a HTML form with post method
function loaddata(){
var name=document.getElementById( "username" );
if(name){
$.ajax({
type: 'post',
url: 'loaddata.php',
data: {user_name:name,},
success: function (response) {
// get element display_info and put the response inside it
$( '#display_info' ).html(response);
}
});
}
else{
$( '#display_info' ).html("Please Enter Some Words");
}
}
<input type="text" name="username" id="username" onkeyup="loaddata();">
<div id="display_info" ></div>
Step 2. Connect To The Database and Send Data
Connect to sample database named student and it has a table named student_info which has 3 columns name, age, course
Query the database and get desired results.
// loaddata.php
if( isset( $_POST['user_name'] ) ) {
$name = $_POST['user_name']; $host = 'localhost';
$user = 'root'; $pass = ' ';
mysql_connect($host, $user, $pass);
mysql_select_db('student');
$selectdata = " SELECT age,course FROM student_info WHERE name LIKE '$name%' ";
$query = mysql_query($selectdata);
while($row = mysql_fetch_array($query)) {
echo "<p>".$row['age']."</p>";
echo "<p>".$row['course']."</p>";
}
}
You can also view load more results from database using ajax.
Load Data Without Page refresh using AJAX, PHP and Javascript
Create a database name 'company' and copy paste these commands in database or you can use your existing database.
CREATE TABLE IF NOT EXISTS `employee` (
`emp_id` int(11) NOT NULL AUTO_INCREMENT,
`emp_name` varchar(150) NOT NULL,
`is_enabled` int(11) NOT NULL,
PRIMARY KEY (`emp_id`)
)
INSERT INTO `employee` (`emp_id`, `emp_name`, `is_enabled`) VALUES
(1, 'John', 1),
(2, 'Smith', 1),
(3, 'Priska', 1),
(4, 'Gaga', 1);
CREATE TABLE IF NOT EXISTS `emp_info` (
`id` int(11) NOT NULL AUTO_INCREMENT,
`emp_id` int(11) NOT NULL,
`emp_name` varchar(150) NOT NULL,
`email` varchar(150) NOT NULL,
`phone` int(11) NOT NULL,
PRIMARY KEY (`id`)
)
INSERT INTO `emp_info` (`id`, `emp_id`, `emp_name`, `email`, `phone`) VALUES
(1, 1, 'John', 'john@example.com', 234534322),
(2, 3, 'Priska', 'priska@example.com', 437777711),
(3, 2, 'Smith', 'smith@example.com', 332454277),
(4, 4, 'Gaga', 'g@example.com', 229503990);
index.php
first mysqli fetched all enabled data from 'employee' table.
Then, store all employee name in HTML select option fields using PHP.
$conn = new mysqli('hostname', 'username', 'password', 'database');
//Check for connection error
if($conn->connect_error){
die("Error in DB connection: ".$conn->connect_errno." : ".$conn-> connect_error);
}
$select = "SELECT * FROM employee WHERE is_enabled = '1'";
$result = $conn->query($select);
$option = '<option value="">Select Name</option>';
while($row = $result->fetch_object()){
$option .= '<option value="'.$row->emp_id.'">'.$row->emp_name.'</option> ';
}
Next, use form element and placed select element inside.
On select element, we have added onChange() name attribute, that calls the getData() method on change the select option.
function getData(empid, divid){
$.ajax({
url: 'loademployeedata.php?empid=' + empid,
success: function(html) {
var ajaxDisplay = document.getElementById(divid);
ajaxDisplay.innerHTML = html;
}
});
}
<form method="post">
<select name="empid" id="empid" class="form-control" onchange="getData(this.value, 'displaydata')">
<?php
echo $option;
?>
</select>
<div id="displaydata"></div>
</form>
onchange="getData(this.value, 'displaydata')"
Here, this.value contains employee id and displaydata is an id of empty div.
The getData() Javascript function is created in the head section
This function calls the Ajax file 'loademployeedata.php' and fetches the employee information based on the passed 'empid' in url and stores the fetched data in the empty div.
loademployeedata.php
$empid = $_GET['empid'];
$conn = new mysqli('localhost', 'root', '', 'company');
//Check for connection error
if($conn->connect_error){
die("Error in DB connection: ".$conn->connect_errno." : ".$conn->connect_error);
}
if (isset($empid)) {
$select = " SELECT * FROM emp_info WHERE emp_id = '$empid'";
$result = $conn->query($select);
echo '<table class="table table-bordered">';
while($row = $result->fetch_object()){
echo '<tr>'
.'<td>'.$row->emp_name.'</td>'
.'<td>'.$row->email.'</td>'
.'<td>'.$row->phone.'</td>'
.'</tr>';
}
echo '</table>';
}
In the above file, we have received the 'empid' using global variable $_GET and stored in a variable $empid.
Next, we have created the mysqli database connection code and fetched the employee information from 'emp_info' table.
Using PHP while loop, iterates over the information and stores the data in a tabular format and this same format is rendered in the empty div that we have generated in 'index.php' page.
load data repeatedly without page refresh using ajax
timers implementation
Timer
The Ajax-Function get only called once: In the moment the document is ready (fully loaded).
Use setTimeout to create a timer, which calls the function every minute.
function getDataEveryMinute() {
setTimeout(function(){
$.get('get-answers.php', {
project_question_id: ?>,
project_id: ?>
}, function(data) {
$('#dispaly-answers').append(data);
getDataEveryMinute();
});
}, 3000);
}
Final approach
$(document).ready(function() {
setInterval(function(){
$.ajax( {
type: "GET",
url: "get-answers.php",
data: { project_question_id: ?>,
project_id: ?>
},
cache: false,
success: function(data) {$('#dispaly-answers').html(data);},
})// ajax
}, 1000);
});
PHP Numbers
One thing to notice about PHP is that it provides automatic data type conversion.
So, if you assign an integer value to a variable, the type of that variable will automatically be an integer.
Then, if you assign a string to the same variable, the type will change to a string.
This automatic conversion can sometimes break your code.
PHP Integers
Another important thing to know is that even if 4 * 2.5 is 10, the result is stored as float, because one of the operands is a float (2.5).
Here are some rules for integers:An integer must have at least one digitAn integer must not have a decimal pointAn integer can be either positive or negativeIntegers can be specified in three formats: decimal (10-based), hexadecimal (16-based - prefixed with 0x) or octal (8-based - prefixed with 0)
PHP has the following functions to check if the type of a variable is integer:is_int()is_integer() - alias of is_int()is_long() - alias of is_int()
Check if the type of a variable is integer:
$x = 5985;
var_dump(is_int($x));
$x = 59.85;
var_dump(is_int($x));
PHP Floats
PHP has the following functions to check if the type of a variable is float:is_float()is_double() - alias of is_float()
Check if the type of a variable is float:
$x = 10.365;
var_dump(is_float($x));
PHP Infinity
A numeric value that is larger than PHP_FLOAT_MAX is considered infinite.
PHP has the following functions to check if a numeric value is finite or infinite:is_finite()is_infinite()
However, the PHP var_dump() function returns the data type and value:
Check if a numeric value is finite or infinite:
$x = 1.9e411;
var_dump($x);
PHP NaN
NaN stands for Not a Number.
NaN is used for impossible mathematical operations.
PHP has the following functions to check if a value is not a number:is_nan()
However, the PHP var_dump() function returns the data type and value:
Invalid calculation will return a NaN value:
$x = acos(8);
var_dump($x);
PHP Numerical Strings
The PHP is_numeric() function can be used to find whether a variable is numeric.
The function returns true if the variable is a number or a numeric string, false otherwise.
Check if the variable is numeric:
$x = 5985;
var_dump(is_numeric($x));
$x = "5985";
var_dump(is_numeric($x));
$x = "59.85" + 100;
var_dump(is_numeric($x));
$x = "Hello";
var_dump(is_numeric($x));
Note: From PHP 7.0: The is_numeric() function will return FALSE for numeric strings in hexadecimal form (e.g. 0xf4c3b00c), as they are no longer considered as numeric strings.
PHP Casting Strings and Floats to Integers
Sometimes you need to cast a numerical value into another data type.
The (int), (integer), or intval() function are often used to convert a value to an integer.
Cast float and string to integer:
// Cast float to int
$x = 23465.768;
$int_cast = (int)$x;
echo $int_cast;
echo "<br>";
// Cast string to int
$x = "23465.768";
$int_cast = (int)$x;
echo $int_cast;
Data Type Conversion
$count = "5"; //$count is a string variable
$count = 5; //$count is an int variable
PHP type casting is similar to that of C language.
PHP also provides settype() function to convert the datatype of a variable.
Typecasting for Different Datatype
The following example code shows how to do type casting in PHP to convert a variable datatype.
It has a $count variable initialized with an integer value.
After initialization, I do type casting with various datatype.
After each type casting, I have specified the output and the type of the variable using PHP comment line.
$count = 5;
// $count is a string; Output: "5"
$count = (string) $count;
// $count is a float; Output: 5
$count = (float) $count;
// $count is a bool; Output: true
$count = (boolean) $count;
/* $count is an array
Output;
array(1) {
[0]=>true
}
*/
$count = (array) $count;
/* $count is an object
Output;
(stdClass)#1 (1) {
[0]=>true
}
*/
$count = (object) $count;
PHP Functions to Convert DataType
PHP provides datatype functions to get or set the datatype of a variable or to check whether a variable is a particular datatype.
Those functions are gettype(), settype(), is_array(), is_null() and more.
The following code uses PHP settype() to change a variables datatype and uses gettype() and print the result to know what data type if the variable contains before and after conversion.
I initialized $count variable as string convert it to an integer using PHP settype().
$count = "5";
echo gettype($count); // before datatype conversion: $count is a string
settype($count,'int');
echo gettype($count); // after datatype conversion: $count is an integer
Date() Function
The PHP date() function is used to format a date and/or a time.
The PHP date() function formats a timestamp to a more readable date and time.
date(format,timestamp)
Parameter Description format Required. Specifies the format of the timestamp timestamp Optional. Specifies a timestamp. Default is the current date and time
A timestamp is a sequence of characters, denoting the date and/or time at which a certain event occurred.
Get a Date
The required format parameter of the date() function specifies how to format the date (or time).
Here are some characters that are commonly used for dates:d - Represents the day of the month (01 to 31) m - Represents a month (01 to 12)Y - Represents a year (in four digits)l (lowercase 'L') - Represents the day of the week
Other characters, like"/", ".", or "-" can also be inserted between the characters to add additional formatting.
The example below formats today's date in three different ways:
echo "Today is " . date("Y/m/d") . "<br>";
echo "Today is " . date("Y.m.d") . "<br>";
echo "Today is " . date("Y-m-d") . "<br>";
echo "Today is " . date("l");
Tip - Automatic Copyright Year
Use the date() function to automatically update the copyright year on your website:
© 2010-<?php echo date("Y");
Get a Time
Here are some characters that are commonly used for times:H - 24-hour format of an hour (00 to 23)h - 12-hour format of an hour with leading zeros (01 to 12) i - Minutes with leading zeros (00 to 59)s - Seconds with leading zeros (00 to 59)a - Lowercase Ante meridiem and Post meridiem (am or pm)
The example below outputs the current time in the specified format:
echo "The time is " . date("h:i:sa");
Note that the PHP date() function will return the current date/time of the server!
Get Your Time Zone
If the time you got back from the code is not correct, it's probably because your server is in another country or set up for a different timezone.
So, if you need the time to be correct according to a specific location, you can set the timezone you want to use.
The example below sets the timezone to "America/New_York", then outputs the current time in the specified format:
date_default_timezone_set("America/New_York");
echo "The time is " . date("h:i:sa");
Create a Date With mktime()
The optional timestamp parameter in the date() function specifies a timestamp. If omitted, the current date and time will be used (as in the examples above).
The PHP mktime() function returns the Unix timestamp for a date. The Unix timestamp contains the number of seconds between the Unix Epoch (January 1 1970 00:00:00 GMT) and the time specified.
mktime(hour, minute, second, month, day, year)
The example below creates a date and time with the date() function from a number of parameters in the mktime() function:
$d=mktime(11, 14, 54, 8, 12, 2014);
echo "Created date is " . date("Y-m-d h:i:sa", $d);
Create a Date From a String With strtotime()
The PHP strtotime() function is used to convert a human readable date string into a Unix timestamp (the number of seconds since January 1 1970 00:00:00 GMT).
strtotime(time, now)
The example below creates a date and time from the strtotime() function:
$d=strtotime("10:30pm April 15 2014");
echo "Created date is " . date("Y-m-d h:i:sa", $d);
PHP is quite clever about converting a string to a date, so you can put in various values:
$d=strtotime("tomorrow");
echo date("Y-m-d h:i:sa", $d) . "<br>";
$d=strtotime("next Saturday");
echo date("Y-m-d h:i:sa", $d) . "<br>";
$d=strtotime("+3 Months");
echo date("Y-m-d h:i:sa", $d) . "<br>";
However, strtotime() is not perfect, so remember to check the strings you put in there.
More Date Examples
The example below outputs the dates for the next six Saturdays:
$startdate = strtotime("Saturday");
$enddate = strtotime("+6 weeks", $startdate);
while ($startdate < $enddate) {
echo date("M d", $startdate) . "<br>";
$startdate = strtotime("+1 week", $startdate);
}
The example below outputs the number of days until 4th of July:
$d1=strtotime("July 04");
$d2=ceil(($d1-time())/60/60/24);
echo "There are " . $d2 ." days until 4th of July.";
Complete PHP Date Reference
For a complete reference of all date functions, go to our complete
PHP Date Reference.
The reference contains a brief description, and examples of use, for each function!
The include (or require) statement takes all the text/code/markup that exists in the specified file and copies it intothe file that uses the include statement.
Including files is very useful when you want to include the same PHP,HTML, or text on multiple pages of a website.
include and require Statements
It is possible to insert the content of one PHP file into another PHP file (before the server executes it), with the include or require statement.
The include and require statements are identical, except upon failure:require will produce a fatal error (E_COMPILE_ERROR) and stop the scriptinclude will only produce a warning (E_WARNING) and the script will continue
So, if you want the execution to go on and show users the output, even if the include file is missing, use the include statement. Otherwise, in case of FrameWork, CMS, or a complex PHP application coding, always use the require statement to include a key file to the flow of execution. This will help avoid compromising your application's security and integrity, just in-case one key file is accidentally missing.
Including files saves a lot of work. This means that you can create a standard header, footer, or menu file for all your web pages.
Then, when the header needs to be updated, you can only update the header include file.
include 'filename';
or
require 'filename';
include Examples
Example 1
Assume we have a standard footer file called "footer.php", that looks like this: echo "<p>Copyright © 1999-" . date("Y") . " W3Schools.com</p>";
To include the footer file in a page, use the include statement:
<html>
<body>
<h1>Welcome to my home page!</h1>
<p>Some text.</p>
<p>Some more text.</p>
<?php include 'footer.php';
</body>
</html>
Run example »
Example 2
Assume we have a standard menu file called "menu.php":
echo '<a href="/default.asp">Home</a> -
<a href="/html/default.asp">HTML Tutorial</a> -
<a href="/css/default.asp">CSS Tutorial</a> -
<a href="/js/default.asp">JavaScript Tutorial</a> -
<a href="default.asp">PHP Tutorial</a>';
All pages in the Web site should use this menu file. Here is how it can be done (we are using a <div> element so that the menu easily can be styled with CSS later):
<html>
<body>
<div class="menu">
<?php include 'menu.php';
</div>
<h1>Welcome to my home page!</h1>
<p>Some text.</p>
<p>Some more text.</p>
</body>
</html>
Run example »
Example 3
Assume we have a file called "vars.php", with some variables defined:
$color='red';
$car='BMW';
Then, if we include the "vars.php" file, the variables can be used in the calling file:
<h1>Welcome to my home page!</h1>
<?php include 'vars.php';
echo "I have a $color $car.";
Run example »
include vs. require
The require statement is also used to include a file into the PHP code.
However, there is one big difference between include and require; when a file is included with the include statement and PHP cannot find it, the script will continue to execute:
<h1>Welcome to my home page!</h1>
<?php include 'noFileExists.php';
echo "I have a $color $car.";
Run example »
If we do the same example using the require statement, the echo statement will not be executed because the script execution dies after the
require statement returned a fatal error:
<h1>Welcome to my home page!</h1>
<?php require 'noFileExists.php';
echo "I have a $color $car.";
Run example »
Use require when the file is required by the application.
Use include when the file is not required and application should continue when file is not found.
Manipulating Files
File handling is an important part of any web application. You often need to open and process a file for different tasks.
PHP has several functions for creating, reading, uploading, and editing files.
Be careful when manipulating files!When you are manipulating files you must be very careful.
You can do a lot of damage if you do something wrong. Common errors are: editing the wrong file, filling a hard-drive with garbage data, and deleting the content of a file by accident.
readfile() Function
The readfile() function reads a file and writes it to the output buffer.
Assume we have a text file called "webdictionary.txt", stored on the server, that looks like this:
AJAX = Asynchronous JavaScript and XML
CSS = Cascading Style Sheets
HTML = Hyper Text Markup Language
PHP = PHP Hypertext Preprocessor
SQL = Structured Query Language
SVG = Scalable Vector Graphics
XML = EXtensible Markup Language
The PHP code to read the file and write it to the output buffer is as follows
(the readfile() function returns the number of bytes read on success):
echo readfile("webdictionary.txt");
Run example »
The readfile() function is useful if all you want to do is open up a file and read its contents.
The next chapters will teach you more about file handling.
Open File - fopen()
In this chapter we will teach you how to open, read, and close a file on the server.
A better method to open files is with the fopen() function. This function gives you more options than the readfile() function.
We will use the text file, "webdictionary.txt", during the lessons:
AJAX = Asynchronous JavaScript and XML
CSS = Cascading Style Sheets
HTML = Hyper Text Markup Language
PHP = PHP Hypertext Preprocessor
SQL = Structured Query Language
SVG = Scalable Vector Graphics
XML = EXtensible Markup Language
The first parameter of fopen() contains the name of the file to be opened and the second parameter specifies in which mode the file should be opened. The following example also generates a message if the fopen() function is unable to open the specified file:
$myfile = fopen("webdictionary.txt", "r") or die("Unable to open file!");
echo fread($myfile,filesize("webdictionary.txt"));
fclose($myfile);
Run example »
Tip: The fread() and the fclose() functions will be explained below.
The file may be opened in one of the following modes:
Modes
Description
r Open a file for read only. File pointer starts at the beginning of the file w Open a file for write only. Erases the contents of the file or creates a new file if it doesn't exist. File pointer starts at the beginning of the file
a Open a file for write only. The existing data in file is preserved. File pointer starts at the end of the file. Creates a new file if the file doesn't exist
x Creates a new file for write only. Returns FALSE and an error if file already exists
r+ Open a file for read/write. File pointer starts at the beginning of the file w+ Open a file for read/write. Erases the contents of the file or creates a new file if it doesn't exist. File pointer starts at the beginning of the file a+ Open a file for read/write. The existing data in file is preserved. File pointer starts at the end of the file. Creates a new file if the file doesn't exist x+ Creates a new file for read/write. Returns FALSE and an error if file already exists
Read File - fread()
The fread() function reads from an open file.
The first parameter of fread() contains the name of the file to read from and the second parameter specifies the maximum number of bytes to read.
The following PHP code reads the "webdictionary.txt" file to the end:
fread($myfile,filesize("webdictionary.txt"));
Close File - fclose()
The fclose() function is used to close an open file.
It's a good programming practice to close all files after you have finished with them.
You don't want an open file running around on your server taking up resources!
The fclose() requires the name of the file (or a variable that holds the filename) we want to close:
<?php
$myfile = fopen("webdictionary.txt", "r");
// some code to be executed....
fclose($myfile);
Read Single Line - fgets()
The fgets() function is used to read a single line from a file.
The example below outputs the first line of the "webdictionary.txt" file:
$myfile = fopen("webdictionary.txt", "r") or die("Unable to open file!");
echo fgets($myfile);
fclose($myfile);
Run example »
Note: After a call to the fgets() function, the file pointer has moved to the next line.
Check End-Of-File - feof()
The feof() function checks if the "end-of-file" (EOF) has been reached.
The feof() function is useful for looping through data of unknown length.
The example below reads the "webdictionary.txt" file line by line, until end-of-file is reached:
$myfile = fopen("webdictionary.txt", "r") or die("Unable to open file!");
// Output one line until end-of-file
while(!feof($myfile)) {
echo fgets($myfile) . "<br>";
}
fclose($myfile);
Run example »
Read Single Character - fgetc()
The fgetc() function is used to read a single character from a file.
The example below reads the "webdictionary.txt" file character by character, until end-of-file is reached:
$myfile = fopen("webdictionary.txt", "r") or die("Unable to open file!");
// Output one character until end-of-file
while(!feof($myfile)) {
echo fgetc($myfile);
}
fclose($myfile);
Run example »
Note: After a call to the fgetc() function, the file pointer moves to the next character.
Create File - fopen()
In this chapter we will teach you how to create and write to a file on the server.
The fopen() function is also used to create a file. Maybe a little confusing, but in PHP, a file is created using the same function used to open files.
If you use fopen() on a file that does not exist, it will create it, given that the file is opened for writing (w) or appending (a).
The example below creates a new file called "testfile.txt". The file will be created in the same directory where the PHP code resides:
$myfile = fopen("testfile.txt", "w")
File Permissions
If you are having errors when trying to get this code to run, check that you have granted your PHP file access to write information to the hard drive.
Write to File - fwrite()
The fwrite() function is used to write to a file.
The first parameter of fwrite() contains the name of the file to write to and the second parameter is the string to be written.
The example below writes a couple of names into a new file called "newfile.txt":
$myfile = fopen("newfile.txt", "w") or die("Unable to open file!");
$txt = "John Doe\n";
fwrite($myfile, $txt);
$txt = "Jane Doe\n";
fwrite($myfile, $txt);
fclose($myfile);
Notice that we wrote to the file "newfile.txt" twice. Each time we wrote to the file we sent the string $txt that first contained "John Doe" and second contained "Jane Doe". After we finished writing, we closed the file using the fclose() function.
If we open the "newfile.txt" file it would look like this:
John Doe
Jane Doe
Overwriting
Now that "newfile.txt" contains some data we can show what happens when we open an existing file for writing. All the existing data will be ERASED and we start with an empty file.
In the example below we open our existing file "newfile.txt", and write some new data into it:
$myfile = fopen("newfile.txt", "w") or die("Unable to open file!");
$txt = "Mickey Mouse\n";
fwrite($myfile, $txt);
$txt = "Minnie Mouse\n";
fwrite($myfile, $txt);
fclose($myfile);
If we now open the "newfile.txt" file, both John and Jane have vanished, and only the data we just wrote is present:
Mickey Mouse
Minnie Mouse
Configure The "php.ini" File
First, ensure that PHP is configured to allow file uploads.
In your "php.ini" file, search for the file_uploads directive, and set it to On:
file_uploads = On
Create The HTML Form
Next, create an HTML form that allow users to choose the image file they want to upload:
<!DOCTYPE html>
<html>
<body>
<form action="upload.php" method="post"
enctype="multipart/form-data">
Select image to upload:
<input type="file" name="fileToUpload" id="fileToUpload">
<input type="submit" value="Upload Image" name="submit">
</form>
</body>
</html>
Some rules to follow for the HTML form above:Make sure that the form uses method="post"The form also needs the following attribute: enctype="multipart/form-data". It specifies which content-type to use when submitting the form
Without the requirements above, the file upload will not work.
Other things to notice:The type="file" attribute of the <input> tag shows the input field as a file-select control, with a "Browse" button next to the input control
The form above sends data to a file called "upload.php", which we will create next.
Create The Upload File PHP Script
The "upload.php" file contains the code for uploading a file:
<?php
$target_dir = "uploads/";
$target_file = $target_dir . basename($_FILES["fileToUpload"]["name"]);
$uploadOk = 1;
$imageFileType = strtolower(pathinfo($target_file,PATHINFO_EXTENSION));
// Check if image file is a actual image or fake image
if(isset($_POST["submit"])) {
$check = getimagesize($_FILES["fileToUpload"]["tmp_name"]);
if($check !== false) {
echo "File is an image - " . $check["mime"] . ".";
$uploadOk = 1;
} else {
echo "File is not an image.";
$uploadOk = 0;
}
}
PHP script explained:$target_dir = "uploads/" - specifies the directory where the file is going to be placed$target_file specifies the path of the file to be uploaded$uploadOk=1 is not used yet (will be used later)$imageFileType holds the file extension of the file (in lower case)Next, check if the image file is an actual image or a fake image
Note: You will need to create a new directory called
"uploads" in the directory where "upload.php" file resides. The uploaded files will be saved there.
Check if File Already Exists
Now we can add some restrictions.
First, we will check if the file already exists in the "uploads" folder. If it does, an error message is displayed, and $uploadOk is set to 0:
// Check if file already exists
if (file_exists($target_file)) {
echo "Sorry, file already exists.";
$uploadOk = 0;
}
Limit File Size
The file input field in our HTML form above is named "fileToUpload".
Now, we want to check the size of the file. If the file is larger than 500KB, an error message is displayed, and $uploadOk is set to 0:
// Check file size
if ($_FILES["fileToUpload"]["size"] > 500000) {
echo "Sorry, your file is too large.";
$uploadOk = 0;
}
Limit File Type
The code below only allows users to upload JPG, JPEG, PNG, and GIF files. All other file types gives an error message before setting $uploadOk to 0:
// Allow certain file formats
if($imageFileType != "jpg" && $imageFileType != "png" && $imageFileType != "jpeg"
&& $imageFileType != "gif" ) {
echo "Sorry, only JPG, JPEG, PNG & GIF files are allowed.";
$uploadOk = 0;
}
Complete Upload File PHP Script
The complete "upload.php" file now looks like this:
<?php
$target_dir = "uploads/";
$target_file = $target_dir . basename($_FILES["fileToUpload"]["name"]);
$uploadOk = 1;
$imageFileType = strtolower(pathinfo($target_file,PATHINFO_EXTENSION));
// Check if image file is a actual image or fake image
if(isset($_POST["submit"])) {
$check = getimagesize($_FILES["fileToUpload"]["tmp_name"]);
if($check !== false) {
echo "File is an image - " . $check["mime"] . ".";
$uploadOk = 1;
} else {
echo "File is not an image.";
$uploadOk = 0;
}
}
// Check if file already exists
if (file_exists($target_file)) {
echo "Sorry, file already exists.";
$uploadOk = 0;
}
// Check file size
if ($_FILES["fileToUpload"]["size"] > 500000) {
echo "Sorry, your file is too large.";
$uploadOk = 0;
}
// Allow certain file formats
if($imageFileType != "jpg" && $imageFileType != "png" && $imageFileType != "jpeg"
&& $imageFileType != "gif" ) {
echo "Sorry, only JPG, JPEG, PNG & GIF files are allowed.";
$uploadOk = 0;
}
// Check if $uploadOk is set to 0 by an error
if ($uploadOk == 0) {
echo "Sorry, your file was not uploaded.";
// if everything is ok, try to upload file
} else {
if (move_uploaded_file($_FILES["fileToUpload"]["tmp_name"], $target_file)) {
echo "The file ". basename( $_FILES["fileToUpload"]["name"]). " has been uploaded.";
} else {
echo "Sorry, there was an error uploading your file.";
}
}
What is a Cookie?
A cookie is often used to identify a user. A cookie is a small file that the server embeds on the user's computer. Each time the same computer requests a page with a browser, it will send the cookie too. With PHP, you can both create and retrieve cookie values.
Create Cookies With PHP
A cookie is created with the setcookie() function.
setcookie(name, value, expire, path, domain, secure, httponly);
Only the name parameter is required. All other parameters are optional.
Create/Retrieve a Cookie
The following example creates a cookie named "user" with the value "John
Doe". The cookie will expire after 30 days (86400 * 30). The "/" means that the cookie is available in entire website (otherwise, select the directory you prefer).
We then retrieve the value of the cookie "user" (using the global variable
$_COOKIE). We also use the isset() function to find out if the cookie is set:
$cookie_name = "user";
$cookie_value = "John Doe";
setcookie($cookie_name, $cookie_value, time() + (86400 * 30), "/"); // 86400 = 1 day
<html>
<body>
<?php
if(!isset($_COOKIE[$cookie_name])) {
echo "Cookie named '" . $cookie_name . "' is not set!";
} else {
echo "Cookie '" . $cookie_name . "' is set!<br>";
echo "Value is: " . $_COOKIE[$cookie_name];
}
</body>
</html>
Run example »
Note: The setcookie() function must appear BEFORE the <html> tag.
Note: The value of the cookie is automatically URLencoded when sending the cookie, and automatically decoded when received (to prevent
URLencoding, use setrawcookie() instead).
Modify a Cookie Value
To modify a cookie, just set (again) the cookie using the setcookie() function:
$cookie_name = "user";
$cookie_value = "Alex Porter";
setcookie($cookie_name, $cookie_value, time() + (86400 * 30), "/");
<html>
<body>
<?php
if(!isset($_COOKIE[$cookie_name])) {
echo "Cookie named '" . $cookie_name . "' is not set!";
} else {
echo "Cookie '" . $cookie_name . "' is set!<br>";
echo "Value is: " . $_COOKIE[$cookie_name];
}
</body>
</html>
Run example »
Delete a Cookie
To delete a cookie, use the setcookie() function with an expiration date in the past:
// set the expiration date to one hour ago
setcookie("user", ", time() - 3600);
<html>
<body>
<?php
echo "Cookie 'user' is deleted.";
</body>
</html>
Run example »
Check if Cookies are Enabled
The following example creates a small script that checks whether cookies are enabled. First, try to create a test cookie with the setcookie() function, then count the $_COOKIE array variable:
setcookie("test_cookie", "test", time() + 3600, '/');
<html>
<body>
<?php
if(count($_COOKIE) > 0) {
echo "Cookies are enabled.";
} else {
echo "Cookies are disabled.";
}
</body>
</html>
Run example »
Complete PHP Network Reference
For a complete reference of Network functions, go to our complete
PHP Network Reference.
What is a PHP Session?
A session is a way to store information (in variables) to be used across multiple pages.
Unlike a cookie, the information is not stored on the users computer.
When you work with an application, you open it, do some changes, and then you close it. This is much like a Session. The computer knows who you are.
It knows when you start the application and when you end. But on the internet there is one problem: the web server does not know who you are or what you do, because the HTTP address doesn't maintain state.
Session variables solve this problem by storing user information to be used across multiple pages (e.g. username, favorite color, etc). By default, session variables last until the user closes the browser.
So; Session variables hold information about one single user, and are available to all pages in one application.
Tip: If you need a permanent storage, you may want to store the data in a
database.
Start a PHP Session
A session is started with the session_start() function.
Session variables are set with the PHP global variable: $_SESSION.
Now, let's create a new page called "demo_session1.php". In this page, we start a new PHP session and set some session variables:
// Start the session
session_start();
<!DOCTYPE html>
<html>
<body>
<?php
// Set session variables
$_SESSION["favcolor"] = "green";
$_SESSION["favanimal"] = "cat";
echo "Session variables are set.";
</body>
</html>
Run example »
Note: The session_start() function must be the very first thing in your document. Before any HTML tags.
Get PHP Session Variable Values
Next, we create another page called "demo_session2.php". From this page, we will access the session information we set on the first page ("demo_session1.php").
Notice that session variables are not passed individually to each new page, instead they are retrieved from the session we open at the beginning of each page (session_start()).
Also notice that all session variable values are stored in the global $_SESSION variable:
<?php
session_start();
?>
<!DOCTYPE html>
<html>
<body>
<?php
// Echo session variables that were set on previous page
echo "Favorite color is " . $_SESSION["favcolor"] . ".<br>";
echo "Favorite animal is " . $_SESSION["favanimal"] . ".";
</body>
</html>
Run example »
Another way to show all the session variable values for a user session is to run the following code:
<?php
session_start();
?>
<!DOCTYPE html>
<html>
<body>
<?php
print_r($_SESSION);
</body>
</html>
Run example »
How does it work? How does it know it's me?
Most sessions set a user-key on the user's computer that looks something like this: 765487cf34ert8dede5a562e4f3a7e12. Then, when a session is opened on another page, it scans the computer for a user-key. If there is a match, it accesses that session, if not, it starts a new session.
Modify a PHP Session Variable
To change a session variable, just overwrite it:
session_start();
<!DOCTYPE html>
<html>
<body>
<?php
// to change a session variable, just overwrite it
$_SESSION["favcolor"] = "yellow";
print_r($_SESSION);
</body>
</html>
Run example »
Destroy a PHP Session
To remove all global session variables and destroy the session, use session_unset()
and session_destroy():
session_start();
<!DOCTYPE html>
<html>
<body>
<?php
// remove all session variables
session_unset();
// destroy the session session_destroy();
</body>
</html>
session_destroy() function:
It destroys all of the data associated with the current session.
It does not unset any of the global variables associated with the session, or unset the session cookie.
session_unset() function:
It deletes only the variables from session and session still exists.
Only data is truncated.
Run example »
Filter Extension
Validating data = Determine if the data is in proper form.
Sanitizing data = Remove any illegal character from the data.
PHP filters are used to validate and sanitize external input.
The PHP filter extension has many of the functions needed for checking user input,
and is designed to make data validation easier and quicker.
The filter_list() function can be used to list what the PHP filter extension offers:
<table>
<tr>
<td>Filter Name</td>
<td>Filter ID</td>
</tr>
foreach (filter_list() as $id =>$filter) {
echo '<tr><td>' . $filter . '</td><td>' . filter_id($filter) . '</td></tr>';
}
</table>
Why Use Filters?
Many web applications receive external input. External input/data can be:User input from a formCookiesWeb services dataServer variablesDatabase query results
You should always validate external data!
Invalid submitted data can lead to security problems and break your webpage!
By using PHP filters you can be sure your application gets the correct input!
filter_var() Function
The filter_var() function both validate and sanitize data.
The filter_var() function filters a single variable with a specified filter. It takes two pieces of data:The variable you want to checkThe type of check to use
Sanitize a String
The following example uses the filter_var() function to remove all HTML tags from a string:
$str = "<h1>Hello World!</h1>";
$newstr = filter_var($str, FILTER_SANITIZE_STRING);
echo $newstr;
Validate an Integer
The following example uses the filter_var() function to check if the variable $int is an integer. If $int is an integer,
the output of the code below will be: "Integer is valid". If $int is not an integer, the output will be: "Integer is not valid":
$int = 100;
if (!filter_var($int, FILTER_VALIDATE_INT) === false) {
echo("Integer is valid");
} else {
echo("Integer is not valid");
}
Tip: filter_var() and Problem With 0
In the example above, if $int was set to 0, the function above will return
"Integer is not valid". To solve this problem, use the code below:
$int = 0;
if (filter_var($int, FILTER_VALIDATE_INT) === 0 || !filter_var($int, FILTER_VALIDATE_INT) === false) {
echo("Integer is valid");
} else {
echo("Integer is not valid");
}
Validate an IP Address
The following example uses the filter_var() function to check if the variable $ip is a valid IP address:
$ip = "127.0.0.1";
if (!filter_var($ip, FILTER_VALIDATE_IP) === false) {
echo("$ip is a valid IP address");
} else {
echo("$ip is not a valid IP address");
}
Sanitize and Validate an Email Address
The following example uses the filter_var() function to first remove all illegal characters from the $email variable, then check if it is a valid email address:
$email = "john.doe@example.com";
// Remove all illegal characters from email
$email = filter_var($email, FILTER_SANITIZE_EMAIL);
// Validate e-mail
if (!filter_var($email, FILTER_VALIDATE_EMAIL) === false) {
echo("$email is a valid email address");
} else {
echo("$email is not a valid email address");
}
Sanitize and Validate a URL
The following example uses the filter_var() function to first remove all illegal characters from a URL, then check if $url is a valid URL:
$url = "https://www.w3schools.com";
// Remove all illegal characters from a url
$url = filter_var($url, FILTER_SANITIZE_URL);
// Validate url
if (!filter_var($url, FILTER_VALIDATE_URL) === false) {
echo("$url is a valid URL");
} else {
echo("$url is not a valid URL");
}
Complete PHP Filter Reference
For a complete reference of all filter functions, go to our complete
PHP Filter Reference. Check each filter to see what options and flags are available.
The reference contains a brief description, and examples of use, for each function!
Validate an Integer Within a Range
The following example uses the filter_var() function to check if a variable is both of type INT, and between 1 and 200:
$int = 122;
$min = 1;
$max = 200;
if (filter_var($int, FILTER_VALIDATE_INT, array("options" => array("min_range"=>$min, "max_range"=>$max))) === false) {
echo("Variable value is not within the legal range");
} else {
echo("Variable value is within the legal range");
}
Validate IPv6 Address
The following example uses the filter_var() function to check if the variable $ip is a valid
IPv6 address:
$ip = "2001:0db8:85a3:08d3:1319:8a2e:0370:7334";
if (!filter_var($ip, FILTER_VALIDATE_IP, FILTER_FLAG_IPV6) === false) {
echo("$ip is a valid IPv6 address");
} else {
echo("$ip is not a valid IPv6 address");
}
Validate URL - Must Contain QueryString
The following example uses the filter_var() function to check if the variable $url is a
URL with a querystring:
$url = "https://www.w3schools.com";
if (!filter_var($url, FILTER_VALIDATE_URL, FILTER_FLAG_QUERY_REQUIRED) === false) {
echo("$url is a valid URL with a query string");
} else {
echo("$url is not a valid URL with a query string");
}
Remove Characters With ASCII Value > 127
The following example uses the filter_var() function to sanitize a string. It will both remove all HTML tags, and all characters with ASCII value > 127, from the string:
$str = "<h1>Hello WorldÆØÅ!</h1>";
$newstr = filter_var($str, FILTER_SANITIZE_STRING, FILTER_FLAG_STRIP_HIGH);
echo $newstr;
Complete PHP Filter Reference
For a complete reference of all filter functions, go to our complete
PHP Filter Reference. Check each filter to see what options and flags are available.
The reference contains a brief description, and examples of use, for each function!
What is JSON?
JSON stands for JavaScript Object Notation, and is a syntax for storing and exchanging data.
Since the JSON format is a text-based format, it can easily be sent to and from a server, and used as a data format by any programming language.
and JSON
PHP has some built-in functions to handle JSON.
First, we will look at the following two functions:
json_encode()
json_decode()
json_encode()
The json_encode() function is used to encode a value to JSON format.
This example shows how to encode an associative array into a JSON object:
$age = array("Peter"=>35, "Ben"=>37, "Joe"=>43);
echo json_encode($age);
Run Example »
This example shows how to encode an indexed array into a JSON array:
$cars = array("Volvo", "BMW", "Toyota");
echo json_encode($cars);
Run Example »
json_decode()
The json_decode() function is used to decode a JSON object into a PHP object or an associative array.
This example decodes JSON data into a
PHP object:
$jsonobj = '{"Peter":35,"Ben":37,"Joe":43}';
var_dump(json_decode($jsonobj));
Run Example »
The json_decode() function returns an object by default. The json_decode() function has a second parameter, and when set to true, JSON objects are decoded into associative arrays.
This example decodes JSON data into a
PHP associative array:
$jsonobj = '{"Peter":35,"Ben":37,"Joe":43}';
var_dump(json_decode($jsonobj, true));
Run Example »
Accessing the Decoded Values
Here are two examples of how to access the decoded values from an object and from an associative array:
This example shows how to access the values from a PHP object:
$jsonobj = '{"Peter":35,"Ben":37,"Joe":43}';
$obj = json_decode($jsonobj);
echo $obj->Peter;
echo $obj->Ben;
echo $obj->Joe;
Run Example »
This example shows how to access the values from a
PHP associative array:
$jsonobj = '{"Peter":35,"Ben":37,"Joe":43}';
$arr = json_decode($jsonobj, true);
echo $arr["Peter"];
echo $arr["Ben"];
echo $arr["Joe"];
Run Example »
Looping Through the Values
You can also loop through the values with a foreach() loop:
This example shows how to loop through the values of a PHP object:
$jsonobj = '{"Peter":35,"Ben":37,"Joe":43}';
$obj = json_decode($jsonobj);
foreach($obj as $key => $value) {
echo $key . " => " . $value . "<br>";
}
Run Example »
This example shows how to loop through the values of a PHP associative array:
$jsonobj = '{"Peter":35,"Ben":37,"Joe":43}';
$arr = json_decode($jsonobj, true);
foreach($arr as $key => $value) {
echo $key . " => " . $value
. "<br>";
}
Run Example »
From PHP5, you can also write PHP code in an object-oriented style.
Object-Oriented programming is faster and easier to execute.
What is OOP?
OOP stands for Object-Oriented Programming.
Procedural programming is about writing procedures or functions that perform operations on the data, while object-oriented programming is about creating objects that contain both data and functions.
Object-oriented programming has several advantages over procedural programming:OOP is faster and easier to executeOOP provides a clear structure for the programsOOP helps to keep the PHP code DRY "Don't Repeat Yourself", and makes the code easier to maintain, modify and debugOOP makes it possible to create full reusable applications with less code and shorter development time
Tip: The "Don't Repeat Yourself" (DRY) principle is about reducing the repetition of code. You should extract out the codes that are common for the application, and place them at a single place and reuse them instead of repeating it.
What are Classes and Objects?
Classes and objects are the two main aspects of object-oriented programming.
a class is a template for objects, and an object is an instance of a class.
When the individual objects are created, they inherit all the properties and behaviors from the class, but each object will have different values for the properties.
Look at the next chapters to learn more about OOP.
A class is a template for objects, and an object is an instance of class.
OOP Case
Let's assume we have a class named Fruit. A Fruit can have properties like name, color, weight, etc. We can define variables like $name, $color, and $weight to hold the values of these properties.
When the individual objects (apple, banana, etc.) are created, they inherit all the properties and behaviors from the class, but each object will have different values for the properties.
Define a Class
A class is defined by using the class keyword, followed by the name of the class and a pair of curly braces ({}). All its properties and methods goes inside the braces:
class Fruit {
// code goes here...
}
Below we declare a class named Fruit consisting of two properties
($name and $color) and two methods set_name() and get_name() for setting and getting the $name property:
class Fruit {
// Properties
public
$name;
public $color;
// Methods
function
set_name($name) {
$this->name = $name;
}
function get_name() {
return $this->name;
}
}
Note: In a class, variables are called properties and functions are called methods!
Define Objects
Classes are nothing without objects! We can create multiple objects from a class. Each object has all the properties and methods defined in the class, but they will have different property values.
Objects of a class is created using the new keyword.
In the example below, $apple and $banana are instances of the class Fruit:
class Fruit {
// Properties
public
$name;
public $color;
// Methods
function
set_name($name) {
$this->name = $name;
}
function get_name() {
return $this->name;
}
}
$apple = new Fruit();
$banana = new Fruit();
$apple->set_name('Apple');
$banana->set_name('Banana');
echo $apple->get_name();
echo "<br>";
echo $banana->get_name();
In the example below, we add two more methods to class Fruit, for setting and getting the $color property:
class Fruit {
// Properties
public $name;
public $color;
// Methods
function set_name($name) {
$this->name = $name;
}
function get_name() {
return $this->name;
}
function set_color($color) {
$this->color = $color;
}
function get_color() {
return $this->color;
}
}
$apple = new Fruit();
$apple->set_name('Apple');
$apple->set_color('Red');
echo "Name: " . $apple->get_name();
echo "<br>";
echo "Color: " . $apple->get_color();
$this Keyword
The $this keyword refers to the current object, and is only available inside methods.
Look at the following example:
class Fruit {
public $name;
}
$apple = new Fruit();
So, where can we change the value of the $name property? There are two ways:
1. Inside the class (by adding a set_name() method and use $this):
class Fruit {
public $name;
function set_name($name) {
$this->name = $name;
}
}
$apple = new Fruit();
$apple->set_name("Apple");
2. Outside the class (by directly change the property value):
class Fruit {
public $name;
}
$apple = new Fruit();
$apple->name = "Apple";
instanceof
You can use the instanceof keyword to check if an object belongs to a specific class:
$apple = new Fruit();
var_dump($apple instanceof
Fruit);
__construct Function
A constructor allows you to initialize an object's properties upon creation of the object.
If you create a __construct() function, PHP will automatically call this function when you create an object from a class.
Notice that the construct function starts with two underscores (__)!
We see in the example below, that using a constructor saves us from calling the set_name() method which reduces the amount of code:
class Fruit {
public
$name;
public $color;
function __construct($name) {
$this->name = $name;
}
function get_name() {
return $this->name;
}
}
$apple = new Fruit("Apple");
echo $apple->get_name();
Another example:
class Fruit {
public
$name;
public $color;
function __construct($name, $color) {
$this->name = $name;
$this->color = $color;
}
function get_name() {
return $this->name;
}
function get_color() {
return $this->color;
}
}
$apple = new Fruit("Apple", "red");
echo $apple->get_name();
echo
"<br>";
echo $apple->get_color();
__destruct Function
A destructor is called when the object is destructed or the script is stopped or exited.
If you create a __destruct() function, PHP will automatically call this function at the end of the script.
Notice that the destruct function starts with two underscores (__)!
The example below has a __construct() function that is automatically called when you create an object from a class, and a __destruct() function that is automatically called at the end of the script:
class Fruit {
public
$name;
public $color;
function __construct($name) {
$this->name = $name;
}
function __destruct() {
echo "The fruit is {$this->name}.";
}
}
$apple = new Fruit("Apple");
Another example:
class Fruit {
public
$name;
public $color;
function __construct($name, $color) {
$this->name = $name;
$this->color = $color;
}
function __destruct() {
echo "The fruit is {$this->name}
and the color is {$this->color}.";
}
}
$apple = new Fruit("Apple", "red");
Tip: As constructors and destructors helps reducing the amount of code, they are very useful!
Access Modifiers
Properties and methods can have access modifiers which control where they can be accessed.
There are three access modifiers: public - the property or method can be accessed from everywhere. This is default protected - the property or method can be accessed within the class and by classes derived from that class private - the property or method can
ONLY be accessed within the class
In the following example we have added three different access modifiers to the three properties. Here, if you try to set the name property it will work fine (because the name property is public). However, if you try to set the color or weight property it will result in a fatal error (because the color and weight property are protected and private):
class Fruit {
public
$name;
protected $color;
private $weight;
}
$mango = new Fruit();
$mango->name = 'Mango'; // OK
$mango->color = 'Yellow'; // ERROR
$mango->weight = '300'; // ERROR
?>
In the next example we have added access modifiers to two methods. Here, if you try to call the set_color() or the set_weight() function it will result in a fatal error (because the two functions are considered protected and private), even if all the properties are public:
class Fruit {
public
$name;
public $color;
public $weight;
function set_name($n) {
// a public function (default)
$this->name = $n;
}
protected function set_color($n) {
// a protected function
$this->color = $n;
}
private function set_weight($n) {
// a private function
$this->weight = $n;
}
}
$mango = new Fruit();
$mango->set_name('Mango'); // OK
$mango->set_color('Yellow'); // ERROR
$mango->set_weight('300'); // ERROR
?>
What is Inheritance?
Inheritance in OOP = When a class derives from another class.
The child class will inherit all the public and protected properties and methods from the parent class. In addition, it can have its own properties and methods.
An inherited class is defined by using the extends keyword.
Let's look at an example:
class Fruit {
public
$name;
public $color;
public
function __construct($name, $color) {
$this->name = $name;
$this->color = $color;
}
public function intro() {
echo "The fruit is {$this->name}
and the color is {$this->color}.";
}
}
// Strawberry is inherited from Fruit
class
Strawberry extends Fruit {
public
function message() {
echo "Am I a fruit or a
berry? ";
}
}
$strawberry = new Strawberry("Strawberry", "red");
$strawberry->message();
$strawberry->intro();
Example Explained
The Strawberry class is inherited from the Fruit class.
This means that the Strawberry class can use the public $name and $color properties as well as the public __construct() and intro() methods from the
Fruit class because of inheritance.
The Strawberry class also has its own method: message().
Inheritance and the Protected Access Modifier
In the previous chapter we learned that protected properties or methods can be accessed within the class and by classes derived from that class. What does that mean?
Let's look at an example:
class Fruit {
public
$name;
public $color;
public
function __construct($name, $color) {
$this->name = $name;
$this->color = $color;
}
protected function intro() {
echo "The fruit is {$this->name}
and the color is {$this->color}.";
}
}
class
Strawberry extends Fruit {
public
function message() {
echo "Am I a fruit or a
berry? ";
}
}
// Try to call all three methods from outside class
$strawberry = new Strawberry("Strawberry", "red");
// OK. __construct() is public
$strawberry->message(); // OK. message()
is public
$strawberry->intro(); // ERROR. intro()
is protected
In the example above we see that if we try to call a protected method (intro()) from outside the class, we will receive an error. public methods will work fine!
Let's look at another example:
class Fruit {
public $name;
public
$color;
public function __construct($name, $color) {
$this->name = $name;
$this->color = $color;
}
protected function intro() {
echo "The
fruit is {$this->name} and the color is {$this->color}.";
}
}
class Strawberry extends Fruit {
public function message() {
echo "Am I a fruit or a berry? ";
// Call protected
method from within derived class - OK
$this ->
intro();
}
}
$strawberry = new Strawberry("Strawberry", "red"); // OK. __construct() is
public
$strawberry->message(); // OK. message() is
public and it calls intro() (which is protected) from within the
derived class
In the example above we see that all works fine! It is because we call the
protected method (intro()) from inside the derived class.
Overriding Inherited Methods
Inherited methods can be overridden by redefining the methods (use the same name) in the child class.
Look at the example below. The __construct() and intro() methods in the child class (Strawberry) will override the __construct() and intro() methods in the parent class (Fruit):
class Fruit {
public
$name;
public $color;
public
function __construct($name, $color) {
$this->name = $name;
$this->color = $color;
}
public function intro() {
echo "The fruit is {$this->name}
and the color is {$this->color}.";
}
}
class
Strawberry extends Fruit {
public $weight;
public
function __construct($name, $color, $weight) {
$this->name = $name;
$this->color = $color;
$this->weight = $weight;
}
public function intro() {
echo "The fruit is {$this->name}, the color is {$this->color},
and the weight is {$this->weight} gram.";
}
}
$strawberry = new Strawberry("Strawberry", "red",
50);
$strawberry->intro();
final Keyword
The final keyword can be used to prevent class inheritance or to prevent method overriding.
The following example shows how to prevent class inheritance:
final class Fruit {
// some code
}
//
will result in error
class
Strawberry extends Fruit {
// some code
}
The following example shows how to prevent method overriding:
class Fruit {
final public function intro() {
// some code
}
}
class
Strawberry extends Fruit {
//
will result in error
public function intro() {
// some code
}
}
Class Constants
Constants cannot be changed once it is declared.
Class constants can be useful if you need to define some constant data within a class.
A class constant is declared inside a class with the const keyword.
Class constants are case-sensitive. However, it is recommended to name the constants in all uppercase letters.
We can access a constant from outside the class by using the class name followed by the scope resolution operator (::) followed by the constant name, like here:
class
Goodbye {
const LEAVING_MESSAGE = "Thank you for visiting W3Schools.com!";
}
echo
Goodbye::LEAVING_MESSAGE;
Or, we can access a constant from inside the class by using the
self keyword followed by the scope resolution operator (::) followed by the constant name, like here:
class Goodbye {
const LEAVING_MESSAGE = "Thank you for visiting W3Schools.com!";
public function byebye() {
echo self::LEAVING_MESSAGE;
}
}
$goodbye = new Goodbye();
$goodbye->byebye();
What are Abstract Classes and Methods?
Abstract classes and methods are when the parent class has a named method, but need its child class(es) to fill out the tasks.
An abstract class is a class that contains at least one abstract method. An abstract method is a method that is declared, but not implemented in the code.
An abstract class or method is defined with the abstract keyword:
abstract class
ParentClass {
abstract public function someMethod1();
abstract public function someMethod2($name, $color);
abstract
public function someMethod3() : string;
}
When inheriting from an abstract class, the child class method must be defined with the same name, and the same or a less restricted access modifier.
So, if the abstract method is defined as protected, the child class method must be defined as either protected or public, but not private. Also, the type and number of required arguments must be the same. However, the child classes may have optional arguments in addition.
So, when a child class is inherited from an abstract class, we have the following rules:The child class method must be defined with the same name and it redeclares the parent abstract methodThe child class method must be defined with the same or a less restricted access modifierThe number of required arguments must be the same. However, the child class may have optional arguments in addition
Let's look at an example:
// Parent class
abstract class Car {
public
$name;
public
function __construct($name) {
$this->name = $name;
}
abstract public function intro() : string;
}
// Child classes
class
Audi extends Car {
public
function intro() : string {
return "Choose German
quality! I'm an $this->name!";
}
}
class
Volvo extends Car {
public
function intro() : string {
return "Proud to be
Swedish! I'm a $this->name!";
}
}
class
Citroen extends Car {
public
function intro() : string {
return "French
extravagance! I'm a $this->name!";
}
}
// Create objects from the child classes
$audi = new
audi("Audi");
echo $audi->intro();
echo "<br>";
$volvo = new
volvo("Volvo");
echo $volvo->intro();
echo "<br>";
$citroen = new citroen("Citroen");
echo $citroen->intro();
Example Explained
The Audi, Volvo, and Citroen classes are inherited from the Car class. This means that the
Audi, Volvo, and Citroen classes can use the public $name property as well as the public __construct() method from the
Car class because of inheritance.
But, intro() is an abstract method that should be defined in all the child classes and they should return a string.
More Abstract Class Examples
Let's look at another example where the abstract method has an argument:
abstract class ParentClass {
// Abstract method
with an argument
abstract protected
function prefixName($name);
}
class ChildClass extends ParentClass {
public function prefixName($name) {
if ($name == "John Doe") {
$prefix = "Mr.";
} elseif ($name == "Jane Doe") {
$prefix =
"Mrs.";
} else {
$prefix = ";
}
return
"{$prefix} {$name}";
}
}
$class = new ChildClass;
echo $class->prefixName("John
Doe");
echo "<br>"; echo $class->prefixName("Jane Doe");
Let's look at another example where the abstract method has an argument, and the child class has two optional arguments that are not defined in the parent's
abstract method:
abstract class ParentClass {
// Abstract method
with an argument
abstract protected
function prefixName($name);
}
class ChildClass extends ParentClass {
// The child class may define optional arguments that are not in the parent's
abstract method
public function prefixName($name, $separator = ".",
$greet = "Dear") {
if ($name == "John Doe") {
$prefix = "Mr";
} elseif ($name == "Jane Doe") {
$prefix =
"Mrs";
} else {
$prefix = ";
}
return
"{$greet} {$prefix}{$separator} {$name}";
}
}
$class = new ChildClass;
echo $class->prefixName("John
Doe");
echo "<br>"; echo $class->prefixName("Jane Doe");
What are Traits?
PHP only supports single inheritance: a child class can inherit only from one single parent.
So, what if a class needs to inherit multiple behaviors? OOP traits solve this problem.
Traits are used to declare methods that can be used in multiple classes.
Traits can have methods and abstract methods that can be used in multiple classes, and the methods can have any access modifier (public, private, or protected).
Traits are declared with the trait keyword:
trait TraitName {
// some code...
}
To use a trait in a class, use the
use keyword:
class MyClass {
use TraitName;
}
Let's look at an example:
trait message1 {
public function msg1() {
echo "OOP is fun! ";
}
}
class Welcome {
use
message1;
}
$obj = new Welcome();
$obj->msg1();
Example Explained
Here, we declare one trait: message1. Then, we create a class:
Welcome. The class uses the trait, and all the methods in the trait will be available in the class.
If other classes need to use the msg1() function, simply use the message1 trait in those classes. This reduces code duplication, because there is no need to redeclare the same method over and over again.
Using Multiple Traits
Let's look at another example:
trait message1 {
public function msg1() {
echo "OOP is fun! ";
}
}
trait message2 {
public function msg2()
{
echo "OOP reduces code duplication!";
}
}
class Welcome {
use message1;
}
class Welcome2 {
use message1, message2;
}
$obj = new Welcome();
$obj->msg1();
echo "<br>";
$obj2 =
new Welcome2();
$obj2->msg1();
$obj2->msg2();
Example Explained
Here, we declare two traits: message1 and message2. Then, we create two classes:
Welcome and Welcome2. The first class (Welcome) uses the message1 trait, and the second class (Welcome2) uses both message1 and message2 traits (multiple traits are separated by comma).
Static Methods
Static methods can be called directly - without creating an instance of a class.
Static methods are declared with the static keyword:
class ClassName {
public static function staticMethod() {
echo "Hello World!";
}
}
To access a static method use the class name, double colon (::), and the method name:
ClassName::staticMethod();
Let's look at an example:
class
greeting {
public static function
welcome() {
echo "Hello World!";
}
}
// Call static method
greeting::welcome();
Example Explained
Here, we declare a static method: welcome(). Then, we call the static method by using the class name, double colon (::), and the method name (without creating a class first).
More on Static Methods
A class can have both static and non-static methods. A static method can be accessed from a method in the same class using the self keyword and double colon (::):
class greeting {
public static function welcome() {
echo "Hello World!";
}
public function __construct()
{
self::welcome();
}
}
new
greeting();
Static methods can also be called from methods in other classes. To do this, the static method should be public:
class
greeting {
public static function
welcome() {
echo "Hello World!";
}
}
class
SomeOtherClass {
public function
message() {
greeting::welcome();
}
}
To call a static method from a child class, use the parent keyword inside the child class. Here, the static method can be public or protected.
class domain {
protected static function
getWebsiteName() {
return "W3Schools.com";
}
}
class domainW3 extends domain {
public $websiteName;
public function __construct() {
$this->websiteName =
parent::getWebsiteName();
}
}
$domainW3 = new domainW3;
echo $domainW3 -> websiteName;
Static Properties
Static properties can be called directly - without creating an instance of a class.
Static properties are declared with the static keyword:
class ClassName {
public static $staticProp = "W3Schools";
}
To access a static property use the class name, double colon (::), and the property name:
ClassName::staticProp;
Let's look at an example:
class
pi {
public static $value = 3.14159;
}
// Get static property
echo pi::$value;
Example Explained
Here, we declare a static property: $value. Then, we echo the value of the static property by using the class name, double colon (::), and the property name (without creating a class first).
More on Static Properties
A class can have both static and non-static properties. A static property can be accessed from a method in the same class using the self keyword and double colon (::):
class
pi {
public static $value=3.14159;
public function
staticValue() {
return self::$value;
}
}
$pi = new pi();
echo $pi->staticValue();
To call a static property from a child class, use the parent keyword inside the child class:
class
pi {
public static $value=3.14159;
}
class x extends pi {
public function xStatic() {
return
parent::$value;
}
}
// Get value of static property
directly via child class
echo x::$value;
// or get value of static property via xStatic()
method
$x = new x();
echo $x->xStatic();
PHP Conditional Statements
In PHP we have the following conditional statements:if statement - executes some code if one condition is trueif...else statement - executes some code if a condition is true and another code if that condition is falseif...elseif...else statement - executes different codes for more than two conditionsswitch statement - selects one of many blocks of code to be executed
if Statement
The if statement executes some code if one condition is true.
Syntax
if (condition) {
code to be executed if condition is true;
}
Output "Have a good day!" if the current time (HOUR) is less than 20:
$t = date("H");
if ($t < "20") {
echo "Have a good day!";
}
if...else Statement
The if...else statement executes some code if a condition is true and another code if that condition is false.
Syntax
if (condition) {
code to be executed if condition is true;
}
else {
code to be executed if condition is false;
}
Output "Have a good day!" if the current time is less than 20, and "Have a
good night!" otherwise:
$t = date("H");
if ($t < "20") {
echo "Have a good day!";
}
else {
echo
"Have a good night!";
}
if...elseif...else Statement
The if...elseif...else statement executes different codes for more than two conditions.
Syntax
if (condition) {
code to be executed if this condition is true;
}
elseif (condition) {
code to be executed if first condition is false and this
condition is true;
} else {
code to be executed if all conditions are false;
}
Output "Have a good morning!" if the current time is less than 10, and
"Have a good day!" if the current time is less than 20. Otherwise it will
output "Have a good night!":
$t = date("H");
if ($t < "10") {
echo "Have a good morning!";
}
elseif ($t < "20") {
echo "Have a good day!";
} else {
echo "Have a good night!";
}
switch Statement
The switch statement is used to perform different actions based on different conditions.
Use the switch statement to select one of many blocks of code to be executed.
Syntax
switch (n)
{
case label1:
code to be executed if n=label1;
break;
case label2:
code to be executed if n=label2;
break;
case label3:
code to be executed if n=label3;
break;
...
default:
code to be executed if n is different from all labels;
}
This is how it works: First we have a single expression n (most often a
variable), that is evaluated once. The value of the expression is then compared
with the values for each case in the structure. If there is a match, the block
of code associated with that case is executed. Use break to prevent the
code from running into the next case automatically. The default statement is used if no match is found.
$favcolor = "red";
switch ($favcolor)
{
case "red":
echo "Your favorite color is red!";
break;
case "blue":
echo "Your favorite color is blue!";
break;
case "green":
echo "Your favorite color is green!";
break;
default:
echo "Your favorite color is neither red, blue, nor green!";
}
PHP Loops
In PHP, we have the following loop types:while - loops through a block of code as long as the specified condition is truedo...while - loops through a block of code once, and then repeats the loop
as long as the specified condition is truefor - loops through a block of code a specified number of timesforeach - loops through a block of code for each element in an
array
The following chapters will explain and give examples of each loop type.
The while loop - Loops through a block of code as long as the specified condition is true.
while Loop
The while loop executes a block of code as long as the specified condition is true.
Syntax
while (condition is true) {
code to be executed;
}
The example below displays the numbers from 1 to 5:
$x = 1;
while($x <= 5) {
echo "The number is: $x <br>";
$x++;
}
$x = 1; - Initialize the loop counter ($x), and set the start value to 1$x <= 5 - Continue the loop as long as $x is less than or equal to 5$x++; - Increase the loop counter value by 1 for each iteration
This example counts to 100 by tens:
$x = 0;
while($x <= 100) {
echo "The number is: $x <br>";
$x+=10;
}
$x = 0; - Initialize the loop counter ($x), and set the start value to 0$x <= 100 - Continue the loop as long as $x is less than or equal to 100$x+=10; - Increase the loop counter value by 10 for each iteration
The do...while loop - Loops through a block of code once, and then repeats the loop as long as the specified condition is true.
do...while Loop
The do...while loop will always execute the block of code once, it will then check the condition, and repeat the loop while the specified condition is true.
Syntax
do
{
code to be executed;}
while (condition is true);
The example below first sets a variable $x to 1 ($x = 1). Then, the do while loop will write some output, and then increment the variable $x with 1. Then the condition is checked (is
$x less than, or equal to 5?), and the loop will continue to run as long as $x is less than, or equal to 5:
$x = 1;
do {
echo "The number is: $x <br>";
$x++;
} while ($x <= 5);
Note: In a do...while loop the condition is tested AFTER executing the statements within the loop. This means that the do...while loop will execute its statements at least once, even if the condition is false. See example below.
This example sets the $x variable to 6, then it runs the loop,
and then the condition is checked:
$x = 6;
do {
echo "The number is: $x <br>";
$x++;
} while ($x <= 5);
The for loop - Loops through a block of code a specified number of times.
for Loop
The for loop is used when you know in advance how many times the script should run.
Syntax
for (init counter; test counter; increment counter)
{
code to be executed
for each iteration;
}
Parameters:init counter: Initialize the loop counter valuetest counter: Evaluated for each loop iteration. If it evaluates to TRUE, the loop continues. If it evaluates to FALSE, the loop ends.increment counter: Increases the loop counter value
The example below displays the numbers from 0 to 10:
<?php for ($x = 0; $x <= 10; $x++)
{
echo "The number is: $x <br>";
}
$x = 0; - Initialize the loop counter ($x), and set the start value to 0$x <= 10; - Continue the loop as long as $x is less than or equal to 10$x++ - Increase the loop counter value by 1 for each iteration
This example counts to 100 by tens:
<?php for ($x = 0; $x <= 100; $x+=10)
{
echo "The number is: $x <br>";
}
$x = 0; - Initialize the loop counter ($x), and set the start value to 0$x <= 100; - Continue the loop as long as $x is less than or equal to 100$x+=10 - Increase the loop counter value by 10 for each iteration
The foreach loop - Loops through a block of code for each element in an array.
foreach Loop
The foreach loop works only on arrays, and is used to loop through each key/value pair in an array.
Syntax
foreach ($array as $value)
{
code to be executed;
}
For every loop iteration, the value of the current array element is assigned to $value and the array pointer is moved by one, until it reaches the last array element.
The following example will output the values of the given array ($colors):
$colors = array("red", "green", "blue", "yellow");
foreach ($colors as $value) {
echo "$value <br>";
}
The following example will output both the keys and the values of the given array ($age):
$age = array("Peter"=>"35", "Ben"=>"37", "Joe"=>"43");
foreach($age as $x => $val) {
echo "$x = $val<br>";
}
Debugging PHP
the “echo” statement is probably the most used tool
combined with one of these three variables :
var_dump , print_r , var_export()
very useful to print out to the browsers console instead of just var_dumping:
function console_log( $data ){
echo '<script>';
echo 'console.log('. json_encode( $data ) .')';
echo '</script>';
}
Usage:
$myvar = array(1,2,3);
console_log( $myvar ); // [1,2,3]
fetch_array(MYSQLI_ASSOC) or fetch_all(MYSQLI_ASSOC)
They are two functions of mysqli_result.
fetch_array(): Fetch a result row.
In this way, query for each row to the database
fetch_all(): Fetches all result rows.
And in this way, only query once to the database
examples:
1.-fetch_array():
$resultUsers = getAllUsers($db);
while($row = $resultUsers->fetch_array()){
echo $row['name'];
}
2.- fetch_all():
$resultUsers = getAllUsers($db);
foreach ($resultUsers->fetch_all(MYSQLI_ASSOC) as $value) {
echo $value['name'] . "<br>";
}
2.A.-
foreach (getAllUser($db)->fetch_all(MYSQLI_ASSOC) as $value) {
echo $value['name'] . "<br>";
}
fetch_all()
function called getAllUsers() should get you all users, not mysqli result.
$allUsers = getAllUsers($db);
and then $allUsers sent to a template for the output like
<?php foreach ($allUsers as $user) { ?>
<?=$user['name']?>
>?} ?>
MYSQLI_NUM
MYSQLI_NUM is a constant in PHP associated with a mysqli_result.
If you're using mysqli to retrieve information from the database, MYSQLI_NUM can be used to specify the return format of the data. Specifically, when using the fetch_array function, MYSQLI_NUM specifies that the return array should use numeric keys for the array, instead of creating an associative array.
Assuming you have two fields in your database table,
"first_field_name" and "second_field_name",
with the content "first_field_content" and "second_field_content"...
$result->fetch_array(MYSQLI_NUM);
fetches each row of the result like this:
array(
0 => "first_field_content",
1 => "second_field_content"
);
Alternatively...
$result->fetch_array(MYSQLI_ASSOC);
fetches an array like this:
array(
"first_field_name" => "first_field_content",
"second_field_name" => "second_field_content"
);
Using the constant MYSQLI_BOTH will fetch both.
suggest to use PDO, since mysql_* api is deprecated.
PHP mysqli
There are also ORM solutions for working with MySQL in PHP such as Doctrine or Eloquent.
version
$res = $conn->query("SELECT VERSION()");
if ($res) {
$row = $res->fetch_row();
echo $row[0];
}
$res->close();
$conn->close();
The example prints the version of MySQL.
$res = $conn->query("SELECT VERSION()");
The SELECT VERSION() statement returns the version of MySQL.
if ($res) {
$row = $res->fetch_row();
echo $row[0];
}
The fetch_row() returns a result row as an enumerated array.
Our result contains only one value.
create table
A table is created with the CREATE TABLE statement.
Rows are added to the table with the INSERT INTO statements.
$conn ->query("DROP TABLE IF EXISTS cars");
$conn ->query("CREATE TABLE cars(id INT PRIMARY KEY AUTO_INCREMENT,
name VARCHAR(255), price INT)");
$conn ->query("INSERT INTO cars(name, price) VALUES('Audi', 52642)");
$conn ->query("INSERT INTO cars(name, price) VALUES('Mercedes', 57127)");
$conn->close();
The example creates the cars table with eight rows.
prepared statements
// prepare and bind
// question mark (?) substitutes integer, string, double or blob value.
$stmt = $conn->prepare("INSERT INTO MyGuests (firstname, lastname, email) VALUES (?, ?, ?)");
$stmt->bind_param("sss", $firstname, $lastname, $email);
bind function tells the database what the parameters are.
The "sss" argument lists the types of data that the parameters are.
The s character tells mysql that the parameter is a string.
The argument may be one of four types:
i - integer; d - double; s - string; b - BLOB
// set parameters and execute
$firstname = "John";
$lastname = "Doe";
$email = "john@example.com";
$stmt->execute();
$firstname = "Mary";
$lastname = "Moe";
$email = "mary@example.com";
$stmt->execute();
echo "New records created successfully";
$stmt->close();
fetch_row
The fetch_row() method fetches one row of data from the result set and returns it as an enumerated array.
Each column is stored in an array offset starting from 0.
Each subsequent call to this function will return the next row within the result set, or NULL if there are no more rows.
$conn ->query("SELECT * FROM cars";
if ($res = $conn->query($sql)) {
printf("Select query returned %d rows.\n", $res->num_rows);
while ($row = $res->fetch_row())
{
printf("%s %s %s\n", $row[0], $row[1], $row[2]);
}
$res->close();
} else {
echo "failed to fetch data\n";
}
$conn->close();
The example returns all rows from the cars table.
$conn ->query("SELECT * FROM cars";
This SELECT query selects all rows from the table.
if ($res = $conn->query($sql)) {
We execute the SELECT query with the query() method.
printf("Select query returned %d rows.\n", $res->num_rows);
The number of returned rows is stored in the num_rows attribute.
while ($row = $res->fetch_row())
{ printf("%s %s %s\n", $row[0], $row[1], $row[2]); }
With the fetch_row() in a while loop, we fetch all rows from the table.
fetch_assoc
The fetch_assoc() returns an associative array of strings representing the fetched row in the result set.
Each key in the array represents the name of one of the result set's columns or NULL if there are no more rows in result set.
$conn ->query("SELECT * FROM cars";
if ($res = $conn->query($sql)) {
printf("Select query returned %d rows.\n", $res->num_rows);
while ($row = $res->fetch_assoc())
{ printf("%s %s %s\n", $row['id'], $row['name'], $row['price']); }
$res->close();
} else {
echo "failed to fetch data\n";
}
$conn->close();
The example returns all rows from the cars table.
while ($row = $res->fetch_assoc())
{ printf("%s %s %s\n", $row['id'], $row['name'], $row['price']); }
When we use fetch_assoc(), we refer to the columns via array notation.
Another example
$results = $conn->fetch("SELECT * FROM customer");
A variable $results has a collection of rows which are returned by a query. The size of the collection can be from 0 to n.
$resultsArray = $results->fetch_assoc();
This line fetch the first element from the collection.
If the collection is empty it will return NULL.
while($row = $results->fetch_assoc()){ print_r($row); }
It can be decoupled in the following steps:
Calculate $row = $results->fetch_assoc() and return array with elements or NULL.
Substitute $row = $results->fetch_assoc() in while with gotten value and get the following statements:
while(array(with elements)) or while(NULL).
If it's while(array(with elements)) it resolves the while condition in True and allow to perform an iteration.
If it's while(NULL) it resolves the while condition in False and exits the loop.
fetch_object
The fetch_object() returns an object with string properties that correspond to the fetched row or NULL if there are no more rows in resultset.
$conn ->query("SELECT * FROM cars";
if ($res = $conn->query($sql)) {
printf("Select query returned %d rows.\n", $res->num_rows);
while ($row = $res->fetch_object())
{
printf("%s %s %s\n", $row->id, $row->name, $row->price);
}
$res->close();
} else {
echo "failed to fetch data\n";
}
$conn->close();
The example returns all rows from the cars table.
while ($row = $res->fetch_object())
{ printf("%s %s %s\n", $row->id, $row->name, $row->price); }
When we use fetch_object(), we refer to the columns via object access notation.
column names
The next example prints column names with the data from the database table.
We refer to column names as meta data.
$conn ->query("SELECT * FROM cars";
if ($res = $conn->query($sql)) {
$num_rows = $res->num_rows;
$num_fields = $res->field_count;
printf("Select query returned %d rows.\n", $num_rows);
printf("Select query returned %d columns.\n", $num_fields);
$fields = $res->fetch_fields();
while ($row = $res->fetch_row()) {
for ($i = 0; $i < $num_fields; $i++) {
echo $fields[$i]->name . ": " . $row[$i] . "\n";
}
echo "*******************************\n";
}
$res->close();
} else {
echo "failed to fetch data\n";
}
$conn->close();
The example prints all rows of the cars table with the column headers.
$num_rows = $res->num_rows;
$num_fields = $res->field_count;
The num_rows attribute returns the number of rows in the result.
The field_count returns the number of fields in the result.
$fields = $res->fetch_fields();
The fetch_fields() method returns an array of objects representing the fields in a result set.
while ($row = $res->fetch_row()) {
for ($i = 0; $i < $num_fields; $i++) {
echo $fields[$i]->name . ": " . $row[$i] . "\n";
}
echo "*******************************\n";
}
SQL WILDCARD LIKE SEARCHES
Wildcard Characters in SQL Server
%
Represents zero or more characters
bl% finds bl, black, blue, and blob
_
Represents a single character
h_t finds hot, hat, and hit
[]
Represents any single character within the brackets
h[oa]t finds hot and hat, but not hit
^
Represents any character not in the brackets
h[^oa]t finds hit, but not hot and hat
-
Represents a range of characters
c[a-b]t finds cat and cbt
All the wildcards can also be used in combinations!
Here are some examples showing different LIKE operators with '%' and '_' wildcards:
WHERE CustomerName LIKE 'a%'
Finds any values that starts with "a"
WHERE CustomerName LIKE '%a'
Finds any values that ends with "a"
WHERE CustomerName LIKE '%or%'
Finds any values that have "or" in any position
WHERE CustomerName LIKE '_r%'
Finds any values that have "r" in the second position
WHERE CustomerName LIKE 'a_%_%'
Finds any values that starts with "a" and are at least 3 characters in length
WHERE ContactName LIKE 'a%o'
Finds any values that starts with "a" and ends with "o"
THE NUMBER OF ROWS RETURNED
The PHP mysqli method store_result() method and num_rows property will help us out here.
CLOSING THINGS OFF
To free up memory tidy up the end of your script by freeing and closing the prepare statement, and closing the database connection.
$mysqli->close()
Closes the database connection – in our examples that would be the variable $mysqli
$stmt->close()
Closes the prepare statement – in our examples that would be the variable $stmt
$stmt->free_result()
Frees stored result memory from the prepare statement – in our examples that would be the variable $stmt
To show MySQL databases in PHP script
Use fetch_assoc()
$result = $mysqli->query($query);
while ($row = $result->fetch_assoc()) { var_dump($row);}
to echo a object
use print_r($foo), or var_dump($foo).
or using the __toString magic method
to echo an array
foreach($results['data'] as $result) {
echo $result['type'], '<br>';
}
or
print_r($array);
or
echo '<pre>'; print_r($array); echo '</pre>';
or
var_dump($array)
or
echo json_encode($array);
or
echo "<pre>";
print_r($arr);
echo "</pre>";
or
echo "<pre>";
var_export($arr);
echo "</pre>";
fetchAll()
Fatal error: Uncaught Error: Call to undefined method mysqli_result::fetchAll()
mysqli::fetch_all() needs mysqlnd driver to be installed before you can use it.
php mysqlnd driver
In the official PHP Windows distributions from 5.3 onwards, MySQL Native Driver is enabled by default, so no additional configuration is required to use it.
All MySQL database extensions will use MySQL Native Driver in this case.
The MySQL Native Driver requires the OpenSSL functionality of PHP to be loaded and enabled to connect to MySQL through accounts that use the MySQL SHA-256 Authentication Plugin.
For example, PHP could be configured using:
./configure --with-mysql=mysqlnd \
--with-mysqli=mysqlnd \
--with-pdo-mysql=mysqlnd \
--with-openssl
[other options]
The ./configure command is part of the compilation process from source code.
You can either compile from source or install via package manager.
As the package manager complains, you can’t have both php-mysql and php-mysqlnd installed.
So you can
yum remove php-mysql
before
yum install php-mysqlnd
Then check for success via
php -m | grep mysqlnd
or
php -i | grep mysqlnd
Another option:
yum swap php-mysql php-mysqlnd
free_result()
free the memory associated with the result
$result -> free_result();
JavaScript call PHP functions
<script>
var phpadd= <?php echo add(1,2);?> //call the php add function
var phpmult= <?php echo mult(1,2);?> //call the php mult function
var phpdivide= <?php echo divide(1,2);?> //call the php divide function
</script>
use document.write for example,
<script>
document.write(' <?php add(1,2); ?> ');
document.write(' <?php milt(1,2); ?> ');
document.write(' <?php divide(1,2); ?> ');
</script>
create an API : the js functions execute AJAX requests on web service
var mult = function(arg1, arg2)
$.ajax({
url: "webservice.php?action=mult&arg1="+arg1+"&arg2="+arg2
}).done(function(data) {
console.log(data);
});
}
on the php side, check the action parameter in order to execute the propre function (basically a switch statement on the $_GET["action"] variable)
ajax request to server with data in request parameters, like this:
jQuery.ajax({
type: "POST",
url: 'your_functions_address.php',
dataType: 'json',
data: {functionname: 'add', arguments: [1, 2]},
success: function (obj, textstatus) {
if( !('error' in obj) ) { yourVariable = obj.result; }
else { console.log(obj.error); }
}
});
and your_functions_address.php like this:
<?php
header('Content-Type: application/json');
$aResult = array();
if( !isset($_POST['functionname']) ) { $aResult['error'] = 'No function name!'; }
if( !isset($_POST['arguments']) ) { $aResult['error'] = 'No function arguments!'; }
if( !isset($aResult['error']) ) {
switch($_POST['functionname']) {
case 'add':
if( !is_array($_POST['arguments']) || (count($_POST['arguments']) < 2) ) {
$aResult['error'] = 'Error in arguments!';
}
else {
$aResult['result'] = add(floatval($_POST['arguments'][0]), floatval($_POST['arguments'][1]));
}
break;
default:
$aResult['error'] = 'Not found function '.$_POST['functionname'].'!';
break;
}
}
echo json_encode($aResult);
?>
PHP connecting to a MySQL
There are three main API options when considering connecting to a MySQL database server:
PHP's MySQL Extension
PHP's MySQLi Extension
PHP Data Objects (PDO)
PHP's MySQL-related extensions, such as the MySQLi extension, and the MySQL extension, are implemented using the PHP extension framework.
MySQLi is an improved version of the older PHP MySQL driver.
The MySQLi extension features a dual interface.
It supports the procedural and object-oriented programming paradigms.
Users migrating from the old MySQL extension may prefer the procedural interface.
The procedural interface is similar to that of the old MySQL extension.
In many cases, the function names differ only by prefix.
Some MySQLi functions take a connection handle as their first argument, whereas matching functions in the old MySQL interface took it as an optional last argument.
$mysqli = new mysqli("example.com", "user", "password", "database");
if ($mysqli->connect_errno) {
echo "Failed to connect to MySQL: (" . $mysqli->connect_errno . ") " . $mysqli->connect_error;
}
if (!$mysqli->query("DROP TABLE IF EXISTS test") ||
!$mysqli->query("CREATE TABLE test(id INT)") ||
!$mysqli->query("INSERT INTO test(id) VALUES (1), (2), (3)")) {
echo "Table creation failed: (" . $mysqli->errno . ") " . $mysqli->error;
}
$res = $mysqli->query("SELECT id FROM test ORDER BY id ASC");
echo "Reverse order...\n";
for ($row_no = $res->num_rows - 1; $row_no >= 0; $row_no--) {
$res->data_seek($row_no);
$row = $res->fetch_assoc();
echo " id = " . $row['id'] . "\n";
}
echo "Result set order...\n";
$res->data_seek(0);
while ($row = $res->fetch_assoc()) {
echo " id = " . $row['id'] . "\n";
}
MySQLi
num_rows, num_fields, fetch_fields(), fetch_row()
if ($res = $conn->query($sql)) {
$num_rows = $res->num_rows;
$num_fields = $res->field_count;
echo "number of rows: " .$num_rows ."<br>";
echo "number of columns: " .$num_fields ."<br><pre>";
$fields = $res->fetch_fields();
while ($row = $res->fetch_row()) {
for ($i = 0; $i < $num_fields; $i++) {
echo $fields[$i]->name . ": " . $row[$i] . "\n";
}
echo "*******************************\n";
}
$res->close();
} else {
echo "failed to fetch data\n";
}
PHP MYSQLI Prepared Statements Cheat Sheet
Before we start, let’s connect to the database.
<?php $mysqli = new mysqli( 'hostname', 'username', 'password', 'database' );?>
1. SELECT - Selecting one row
$stmt = $mysqli -> prepare('SELECT name, email FROM users WHERE id = ?');
$userId = 1;
$stmt -> bind_param('i', $userId);
$stmt -> execute();
$stmt -> store_result();
$stmt -> bind_result($name, $email);
$stmt -> fetch();
echo $name;
echo $email;
2. SELECT - Selecting Multiple Rows
$stmt = $mysqli -> prepare('SELECT name, email FROM users');
$stmt -> execute();
$stmt -> store_result();
$stmt -> bind_result($name, $email);
while ($stmt -> fetch()) {
echo $name;
echo $email;
}
3. SELECT - Getting Number of Selected Rows
$stmt = $mysqli -> prepare('SELECT name, email FROM users');
$stmt -> execute();
$stmt -> store_result();
echo $stmt -> num_rows;
4. SELECT - Get Results
$stmt = $mysqli -> prepare('SELECT name, email FROM users WHERE id > ?');
$greaterThan = 1;
$stmt -> bind_param('i', $greaterThan);
$stmt -> execute();
$result = $stmt -> get_result();
5. SELECT - With Wildcards
$stmt = $mysqli -> prepare('SELECT name, email FROM users WHERE name LIKE ?');
$like = 'a%';
$stmt -> bind_param('s', $like);
$stmt -> execute();
$stmt -> store_result();
$stmt -> bind_result($name, $email);
while ($stmt -> fetch()) {
echo $name;
echo $email;
}
6. SELECT - With An Array of IDs
// array of user IDs
$userIdArray = [1,2,3,4];
// number of question marks
$questionMarksCount = count($userIdArray);
// create a array with question marks
$questionMarks = array_fill(0, $questionMarksCount, '?');
// join them with ,
$questionMarks = implode(',', $questionMarks);
// data types for bind param
$dataTypes = str_repeat('i', $questionMarksCount);
$stmt = $mysqli -> prepare("SELECT name, email FROM users WHERE id IN ($questionMarks)");
$stmt -> bind_param($dataTypes, ...$userIdArray);
$stmt -> execute();
$stmt -> store_result();
$stmt -> bind_result($name, $email);
while ($stmt -> fetch()) {
echo $name;
echo $email;
}
7. SELECT - LIMIT and OFFSET
$stmt = $mysqli -> prepare("SELECT name, email FROM users LIMIT ? OFFSET ?");
// limit of rows
$limit = 2;
// skip n rows
$offset = 1;
$stmt -> bind_param('ii', $limit, $offset);
$stmt -> execute();
$stmt -> store_result();
$stmt -> bind_result($name, $email);
while ($stmt -> fetch()) {
echo $name;
echo $email;
}
8. SELECT - BETWEEN
$stmt = $mysqli -> prepare("SELECT name, email FROM users WHERE id BETWEEN ? AND ?");
$betweenStart = 2;
$betweenEnd = 4;
$stmt -> bind_param('ii', $betweenStart, $betweenEnd);
$stmt -> execute();
$stmt -> store_result();
$stmt -> bind_result($name, $email);
while ($stmt -> fetch()) {
echo $name;
echo $email;
}
9. INSERT - One Row
$stmt = $mysqli -> prepare('INSERT INTO users (name, email) VALUES (?,?)');
$name = 'John';
$email = 'john@gmail.com';
$stmt -> bind_param('ss', $name, $email);
$stmt -> execute();
10. INSERT - Getting Insert ID
$stmt = $mysqli -> prepare('INSERT INTO users (name, email) VALUES (?,?)');
$name = 'John';
$email = 'john@gmail.com';
$stmt -> bind_param('ss', $name, $email);
$stmt -> execute();
echo 'Your account id is ' . $stmt -> insert_id;
11. INSERT - Multiple Rows (Recursive)
$newUsers = [
[ 'sulliops', 'sulliops@gmail.com' ],
[ 'infinity', 'infinity@gmail.com' ],
[ 'aivarasco', 'aivarasco@gmail.com' ]
];
$stmt = $mysqli -> prepare('INSERT INTO users (name, email) VALUES (?,?)');
foreach ($newUsers as $user) {
$name = $user[0];
$email = $user[1];
$stmt -> bind_param('ss', $name, $email);
$stmt -> execute();
echo "{$name}'s account id is {$stmt -> insert_id}";
}
12. UPDATE
$stmt = $mysqli -> prepare('UPDATE users SET email = ? WHERE id = ? LIMIT 1');
$email = 'newemail@hyvor.com';
$id = 2;
$stmt -> bind_param('si', $email, $id);
$stmt -> execute();
13. UPDATE - Get Affected Rows
$stmt = $mysqli -> prepare('UPDATE users SET email = ? WHERE name = ? LIMIT 1');
$email = 'newemail@hyvor.com';
$name = 'teodor';
$stmt -> bind_param('ss', $email, $name);
$stmt -> execute();
// 1
echo $stmt -> affected_rows;
14. DELETE
$stmt = $mysqli -> prepare('DELETE FROM users WHERE id = ?');
$userId = 4;
$stmt -> bind_param('i', $userId);
$stmt -> execute();
// number of deleted rows
echo $stmt -> affected_rows;
bind_result vs get_result in mysql
Using bind_result() would be better for query's without wild card (*)
for example:
/* Use bind_result() with fetch() */
$query1 = 'SELECT id, first_name, last_name, username FROM table WHERE id = ?';
Using get_result() would be better for query's with wild card (*), for example:
/* Use get_result() with fetch_assoc() */
$query2 = 'SELECT * FROM table WHERE id = ?';
Example 1 for $query1 using bind_result()
$query1 = 'SELECT id, first_name, last_name, username FROM table WHERE id = ?';
$id = 5;
if($stmt = $mysqli->prepare($query)){
/*
Binds variables to prepared statement
i corresponding variable has type integer
d corresponding variable has type double
s corresponding variable has type string
b corresponding variable is a blob and will be sent in packets
*/
$stmt->bind_param('i',$id);
/* execute query */
$stmt->execute();
/* Store the result (to get properties) */
$stmt->store_result();
/* Get the number of rows */
$num_of_rows = $stmt->num_rows;
/* Bind the result to variables */
$stmt->bind_result($id, $first_name, $last_name, $username);
while ($stmt->fetch()) {
echo 'ID: '.$id.'<br>';
echo 'First Name: '.$first_name.'<br>';
echo 'Last Name: '.$last_name.'<br>';
echo 'Username: '.$username.'<br><br>';
}
/* free results */
$stmt->free_result();
/* close statement */
$stmt->close();
}
/* close connection */
$mysqli->close();
PHP
Example 2 for $query2 using get_result()
$query2 = 'SELECT * FROM table WHERE id = ?';
$id = 5;
if($stmt = $mysqli->prepare($query)){
/*
Binds variables to prepared statement
i corresponding variable has type integer
d corresponding variable has type double
s corresponding variable has type string
b corresponding variable is a blob and will be sent in packets
*/
$stmt->bind_param('i',$id);
/* execute query */
$stmt->execute();
/* Store the result (to get properties) */
$stmt->store_result();
/* Get the number of rows */
$num_of_rows = $stmt->num_rows;
/* Get the result */
$result = $stmt->get_result();
while ($row = $result->fetch_assoc()) {
echo 'ID: '.$row['id'].'<br>;';
echo 'First Name: '.$row['first_name'].'<br>';
echo 'Last Name: '.$row['last_name'].'<br>';
echo 'Username: '.$row['username'].'<br>';
}
/* free results */
$stmt->free_result();
/* close statement */
$stmt->close();
}
/* close connection */
$mysqli->close();
PHP
As you can see, you can't use bind_result with * . However, get_result works for both, but bind_result is simpler and take out some of the mess that comes with $row['name'] .
Conclusion
bind_result()
Pros:
Simpler
No need to mess with $row['name']
Uses fetch()
Cons:
Doesn't work with SQL Query that use wildcard *
get_result()
Pros:
Works with all SQL statements
Uses fetch_assoc()
Cons:
Must mess around with array variables $row[]
Not as neat
Multiple Prepared statements in PHP with MySQLi
mysqli_report(MYSQLI_REPORT_ERROR | MYSQLI_REPORT_STRICT);
$conn = new mysqli("localhost", "root", "", "");
$conn->set_charset('utf8mb4');
/* set autocommit to off */
$conn->autocommit(FALSE);
// Multiple Prepared statements
$stmt1 = $conn->prepare("INSERT INTO tbl1 (id, intro) VALUES (?, ?)");
$stmt2 = $conn->prepare("INSERT INTO tbl2 (id, name) VALUES (?, ?)");
$str1 = 'abc';
$str2 = 'efg';
$str3 = 'hij';
$str4 = 'klm';
$stmt1->bind_param('ss', $str1, $str2);
$stmt2->bind_param('ss', $str3,$str4);
$stmt1->execute();
$stmt2->execute();
/* commit and set autocommit to on */
$conn->autocommit(true);
show current working directory
echo getcwd() . "\n";
make MySQL handle UTF-8 properly
MySQL handle UTF-8
A Guide to UTF-8 Encoding in PHP and MySQL
To alter database:
ALTER DATABASE dbname CHARACTER SET utf8mb4 COLLATE utf8mb4_unicode_ci;
If you have existing data that you wish to convert to UTF-8, dump your database, and import it back as UTF-8 making sure:
use SET NAMES utf8 before you query/insert into the database
use DEFAULT CHARSET=utf8 when creating new tables
at this point your MySQL client and server should be in UTF-8 (see my.cnf). remember any languages you use (such as PHP) must be UTF-8 as well.
Some versions of PHP will use their own MySQL client library, which may not be UTF-8 aware.
To make this 'permanent', in my.cnf:
[client]
default-character-set=utf8
[mysqld]
character-set-server = utf8
The short answer: Use utf8mb4 in 4 places:
The bytes in your client are utf8, not latin1/cp1251/etc.
SET NAMES utf8mb4 or something equivalent when establishing the client's connection to MySQL
CHARACTER SET utf8mb4 on all tables/columns -- except columns that are strictly ascii/hex/country_code/zip_code/etc.
<meta charset charset=UTF-8> if you are outputting to HTML. (Yes the spelling is different here.)
PHP Variable Scope
There are only two scopes available in PHP namely local and global scopes.
Local variables (local scope)
Global variables (special global scope)
Static variables (local scope)
Function parameters (local scope)
When a variable is accessed outside its scope it will cause PHP error Undefined Variable.
1. Local Scope Variables
A local scope is a restricted boundary of a variable within which code block it is declared.
That block can be a function, class or any conditional span.
The variable within this limited local scope is known as the local variable of that specific code block.
The following code block shows a PHP function.
We have declared a variable $count inside this function.
This variable is said to be a local variable of this function and it is in the local scope of the function block.
function calculate_count() {
$count = 5;
//will print 5; the value of local variable
echo $count++;
}
Local variables will be destroyed once the end of the code block is reached.
Hence the same named variables can be declared within different local scopes.
2. Global Scope Variables
Variables in global scope can be accessed from anywhere from outside a function or class independent of its boundary.
PHP global variables can be defined by using global keyword.
If we want to use global variables inside a function, we have to prefix the global keyword with the variable.
$count = 0;
function calculate_count() {
global $count;
// will print 0 and increment global variable
echo $count++ . "
";
}
calculate_count();
echo $count;
PHP has a predefined superglobal variable called $GLOBALS.
It is an associative array with the name of the variable as key and value as the array element.
We can use this array variable to add an array of PHP variables in a global scope.
Let us change the above example with the global keyword by using $GLOBALS superglobal to access the variable in global scope.
$count = 0;
function calculate_count() {
// will print 0 and increment global variable declared outside function
echo $GLOBALS["count"]++ . "
";
}
calculate_count();
echo $count;
3. Static Variables (local scope)
A static variable is again a variable with local scope.
But the difference with the regular local variable is that it is not destroyed outside the scope boundary.
A variable can be defined by using the ‘static’ keyword inside a function.
static adhesive
A static variable does not lose its value when the program execution goes past the scope boundary.
But it can be accessed only within that boundary.
Let me demonstrate it using the following example code,
function counter()
{
static $count = 0;
echo $count;
$count++;
}
The above counter function has the static variable ‘count’ declared within its local scope.
When the function execution is complete, the static count variable still retains its value for further computation.
Every time the counter function is called, the value of count is incremented.
The count value is initialized only once on the first call.
4. Function Parameters (Local Scope)
Function parameters (arguments) are local variables defined within the local scope of the function on which it is used as the argument.
Scope and File Includes
The boundary of file includes does not demarcate the scope of variables.
The scope of a variable is only governed by the function block and not based on the file include.
A variable can be declared in a PHP file and used in another file by using ‘include’ or ‘require’ that file.
Function Inside Function or Class
Remember that the scope in PHP is governed by a function block.
Any new function declared anywhere starts a new scope.
If an anonymous function is defined inside another function, the anonymous function has its own local scope.
function foo() {
$fruit = 'apple';
$bar = function () {
// $fruit cannot be accessed inside here
$animal = 'lion';
};
// $animal cannot be accessed outside here
}
In the above example code, $fruit variable is restricted to the outer function and its scope does not span inside the anonymous inner function.
The same way, $animal which is declared inside is not accessible in the outer function as its scope boundary is restricted to the inner function.
General Note:
Whenever you want to use a variable in a different scope, the way in and way out is by passing as an argument.
Do not use global scoped variable for such trivial use cases.
Built-in Regular expression Functions in PHP
preg_match – perform a pattern match on a string.
It returns true if a match is found and false if a match is not found.
preg_split – perform a pattern match on a string and then split the results into a numeric array
preg_replace – perform a pattern match on a string and then replace the match with the specified text.
Below is the syntax for a regular expression function such as preg_match,preg_split or preg_replace.
syntax: function_name('/pattern/',subject);
"function_name(...)" is either preg_match, preg_split or preg_replace.
"/.../" The forward slashes denote the beginning and end of our regular expression
"'/pattern/'" is the pattern that we need to matched
"subject" is the text string to be matched against
PHP Preg_match
$my_url = "www.guru99.com";
if (preg_match("/guru/", $my_url)) { echo "the url $my_url contains guru";}
else{ echo "the url $my_url does not contain guru";}
"preg_match(...)" is the PHP regular expression function
"'/guru/'" is the regular expression pattern to be matched
"$my_url" is the variable containing the text to be matched against.
PHP Preg_split
We will take a string phrase and explode it into an array;
the pattern to be matched is a single space.
$my_text="I Love Regular Expressions";
$my_array = preg_split("/ /", $my_text);
print_r($my_array );
PHP Preg_replace
$text = "We at Guru99 strive to make quality education affordable to the masses. Guru99.com";
$text = preg_replace("/Guru/", 'Guru', $text);
echo $text;
Meta characters
metacharacters allow us to perform more complex pattern matches.
.
Matches any single character except a new line
/./ matches anything that has a single character
^
Matches the beginning of or string / excludes characters
/^PH/ matches any string that starts with PH
$
Matches pattern at the end of the string
/com$/ matches guru99.com,yahoo.com Etc.
*
Matches any zero (0) or more characters
/com*/ matches computer, communication etc.
+
Requires preceding character(s) appear at least once
/yah+oo/ matches yahoo
\
Used to escape meta characters
/yahoo+\.com/ treats the dot as a literal value
[...]
Character class
/[abc]/ matches abc
a-z
Matches lower case letters
/a-z/ matches cool, happy etc.
A-Z
Matches upper case letters
/A-Z/ matches WHAT, HOW, WHY etc.
0-9
Matches any number between 0 and 9
/0-4/ matches 0,1,2,3,4
a fairly complex example that checks the validity of an email address.
$my_email = "name@company.com";
if (preg_match("/^[a-zA-Z0-9._-]+@[a-zA-Z0-9-]+\.[a-zA-Z.]{2,5}$/", $my_email)) { echo "$my_email is a valid email address";}
else { echo "$my_email is NOT a valid email address";}
"'/.../'" starts and ends the regular expression
"^[a-zA-Z0-9._-]" matches any lower or upper case letters, numbers between 0 and 9 and dots, underscores or dashes.
"+@[a-zA-Z0-9-]" matches the @ symbol followed by lower or upper case letters, numbers between 0 and 9 or dashes.
"+\.[a-zA-Z.]{2,5}$/" escapes the dot using the backslash then matches any lower or upper case letters with a character length between 2 and 5 at the end of the string.
PHP query multiple Tables
$query = "SELECT * ".
"FROM comments, users ".
"WHERE comments.user_id = users.user_id ".
"LIMIT 10";
SELECT *
FROM UserInfoTbl, UserPvTbl
WHERE UserPvTbl.username = UserInfoTbl.username
AND UserPvTbl.username = 'user0003'
select * from UserInfoTbl inner join UserPvTbl on UserInfoTbl.username=UserPvTbl.fusename
where UserPvTbl.usename='user0003'
SELECT pet.name,
TIMESTAMPDIFF(YEAR,birth,date) AS age, remark
FROM pet INNER JOIN event
ON pet.name = event.name
WHERE event.type = 'litter';
Retrieving Records from Multiple Tables
Inserting Data into a MySQL Database Table
The INSERT INTO statement is used to insert new rows in a database table.
$sql = "INSERT INTO persons (first_name, last_name, email) VALUES ('Peter', 'Parker', 'peterparker@mail.com')";
Inserting Multiple Rows into a Table
$sql = "INSERT INTO persons (first_name, last_name, email) VALUES
('John', 'Rambo', 'johnrambo@mail.com'),
('Clark', 'Kent', 'clarkkent@mail.com'),
('John', 'Carter', 'johncarter@mail.com'),
('Harry', 'Potter', 'harrypotter@mail.com')";
Insert Data into a Database from an HTML Form
Step 1: Creating the HTML Form
<form action="insert.php" method="post">
<pre>
<label for="firstName">First Name:</label>
<input type="text" name="first_name" id="firstName">
<label for="lastName">Last Name:</label>
<input type="text" name="last_name" id="lastName">
<label for="emailAddress">Email Address:</label>
<input type="text" name="email" id="emailAddress">
<input type="submit" value="Submit">
</pre>
</form>
Step 2: Retrieving and Inserting the Form Data
// Escape user inputs for security
// reference: other parameters: isset($_POST['search'])
// reference: other parameters: $substring = $_POST['schTxt'];
$first_name = mysqli_real_escape_string($conn, $_REQUEST['first_name']);
$last_name = mysqli_real_escape_string($conn, $_REQUEST['last_name']);
$email = mysqli_real_escape_string($conn, $_REQUEST['email']);
// Attempt insert query execution
$sql = "INSERT INTO persons (first_name, last_name, email) VALUES ('$first_name', '$last_name', '$email')";
Note: The mysqli_real_escape_string() function escapes special characters in a string and create a legal SQL string to provide security against SQL injection.
// $escaped_item = mysql_escape_string($item);
PHP MySQL CRUD Application
Creating the Database Table
CREATE TABLE employees (
id INT NOT NULL PRIMARY KEY AUTO_INCREMENT,
name VARCHAR(100) NOT NULL,
address VARCHAR(255) NOT NULL,
salary INT(10) NOT NULL
);
Creating the Config File
script in order to connect to the MySQL database server
We'll later include this config file in other pages using the PHP require_once() function.
/* Database credentials
define('DB_SERVER', 'localhost');
define('DB_USERNAME', 'root');
define('DB_PASSWORD', '');
define('DB_NAME', 'demo');
/* Attempt to connect to MySQL database */
$conn = mysqli_connect(DB_SERVER, DB_USERNAME, DB_PASSWORD, DB_NAME);
// Check connection
if($conn === false){
die("ERROR: Could not connect. " . mysqli_connect_error());
}
Creating the Landing Page
showing the records from the employees database table.
<script>
$(document).ready(function(){ $('[data-toggle="tooltip"]').tooltip(); });
</script>
<h2 class="pull-left">Employees Details</h2>
<a href="create.php" class="btn btn-success pull-right">Add New Employee</a>
// Include config file
require_once "config.php";
// Attempt select query execution
$sql = "SELECT * FROM employees";
if($result = mysqli_query($conn, $sql)){
if(mysqli_num_rows($result) > 0){
echo "<table class='table table-bordered table-striped'>";
echo "<thead>";
echo "<tr>";
echo "<th>#</th>";
echo "<th>Name</th>";
echo "<th>Address</th>";
echo "<th>Salary</th>";
echo "<th>Action</th>";
echo "</tr>";
echo "</thead>";
echo "<tbody>";
while($row = mysqli_fetch_array($result)){
echo "<tr>";
echo "<td>" . $row['id'] . "</td>";
echo "<td>" . $row['name'] . "</td>";
echo "<td>" . $row['address'] . "</td>";
echo "<td>" . $row['salary'] . "</td>";
echo "<td>";
echo "<a href='read.php?id=". $row['id'] ."' title='View Record' data-toggle='tooltip'><span class='glyphicon glyphicon-eye-open'></span></a>";
echo "<a href='update.php?id=". $row['id'] ."' title='Update Record' data-toggle='tooltip'><span class='glyphicon glyphicon-pencil'></span></a>";
echo "<a href='delete.php?id=". $row['id'] ."' title='Delete Record' data-toggle='tooltip'><span class='glyphicon glyphicon-trash'></span></a>";
echo "</td>";
echo "</tr>";
}
echo "</tbody>";
echo "</table>";
// Free result set
mysqli_free_result($result);
} else{
echo "<p class='lead'><em>No records were found.</em></p>";
}
} else{
echo "ERROR: Could not able to execute $sql. " . mysqli_error($conn);
}
// Close connection
mysqli_close($conn);
<img src="https://www.tutorialrepublic.com/lib/images/php-mysql-crud-grid.png">
Creating the Create Page
// Include config file
require_once "config.php";
// Define variables and initialize with empty values
$name = $address = $salary = "";
$name_err = $address_err = $salary_err = "";
// Processing form data when form is submitted
if($_SERVER["REQUEST_METHOD"] == "POST"){
// Validate name
$input_name = trim($_POST["name"]);
if(empty($input_name)){
$name_err = "Please enter a name.";
} elseif(!filter_var($input_name, FILTER_VALIDATE_REGEXP, array("options"=>array("regexp"=>"/^[a-zA-Z\s]+$/")))){
$name_err = "Please enter a valid name.";
} else{
$name = $input_name;
}
// Validate address
$input_address = trim($_POST["address"]);
if(empty($input_address)){
$address_err = "Please enter an address.";
} else{
$address = $input_address;
}
// Validate salary
$input_salary = trim($_POST["salary"]);
if(empty($input_salary)){
$salary_err = "Please enter the salary amount.";
} elseif(!ctype_digit($input_salary)){
$salary_err = "Please enter a positive integer value.";
} else{
$salary = $input_salary;
}
// Check input errors before inserting in database
if(empty($name_err) && empty($address_err) && empty($salary_err)){
// Prepare an insert statement
$sql = "INSERT INTO employees (name, address, salary) VALUES (?, ?, ?)";
if($stmt = mysqli_prepare($conn, $sql)){
// Bind variables to the prepared statement as parameters
mysqli_stmt_bind_param($stmt, "sss", $param_name, $param_address, $param_salary);
// Set parameters
$param_name = $name;
$param_address = $address;
$param_salary = $salary;
// Attempt to execute the prepared statement
if(mysqli_stmt_execute($stmt)){
// Records created successfully. Redirect to landing page
header("location: index.php");
exit();
} else{
echo "Something went wrong. Please try again later.";
}
}
// Close statement
mysqli_stmt_close($stmt);
}
// Close connection
<h2>Create Record</h2>
Please fill this form and submit to add employee record to the database.
<form action="<?php echo htmlspecialchars($_SERVER["PHP_SELF"]); ?> " method="post">
<div class="form-group <?php echo (!empty($name_err)) ? 'has-error' : ''; ?> ">
<label>Name</label>
<input type="text" name="name" class="form-control" value="<?php echo $name; ?> ">
<span class="help-block"><?php echo $name_err;?> </span>
</div>
<div class="form-group <?php echo (!empty($address_err)) ? 'has-error' : ''; ?> ">
<label>Address</label>
<textarea name="address" class="form-control"><?php echo $address; ?> </textarea>
<span class="help-block"><?php echo $address_err;?> </span>
</div>
<div class="form-group <?php echo (!empty($salary_err)) ? 'has-error' : ''; ?> ">
<label>Salary</label>
<input type="text" name="salary" class="form-control" value="<?php echo $salary; ?> ">
<span class="help-block"><?php echo $salary_err;?> </span>
</div>
<input type="submit" class="btn btn-primary" value="Submit">
<a href="index.php" class="btn btn-default">Cancel</a>
</form>
Creating the Read Page
// Check existence of id parameter before processing further
if(isset($_GET["id"]) && !empty(trim($_GET["id"]))){
// Include config file
require_once "config.php";
// Prepare a select statement
$sql = "SELECT * FROM employees WHERE id = ?";
if($stmt = mysqli_prepare($conn, $sql)){
// Bind variables to the prepared statement as parameters
mysqli_stmt_bind_param($stmt, "i", $param_id);
// Set parameters
$param_id = trim($_GET["id"]);
// Attempt to execute the prepared statement
if(mysqli_stmt_execute($stmt)){
$result = mysqli_stmt_get_result($stmt);
if(mysqli_num_rows($result) == 1){
/* Fetch result row as an associative array. Since the result set contains only one row, we don't need to use while loop */
$row = mysqli_fetch_array($result, MYSQLI_ASSOC);
// Retrieve individual field value
$name = $row["name"];
$address = $row["address"];
$salary = $row["salary"];
} else{
// URL doesn't contain valid id parameter. Redirect to error page
header("location: error.php");
exit();
}
} else{
echo "Oops! Something went wrong. Please try again later.";
}
}
// Close statement
mysqli_stmt_close($stmt);
// Close connection
mysqli_close($conn);
} else{
// URL doesn't contain id parameter. Redirect to error page
header("location: error.php");
exit();
}
<h1>View Record</h1>
<div class="form-group">
<label>Name</label>
<p class="form-control-static"><?php echo $row["name"]; ?> </p>
</div>
<div class="form-group">
<label>Address</label>
<p class="form-control-static"><?php echo $row["address"]; ?> </p>
</div>
<div class="form-group">
<label>Salary</label>
<p class="form-control-static"><?php echo $row["salary"]; ?> </p>
</div>
<p><a href="index.php" class="btn btn-primary">Back</a></p>
Creating the Update Page
// Include config file
require_once "config.php";
// Define variables and initialize with empty values
$name = $address = $salary = "";
$name_err = $address_err = $salary_err = "";
// Processing form data when form is submitted
if(isset($_POST["id"]) && !empty($_POST["id"])){
// Get hidden input value
$id = $_POST["id"];
// Validate name
$input_name = trim($_POST["name"]);
if(empty($input_name)){
$name_err = "Please enter a name.";
} elseif(!filter_var($input_name, FILTER_VALIDATE_REGEXP, array("options"=>array("regexp"=>"/^[a-zA-Z\s]+$/")))){
$name_err = "Please enter a valid name.";
} else{
$name = $input_name;
}
// Validate address address
$input_address = trim($_POST["address"]);
if(empty($input_address)){
$address_err = "Please enter an address.";
} else{
$address = $input_address;
}
// Validate salary
$input_salary = trim($_POST["salary"]);
if(empty($input_salary)){
$salary_err = "Please enter the salary amount.";
} elseif(!ctype_digit($input_salary)){
$salary_err = "Please enter a positive integer value.";
} else{
$salary = $input_salary;
}
// Check input errors before inserting in database
if(empty($name_err) && empty($address_err) && empty($salary_err)){
// Prepare an update statement
$sql = "UPDATE employees SET name=?, address=?, salary=? WHERE id=?";
if($stmt = mysqli_prepare($conn, $sql)){
// Bind variables to the prepared statement as parameters
mysqli_stmt_bind_param($stmt, "sssi", $param_name, $param_address, $param_salary, $param_id);
// Set parameters
$param_name = $name;
$param_address = $address;
$param_salary = $salary;
$param_id = $id;
// Attempt to execute the prepared statement
if(mysqli_stmt_execute($stmt)){
// Records updated successfully. Redirect to landing page
header("location: index.php");
exit();
} else{
echo "Something went wrong. Please try again later.";
}
}
// Close statement
mysqli_stmt_close($stmt);
}
// Close connection
mysqli_close($conn);
} else{
// Check existence of id parameter before processing further
if(isset($_GET["id"]) && !empty(trim($_GET["id"]))){
// Get URL parameter
$id = trim($_GET["id"]);
// Prepare a select statement
$sql = "SELECT * FROM employees WHERE id = ?";
if($stmt = mysqli_prepare($conn, $sql)){
// Bind variables to the prepared statement as parameters
mysqli_stmt_bind_param($stmt, "i", $param_id);
// Set parameters
$param_id = $id;
// Attempt to execute the prepared statement
if(mysqli_stmt_execute($stmt)){
$result = mysqli_stmt_get_result($stmt);
if(mysqli_num_rows($result) == 1){
/* Fetch result row as an associative array. Since the result set contains only one row, we don't need to use while loop */
$row = mysqli_fetch_array($result, MYSQLI_ASSOC);
// Retrieve individual field value
$name = $row["name"];
$address = $row["address"];
$salary = $row["salary"];
} else{
// URL doesn't contain valid id. Redirect to error page
header("location: error.php");
exit();
}
} else{
echo "Oops! Something went wrong. Please try again later.";
}
}
// Close statement
mysqli_stmt_close($stmt);
// Close connection
mysqli_close($conn);
} else{
// URL doesn't contain id parameter. Redirect to error page
header("location: error.php");
exit();
}
}
<h2>Update Record</h2>
<p>Please edit the input values and submit to update the record.</p>
<form action="<?php echo htmlspecialchars(basename($_SERVER['REQUEST_URI'])); ?> " method="post">
<div class="form-group <?php echo (!empty($name_err)) ? 'has-error' : ''; ?> ">
<label>Name</label>
<input type="text" name="name" class="form-control" value="<?php echo $name; ?> ">
<span class="help-block"><?php echo $name_err;?> </span>
</div>
<div class="form-group <?php echo (!empty($address_err)) ? 'has-error' : ''; ?> ">
<label>Address</label>
<textarea name="address" class="form-control"><?php echo $address; ?> </textarea>
<span class="help-block"><?php echo $address_err;?> </span>
</div>
<div class="form-group <?php echo (!empty($salary_err)) ? 'has-error' : ''; ?> ">
<label>Salary</label>
<input type="text" name="salary" class="form-control" value="<?php echo $salary; ?> ">
<span class="help-block"><?php echo $salary_err;?> </span>
</div>
<input type="hidden" name="id" value="<?php echo $id; ?> "/>
<input type="submit" class="btn btn-primary" value="Submit">
<a href="index.php" class="btn btn-default">Cancel</a>
</form>
Creating the Delete Page
// Process delete operation after confirmation
if(isset($_POST["id"]) && !empty($_POST["id"])){
// Include config file
require_once "config.php";
// Prepare a delete statement
$sql = "DELETE FROM employees WHERE id = ?";
if($stmt = mysqli_prepare($conn, $sql)){
// Bind variables to the prepared statement as parameters
mysqli_stmt_bind_param($stmt, "i", $param_id);
// Set parameters
$param_id = trim($_POST["id"]);
// Attempt to execute the prepared statement
if(mysqli_stmt_execute($stmt)){
// Records deleted successfully. Redirect to landing page
header("location: index.php");
exit();
} else{
echo "Oops! Something went wrong. Please try again later.";
}
}
// Close statement
mysqli_stmt_close($stmt);
// Close connection
mysqli_close($conn);
} else{
// Check existence of id parameter
if(empty(trim($_GET["id"]))){
// URL doesn't contain id parameter. Redirect to error page
header("location: error.php");
exit();
}
}
<h1>Delete Record</h1>
<form action="<?php echo htmlspecialchars($_SERVER["PHP_SELF"]); ?> " method="post">
<div class="alert alert-danger fade in">
<input type="hidden" name="id" value="<?php echo trim($_GET["id"]); ?> "/>
<p>Are you sure you want to delete this record?</p><br>
<p>
<input type="submit" value="Yes" class="btn btn-danger">
<a href="index.php" class="btn btn-default">No</a>
</p>
</div>
</form>
Creating the Error Page
<h1>Invalid Request</h1>
<div class="alert alert-danger fade in">
<p>Sorry, you've made an invalid request. Please <a href="index.php" class="alert-link">go back</a> and try again.</p>
</div>
header() Function
The header() function is an inbuilt function in PHP which is used to send a raw HTTP header.
The HTTP functions are those functions which manipulate information sent to the client or browser by the Web server, before any other output has been sent.
The PHP header() function send a HTTP header to a client or browser in raw form.
Before HTML, XML, JSON or other output has been sent to a browser or client, a raw data is sent with request (especially HTTP Request) made by the server as header information.
HTTP header provide required information about the object sent in the message body more precisely about the request and response.
void header( $header, $replace = TRUE, $http_response_code )
Parameters: This function accepts three parameters as mentioned above and described below:
It is important to notice that the header() function must be called before any actual output is sent!
$header: This parameter hold the header string.
There are two types of header calls.
The first header starts with string “HTTP/”, which is used to figure out the HTTP status code to send.
The second case of header is the “Location:”.
It is mandatory parameter.
$replace: It is optional parameter.
It denotes the header should replace previous or add a second header.
The default value is True (will replace).
If $replace value is False then it force multiple headers of the same type.
$http_response_code: It is an optional parameter.
It forces the HTTP response code to the specified value (PHP 4.3 and higher).
<?php
header("Content-type:application/pdf");
// It will be called downloaded.pdf
header("Content-Disposition:attachment;filename='downloaded.pdf'");
// The PDF source is in original.pdf
readfile("original.pdf");
?>
Send three HTTP headers to prevent page caching:
<?php
// Date in the past
header("Expires: Mon, 26 Jul 1997 05:00:00 GMT");
header("Cache-Control: no-cache");
header("Pragma: no-cache");
?>
Redirection in PHP can be done using the header() function.
To setup a simple redirect, simply create an index.php file in the directory you wish to redirect from with the following content:
< ?php header("Location: http://www.redirect.to.url.com/"); ?>
Where 'http://www.redirect.to.url.com/' is the URL you wish the users to be redirected too.
This can also be a file, like so:
<?php header("Location: anotherDirectory/anotherFile.php"); ?>
Files can be of any type including but not limited to HTML, python, php, cgi, perl, and compiled cgi programs.
Example
// Redirect the browser
header("Location: http://www.geeksforgeeks.org");
// The below code does not get executed while redirecting
exit;
Example
// Set a past date
header("Expires: Sun, 25 Jul 1997 06:02:34 GMT");
header("Cache-Control: no-cache");
header("Pragma: no-cache");
<html>
<body>
<!-- PHP program to display header list -->
<?php
print_r(headers_list());
?>
</body>
</html>
PHP $_REQUEST
PHP super global variable which is used to collect data after submitting an HTML form.
When a user submits the data by clicking on "Submit"
Then, we can use the super global variable $_REQUEST to collect the value of the input field:
<form method="post" action="?">
Name: <input type="text" name="fname">
<input type="submit">
</form>
<?php
if ($_SERVER["REQUEST_METHOD"] == "POST") {
// collect value of input field
$name = $_REQUEST['fname'];
if (empty($name)) {
echo "Name is empty";
} else {
echo $name;
}
}
?>
PHP createDocumentFragment
The DOMDocument::createDocumentFragment() function is an inbuilt function in PHP which is used to create a new document fragment.
example:
$dom = new DOMDocument(); // create new document
$body = $dom->appendChild($dom->createElement('body')); // create body
$p_fragment = $dom->createDocumentFragment(); // create fragment
$p_fragment->appendXml('<p>first</p>second'); // append content
$body->appendChild($p_fragment); // append fragment to body
echo $dom->saveHtml();
Output:
<body><p>first</p>second</body>
example:
create headings with fragments.
$dom = new DOMDocument(); // Create a new DOM Document
$dom->loadXML("<root/>"); // Create a root element
$fragment = $dom->createDocumentFragment(); // Create a Fragment
$fragment->appendXML("<h1>Heading 1</h1><h2>Heading 2</h2>"); // Append the XML
$dom->documentElement->appendChild($fragment); // Append the fragment
echo $dom->saveXML();
Output:
<root><h1>Heading 1</h1><h2>Heading 2</h2><h3>Heading 3</h3></root>
example:
create colored lines
// Create a new DOM Document
$dom = new DOMDocument('1.0', 'iso-8859-1');
$dom->loadXML("<root/>");
$fragment = $dom->createDocumentFragment();
$colors = ['red', 'green', 'blue'];
for ($i = 0; $i < 3; $i++) {
$fragment->appendXML(
"<div style='color: $colors[$i]'>This is $colors[$i]</div>");
$dom->documentElement->appendChild($fragment);
}
echo $dom->saveXML();
Output:
<?xml version="1.0"?>
<root>
<div style="color: red">This is red</div>
<div style="color: green">This is green</div>
<div style="color: blue">This is blue</div>
</root>
$divElm = $dom->createDocumentFragment();
$divElm->appendXML('<a href="select_user=4">Username');
$element->appendChild($divElm);
append source html to a DOMElement
createDocumentFragment()
appendXML()
appendChild($fragment)
Example
$dom = new DOMDocument(); //init
libxml_use_internal_errors(true); //disable libxmlerrors
//if you are getting a string from the database then use loadHTML($htmlcode)
$dom->loadHTMLFile("http://www.codepunker.com"); // load the codepunker
$all_h3s = $dom->getElementsByTagName('h3'); // get all h3 tags
foreach ($all_h3s as $h3) {
$h3->appendChild( $dom->createTextNode(' (This text was modified) ') ); //append a text node to every h3 in the DOM
}
$out = $dom->saveHTML(); //save the changes
var_dump( $out );
getElementsByTagName
$img = $dom->getElementsByTagName('img')->item(0);
echo $img->attributes->getNamedItem("src")->value;
Echo $_POST
<pre>
<?php var_dump($_POST); ?>
</pre>
call a PHP function on click of button
cannot call PHP functions like clicking on a button from HTML
because HTML is on the client side while PHP runs server side.
they run at different stages.
achieve this by using Ajax:
<input type="submit" class="button" name="insert" value="insert" />
<input type="submit" class="button" name="select" value="select" />
jQuery:
$(document).ready(function(){
$('.button').click(function(){
var clickBtnValue = $(this).val();
var ajaxurl = 'ajax.php',
data = {'action': clickBtnValue};
$.post(ajaxurl, data, function (response) {
// Response div goes here.
alert("action performed successfully");
});
});
});
In ajax.php
if (isset($_POST['action'])) {
switch ($_POST['action']) {
case 'insert':
insert();
break;
case 'select':
select();
break;
}
}
function select() {
echo "The select function is called.";
exit;
}
function insert() {
echo "The insert function is called.";
exit;
}
another example:
$('.button').click(function() {
$.ajax({
type: "POST",
url: "some.php",
data: { name: "John" }
}).done(function( msg ) {
alert( "Data Saved: " + msg );
});
});
In PHP file:
function abc($name){
// Your code here
}
or do it like as in the code php snippet below.
php
if ($_GET) {
if (isset($_GET['insert'])) {
insert();
} elseif (isset($_GET['select'])) {
select();
}
}
function select()
{ echo "The select function is called."; }
function insert()
{ echo "The insert function is called."; }
Build CRM in PHP and MySQL
We'll be creating a simple CRM system for salespeople to:
Access their tasksView their leadsCreate new tasks for each leadCreate new opportunityClose a sale
Sales managers will be able to:
Manage all customersManage sales teamView current sales activities
Download Demo Files
Building Blocks of a CRM
Here is a list of the essential components of the CRM:
Leads: initial contactsAccounts: Information about the companies you do business withContact: Information about the people you know and work with.
Usually, one account has many contactsOpportunities: Qualified leadsActivities: Tasks, meetings, phone calls, emails and any other activities that allow you to interact with customersSales: Your sales teamDashboard: CRM dashboards are much more than just eye candy.
They should deliver key information at a glance and provide links to drill down for more details.Login: Salespeople and managers have different roles in the system.
Managers have access to reports and sales pipeline information.
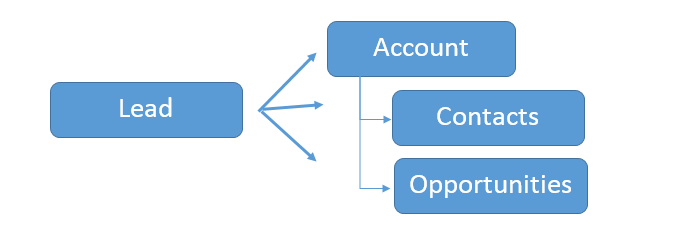
System Requirements
PHP 5.3+,MySQL or MariaDBphpGrid
Create CRM Database
We will start by creating our custom CRM database.
The main tables we will be using are:
contact — contains basic customer datanotes — holds information collection from Contact by sales people.users — information about sales people
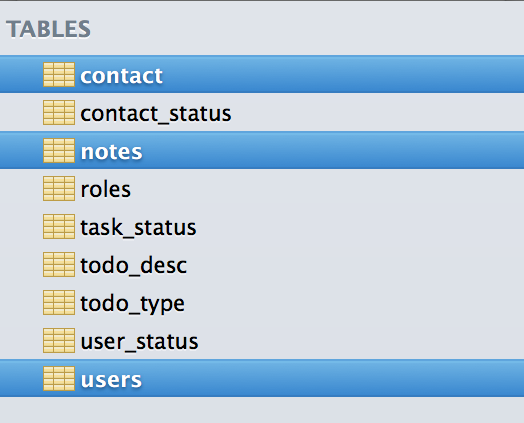 The Contact table contains basic customer information including names, company addresses, project information, and so forth.
The Notes table stores all sales activity information such as meetings and phone calls.
The Users table holds login information about users of the system such as usernames and passwords.
Users can also have roles, such as Sales or Manager.
All other tables are lookup tables to join to the three main relational database tables.
The Contact table contains basic customer information including names, company addresses, project information, and so forth.
The Notes table stores all sales activity information such as meetings and phone calls.
The Users table holds login information about users of the system such as usernames and passwords.
Users can also have roles, such as Sales or Manager.
All other tables are lookup tables to join to the three main relational database tables.
contact_status — contains contact status such as Lead and Opportunity.
Each indicates a different stage in a typical sales cycletask_status — the task status can be either Pending or Completeduser_status — a sale person can be Active or Inactivetodo_type — a type of task either Task or Meetingtodo_desc — description of a task such as Follow Up Email, Phone Call, and Conference etc.roles — a user can be either a Sales Rep or a Manager
Complete Database Schema Diagram
A database schema is the structure that represents the logical view such as tables, views, or primary and foreign keys of the entire database.
A database schema includes entities and the relationship among them.
It is a good practice to have one primary key for each table in a relational database.
A primary key is a unique identifier for each record.
It can be the social security number (SSN), vehicle identification number (VIN), or auto-increment number.
This is a unique number that is generated when a new record is inserted into a table.
Below is the database diagram of our simple CRM.
The key symbol in each table represents the table primary key.
The magnifying glass indicates foreign key linking another table in the database.
Sometimes we call it the “lookup” table.
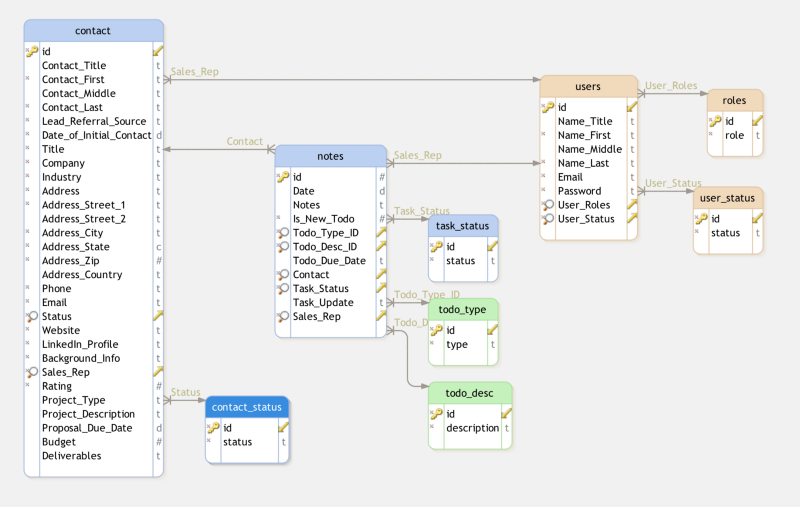
install.sql
Once you have an understanding of the database table structure, find the “install.sql” script in the db folder and use a MySQL tool such as MySQL Workbench or Sequel Pro to run the SQL script.
It should create a new relational database named custom_crm and its database tables.
A Side Note on ZenBase
The CRM application is also one of the many application templates readily available at ZenBase (built on the top of phpGrid) for anyone — with or without coding skills — to use and customize for their own needs.
Our CRM contains many datagrids.
The datagrid is a spreadsheet-like data table that displays rows and columns representing records and fields from the database table.
The datagrid gives the end-user ability to read and write to database tables on a webpage.
We can use a datagrid tool from phpGrid.
We use a tool instead of building them from scratch because developing the datagrid is usually tedious and error-prone.
The datagrid library will handle all internal database CRUD (Create, Remove, Update, and Delete) operations for us with better and faster results with little code.
To install phpGrid, follow these steps:
Unzip the phpGrid download file.Upload the phpGrid folder to the phpGrid folder.Complete the installation by configuring the conf.php file.
Before we begin coding, we must specify the database information in conf.php, the phpGrid configuration file.
Here is an example of database connection settings:
PHPGRID_DB_HOSTNAME — web server IP or host namePHPGRID_DB_USERNAME — database user namePHPGRID_DB_PASSWORD — database passwordPHPGRID_DB_NAME — database name of our CRMPHPGRID_DB_TYPE — type of databasePHPGRID_DB_CHARSET — always ‘utf8' in MySQL
To learn more about configuring phpGrid, check out phpGrid complete installation guide.
Page Template
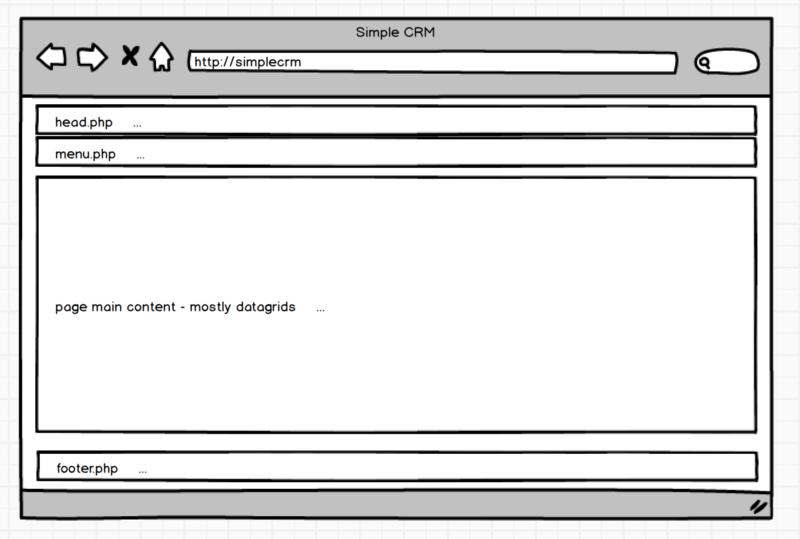 Before we can start building our first page of the CRM, it is a good practice to make the reusable page items such as header and footer.
The page will comprise of a header, menu, body and footer.
We will start by creating a reusable page template.
Before we can start building our first page of the CRM, it is a good practice to make the reusable page items such as header and footer.
The page will comprise of a header, menu, body and footer.
We will start by creating a reusable page template.
head.php
This is a basic HTML5 template header.
It includes a link to a custom stylesheet that will be created in a later step.
menu.php
 Notice the usage of $_GET['currentPage'].
Each page will set a value which will highlight the name of the current page on the top menu bar.
Include the following code in style.css for menu styling (minified).
It will transform the above, unordered list into a menu.
Notice the usage of $_GET['currentPage'].
Each page will set a value which will highlight the name of the current page on the top menu bar.
Include the following code in style.css for menu styling (minified).
It will transform the above, unordered list into a menu.
footer.php
Simple closing body and html tags.
Complete Page Template
This is the complete page template.
The main content will go after Section Title.
CRM Main Pages
Are you still with me? Good! We can now finally develop the first page in our CRM.
Our CRM for the sales team members has four pages:
TasksLeadsOpportunitiesCustomers/Won
Each page indicates a different stage in a typical sales cycle.
Sale People Page Design Mockup
Here's our CRM design mockup for the sales people.
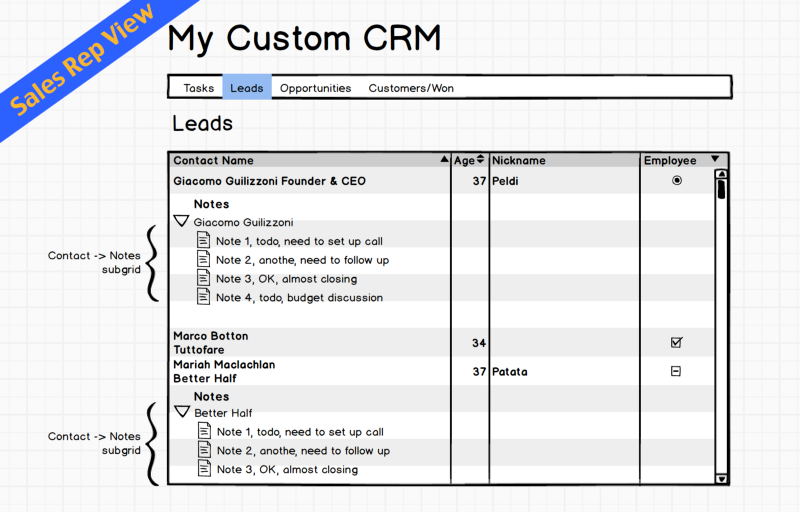
Tasks Page
When a sales team member logged in, the first page he sees is a list of current tasks.
As you may recall, our Notes table holds all the sales activity information.
We can create a datagrid and populate it from the Notes table using phpGrid.
The Tasks page main content is a datagrid.
The following two lines will give us a list of tasks of the current sales person.
The first line creates a phpGrid object by passing the SELECT SQL statement, its primary key — ID, and then the name of the database table - notes.The second and the final line calls display() function to render the datagrid on the screen.
Check out the basic datagrid demo for more detail.
Leads Page
The leads page contains list of current leads that the sales person is responsible for.
Each Lead can have one or many Notes.
We will use the phpGrid master-detail feature for that.
We also need to use set_query_filter() to display only the leads, Status = 1, and only for the current sales person.
Contact status table

Opportunities Page
A Lead becomes an Opportunity once it is qualified.
The Opportunities page is similar to the Leads page.
The only difference is the filtered status code in set_query_filter is Status = 2.
Customers/Won Page
Customers/Won has the Status = 3.
Similar to Leads and Opportunities, Customers/Won can also have Notes.
That's all there is to it for sales people in our simple CRM.
Manager Dashboard
The sales manager will have access to all records in the sales pipeline as well as the ability to manage sales team and customer data.
We will have a single web page with tabbed menu similar to the phpGrid tabbed grid demo.
Manager Dashboard Design Mockup
My Sales Reps

Main content
Each tab represents a table in the CRM database.
$_GET['gn'] will store the table name.
It dynamically generates the datagrid based on table name passed.
It's very easy to integrate jQueryUI Tabs with phpGrid.
Please refer to the phpGrid Tabbed Grid demo for more information.
My Sales Rep Page
Since a sales manager needs to quickly find out whom a sale person is working with, we added a detail grid $sdg populated from contact table and link with the master grid.
sales_rep is the connecting key in contact table to the id that is the foreign key in users table.
Remember the users stores all of our sales people information.
Screenshots
CRM — Sales Screen
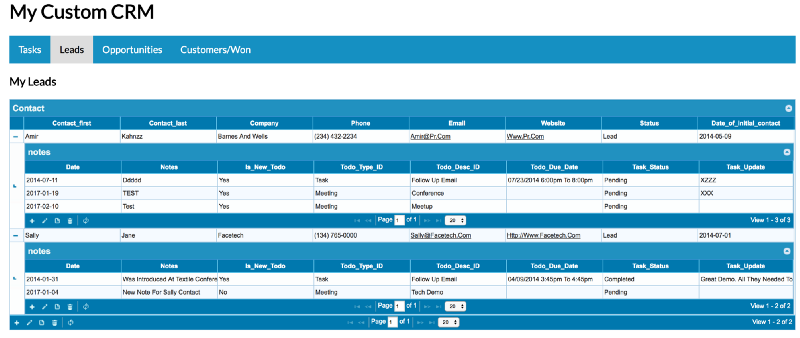
CRM — Manager Screen
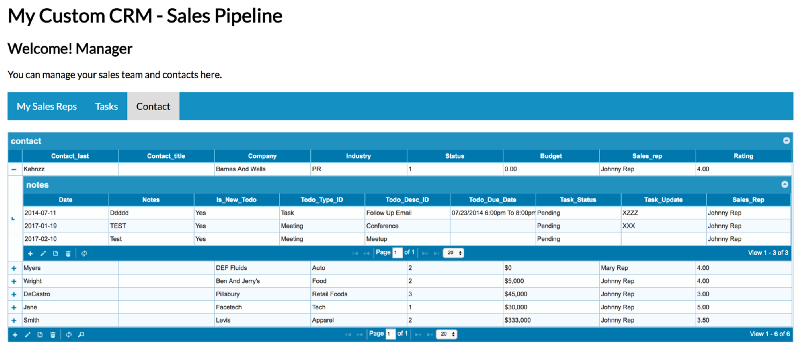
Live Demo
CRM Sales Rep Screen | CRM Managers screen
Need to Write Even Less Code?
If you are new to programming and are not yet comfortable with coding, you may want to check out ZenBase that is built on the top of the phpGrid.
The CRM is but one of the many application templates readily available at ZenBase for anyone — with or without coding skills — to use and customize for their own needs.
Complete Source Code on GitHub
phpcontrols/phpgrid-custom-crm
phpgrid-custom-crm - Custom CRM Demo - Learn to build yourself a custom CRM in PHP and MySQL, which a sales team can…github.com
PHP - MySQL Login
Config.php
Config.php file is having information about MySQL Data base configuration.
define('DB_SERVER', 'localhost:3036');
define('DB_USERNAME', 'root');
define('DB_PASSWORD', 'rootpassword');
define('DB_DATABASE', 'database');
$db = mysqli_connect(DB_SERVER,DB_USERNAME,DB_PASSWORD,DB_DATABASE);
Login.php
Login PHP is having information about php script and HTML script to do login.
include("config.php");
session_start();
if($_SERVER["REQUEST_METHOD"] == "POST") {
// username and password sent from form
$myusername = mysqli_real_escape_string($db,$_POST['username']);
$mypassword = mysqli_real_escape_string($db,$_POST['password']);
$sql = "SELECT id FROM admin WHERE username = '$myusername' and passcode = '$mypassword'";
$result = mysqli_query($db,$sql);
$row = mysqli_fetch_array($result,MYSQLI_ASSOC);
$active = $row['active'];
$count = mysqli_num_rows($result);
// If result matched $myusername and $mypassword, table row must be 1 row
if($count == 1) {
session_register("myusername");
$_SESSION['login_user'] = $myusername;
header("location: welcome.php");
}else {
$error = "Your Login Name or Password is invalid";
}
}
<form action = "" method = "post">
<label>UserName :</label><input type = "text" name = "username" class = "box"/><br /><br />
<label>Password :</label><input type = password" name = "password" class = "box" /><br/><br />
<input type = "submit" value = " Submit "/><br />
</form>
<div><?php echo $error; ?> </div>
welcome.php
After successful login, it will display welcome page.
include('session.php');
<a href = "logout.php">Sign Out</a>
Logout page
Logout page is having information about how to logout from login session.
session_start();
if(session_destroy()) {
header("Location: login.php");
}
session.php
Session.php will verify the session, if there is no session it will redirect to login page.
include('config.php');
session_start();
$user_check = $_SESSION['login_user'];
$ses_sql = mysqli_query($db,"select username from admin where username = '$user_check' ");
$row = mysqli_fetch_array($ses_sql,MYSQLI_ASSOC);
$login_session = $row['username'];
if(!isset($_SESSION['login_user'])){
header("location:login.php");
die();
}
Creating HTML form depending on database fields
The first step is to obtain the table's column information thru the use of DESCRIBE.
And then query it like any normal query.
Example:
$db = new mysqli('localhost', 'username', 'password', 'database');
$query = $db->query('DESCRIBE `TBLUSERS`'); // TBLUSERS is table name
$fields = array();
while($row = $query->fetch_assoc()) { $fields[] = $row['Field']; }
<form id="generate-form" type="POST">
<?php foreach($fields as $field): ?>
<label>
<?php echo "$field: "; ?>
<input type="text" name="<?php echo $field; ?> " />
</label><br/>
<?php endforeach; ?>
<input type="submit" name="submit" />
</form>
Handling checkbox in a PHP form
Handling checkbox in a PHP form processor
Get $_POST from multiple checkboxes
Set the name in the form to check_list[] and you will be able to access all the checkboxes as an array($_POST['check_list'][]).
Here's a little sample as requested:
<form action="test.php" method="post">
<input type="checkbox" name="check_list[]" value="value 1">
<input type="checkbox" name="check_list[]" value="value 2">
<input type="checkbox" name="check_list[]" value="value 3">
<input type="checkbox" name="check_list[]" value="value 4">
<input type="checkbox" name="check_list[]" value="value 5">
<input type="submit" />
</form>
<?php
if(!empty($_POST['check_list'])) {
foreach($_POST['check_list'] as $check) {
echo $check; //echoes the value set in the HTML form for each checked checkbox.
//so, if I were to check 1, 3, and 5 it would echo value 1, value 3, value 5.
}
}
?>
make a PHP session expire upon browser tab close
A PHP session is a cookie-based reference to a given user.
You store a cookie on the user's computer that identifies them as X, then you save information as that X.
This is valuable if, for instance, a user closes their browser or goes to a different IP address.
If you want them to lose session without a browser, you can just send information along with the page - once they close the tab or page it will just die with them.
Otherwise, if you want to keep sessions in the mix, just time them and refresh - if a user doesn't navigate anywhere within, say, 10 minutes, you can go from there.
Session expiration is easy - something like
if (isset($_SESSION["LAST_ACTIVITY"]) && (time() - $_SESSION["LAST_ACTIVITY"] > [time in seconds you want to expire])) {
session_destroy();
session_unset();
}
$_SESSION['LAST_ACTIVITY'] = time(); // update last activity time stamp
at the top of your shared file.
You could also use some javascript to detect them closing the tab - this is a bit tricky since some browsers use "window.onbeforeunload" while others have different indicators - you'd want to test this on your target browsers before you went live with it.
use logout page to leave
<?php
session_start();
session_destroy();
header ("Location: login.php");
?>
To remove all global session variables and destroy the session, use session_unset() and session_destroy():
// remove all session variables
session_unset();
// destroy the session
session_destroy();
Unset Session When browser tab is closed
set an expiration time for the session data, test it with each session_start call and destroy the session if it’s expired:
session_start();
if (!isset($_SESSION['EXPIRES']) || $_SESSION['EXPIRES'] < time()+3600) {
session_destroy();
$_SESSION = array();
}
$_SESSION['EXPIRES'] = time() + 3600;
2) destroy session when broswer tab closed
implement a session timeout with own method.
Use a simple time stamp that denotes the time of the last request and update it with every request:
You need to code something similar to this
if (isset($_SESSION['LAST_ACTIVITY']) && (time() - $_SESSION['LAST_ACTIVITY'] > 1800)) {
// request 30 minates ago
session_destroy();
session_unset();
}
$_SESSION['LAST_ACTIVITY'] = time(); // update last activity time
3) How to change the session timeout in PHP?
session_start(); // ready to go!
$now = time();
if (isset($_SESSION['discard_after']) && $now > $_SESSION['discard_after']) {
// this session has worn out its welcome; kill it and start a brand new one
session_unset();
session_destroy();
session_start();
}
// either new or old, it should live at most for another hour
$_SESSION['discard_after'] = $now + 3600;
4) The unload event is sent to the window element when the user navigates away from the page.
This could mean one of many things.
The user could have clicked on a link to leave the page, or typed in a new URL in the address bar.
The forward and back buttons will trigger the event.
Closing the browser window will cause the event to be triggered.
Even a page reload will first create an unload event.
$( window ).unload(function() {
//use ajax to call another page to session_destroy();
});
Question is: What if the user has two or more tabs open on your site? If they close one tab, the other one would effectively be logged out.
You got my +1 for the great explanation with cases.
Generally speaking, I'm negatively surprised that contemporary browsers don't have a mechanism for this: when I close the tab of such website, EVERY SESSION must destroy, like if I had closed the browser.
I see bad behaviors on this side, e.g. Paypal, in fact, if you close the tab and you open again paypal, you are still logged in, same in google/gmail, on gmail is even worse though, if you don't logout, you are logged in FOREVER EITHER if you don't ask for that.
Try on any third computer either after some days.
REMEMBER TO LOGOUT!! :-)
correct name for <<<
It's called a heredoc.
$message = "
<<< EOF
Huge long text here
EOF;
";
php short hand
<div class="box" style="background-color:<?=$permacolour?> ">
<?php ?> is a perfectly acceptable syntax for this
Also, the <?= in this example is a short hand way of writing <?php echo
And requires short tags be enabled in PHP's ini file!
PHP includes a short echo tag <?= which is a short-hand to the more verbose <?php echo.
PHP also allows for short open tag <? (which is discouraged since it is only available if enabled using the short_open_tag php.ini configuration file directive, or if PHP was configured with the --enable-short-tags option).
Debug PHP and JavaScript code at the same time with PhpStorm
We can also debug the JavaScript running in the browser by starting a JavaScript debugging session from the IDE.
This tutorial provides an overview of how you can debug PHP and JavaScript code simultaneously from within PhpStorm.
Before you start
Before you start debugging, make sure that you have a debugging engine installed and configured properly.
PhpStorm supports debugging with two most popular tools:Xdebugand Zend Debugger.
These tools cannot be used simultaneously because they block each other.
To avoid this problem, you need to update the corresponding sections in the php.ini file as described in Configure Xdebug and Configure Zend Debugger.
Open the active php.ini file in the editor:
In the Settings/Preferences dialog Ctrl+Alt+S, click PHP under Languages & Frameworks .
On the PHP page that opens, click  next to the CLI Interpreter field.
In the CLI Interpreters dialog that opens, the Configuration File read-only field shows the path to the active php.ini file.
Click Open in Editor .
Next, install PhpStorm debugging bookmarklets or one of theBrowser debugging extensions, and the JetBrains Chrome extension extension as described in Live Edit in HTML, CSS, and JavaScript.
next to the CLI Interpreter field.
In the CLI Interpreters dialog that opens, the Configuration File read-only field shows the path to the active php.ini file.
Click Open in Editor .
Next, install PhpStorm debugging bookmarklets or one of theBrowser debugging extensions, and the JetBrains Chrome extension extension as described in Live Edit in HTML, CSS, and JavaScript.
Listening for incoming debugger connections
In PhpStorm, enable listening to incoming debug connections by either clicking  on the toolbar or selecting in the main menu.
This will ensure PhpStorm reacts when a debugging session is started and opens the Debug tool window automatically.
Before launching the script, make sure that either a breakpoint is set or the Break at first line in PHP scripts option is enabled on the Debug page of the Settings/Preferences dialog Ctrl+Alt+S.
on the toolbar or selecting in the main menu.
This will ensure PhpStorm reacts when a debugging session is started and opens the Debug tool window automatically.
Before launching the script, make sure that either a breakpoint is set or the Break at first line in PHP scripts option is enabled on the Debug page of the Settings/Preferences dialog Ctrl+Alt+S.
Start the JavaScript debugger
Depending on your preference or application requirements, you can use the PhpStorm's built-in webserver to run our application locally, or make use of any other web server running either locally or on a remote machine.
Use the built-in web server
The JavaScript debugger in PhpStorm can be started from the editor or from the Project tool window by means of the context menu command.
If the selected file is a PHP file, two entries will be available.
It is important to select the first one marked with  , which will start the JavaScript debugger.
 Once started, we can place breakpoints in JavaScript code and use the JavaScript debugger.
Use an external web server
When using a local web server, such as apache or Nginx, or when developing on a remote web server, a Vagrant or a Docker machine, we can start the JavaScript debugger using a run/debug configuration.
Create a Run/Debug configuration
Do any of the following:
Select Edit configurations... on the PhpStorm toolbar
Select from the main menu.
In the Run/debug configurations dialog dialog that opens, click  on the toolbar and add a new JavaScript Debug configuration.
Enter the full URL to the page we want to debug on the web server.
Optionally, provide some mappings so PhpStorm can determine where to find local files relative to the remote URL.
This is only required when we have a different project structure locally and on the remote server.
Note that if you are deploying PHP applications with PhpStorm, mappings will be reused from the deployment configuration.
on the toolbar and add a new JavaScript Debug configuration.
Enter the full URL to the page we want to debug on the web server.
Optionally, provide some mappings so PhpStorm can determine where to find local files relative to the remote URL.
This is only required when we have a different project structure locally and on the remote server.
Note that if you are deploying PHP applications with PhpStorm, mappings will be reused from the deployment configuration.
![]()
Once the configuration is created, you can start the JavaScript debugging session from the PhpStorm toolbar:
![]()
Start a PHP debugging session from the browser
We'll follow the Zero-configuration debugging approach.
In the browser, we can use PhpStorm debugging bookmarklets or one of the Browser debugging extensions to start a PHP debugging session.
This will instruct the PHP server to make a connection to PhpStorm and open the debugger.
Note that the IDE may initially ask you to provide the necessary path mappings.
Once the debugger is attached, we will be able to debug both JavaScript and PHP at the same time.
PhpStorm will switch between the debuggers as necessary.
Launch the JavaScript and PHP debugger at the same time
In the previous steps, we started the JavaScript and PHP debugger separately.
When using Xdebug, we canpass a XDEBUG_SESSION_START URL parameter to our server to start PHP debugging simultaneously with JavaScript debugging.
We can do this using a customized run/debug configuration.
Create the run/debug configuration as you've done earlier,and make sure to append the XDEBUG_SESSION_START=some-session-name URL parameter,for example, ?XDEBUG_SESSION_START=phpstorm :
![]()
Troubleshooting
I cannot place breakpoints in the JavaScript parts of a php file
Currently, setting both PHP and JavaScript breakpoints in one file is not supported.
For example, no JavaScript breakpoints can be set in the following code:
<?php
// ...
?> <!doctype html>
<html lang="en">
<head>
<script>
/* javascript code */
</script>
</head>
<body>
</body>
</html>
To be able to debug the PHP and JavaScript code simultaneously, move the JavaScript code into a separate .js file and reference it from HTML:
<?php
// ...
?> <!doctype html>
<html lang="en">
<head>
<script src="index.js"></script>
</head>
<body>
</body>
</html>
We can then place PHP breakpoints in the php file, and set JavaScript breakpoints in the .js file.
How to debug PHP scripts
Some basic errors that programmer do while programming in PHP which are:
Missing Semicolon “;” and closing brackets “}”.
To debug the above errors, using a good PHP ide will be very helpful as it will suggest the closing bracket “}” and end of statement by “;”.
Misspelling a variable name.
Remember $var != $Var as we know, PHP is a case sensitive language.
Using “=” instead of “==” (Assignment operator and Equal operator)
Example:
if($a = $b) { // Statement}
This will always result in True as it is never an error to assign one variable to another.
Missing quotes in SQL queries like ‘ ‘ and ” “.
This is a very common and frequent error that occurs while PHP programming.
To debug this kind of error always use mysqli_error($con) command with echo to see what error you are doing in SQL statements where $con is the connection variable that you are using.
Example:
if (!mysqli_query($conn, $sql)) {
echo "Error: " . $sql . " " . mysqli_error($con);
}
If your PHP script produces no output while running then make sure that “display_errors” is set to on in php.ini file.
“Parse Error” – This error occurs when your code is not understood by PHP.
This error generally occurs with a syntax error.
“Misunderstanding isset() behavior” – Despite its name, isset() not only returns false if an item does not exist but also returns false for null values.
This behavior is more problematic than it might appear at first and is a common source of problems.
Example:
$data = fetchRecordFromStorage($storage, $identifier);
if (!isset($data['keyShouldBeSet']) {
// do something here if 'keyShouldBeSet' is not set
}
The author of this code presumably wanted to check if keyShouldBeSet was set in $data.
But, as discussed, isset($data[‘keyShouldBeSet’]) will also return false if $data[‘keyShouldBeSet’] was set, but was set to null.
So the above logic is flawed.
One common error is missing PHP closing before using HTML commands.
So always close PHP with “?> ”and then write HTML code and after ending HTML code use “<?php ” to again start php coding.
PHP debugging tools: PHP code can be debug using one of many debugging tools to attach a debugger client.
PhpStorm works with debug utilities like Xdebug and ZendDebugger.
Being a polyglot (knowing or using several languages), we need an IDE that supports multiple languages.
The Xdebug with Visual Studio is used in the past, so let’s see how to set it up with the VS Code.
The debug server setup is the same, but each client (IDE or CLI) will have a slightly different setup.
See the debug server (a Zend extension) opens a port, and the client communicates with the server through that port.
It is just a matter of configuration and installing the right components.
Here are the steps to doing PHP programming:
Check for PHP extensions in VS Code.
Install the PHP Debug extension.
Click “reload” to reload VS Code.
Install Xdebug.
The PHP Debug extension for VS Code is only integration to Xdebug.
If we install PHP 7.0 then it must get the right version of Xdebug from the download page.
Now when you have the right version, put it in the PHP/ext directory.
Next, you need to configure PHP to use the extension and allow remote debugging.
Add the following configuration to the php.ini file that’s listed in PHP Info:
; set the extension path
zend_extension="C:/Program Files
(x86)/PHP/v7.0/ext/php_xdebug-2.6.1-7.0-vc14-nts.dll"
; allow remote debugging
[XDebug]
xdebug.remote_enable = 1
xdebug.remote_autostart = 1
It will set up the PHP server to use XDebug.
The steps here are the same no matter what IDE you use.
Xdebug opens an HTTP port so that your debugger can attach.
The client still needs to be configured to attach and use the debugging protocol.
Finally, configure VS Code to connect to Xdebug.
There are a few simple steps and then attaching is automatic.
Configuring your IDE: After installing Xdebug, you need to configure IDE to attach to the debugger.
In VS Code, this means adding a debug configuration.
Fortunately, it is automatic at this point.
It’s just a few simple steps:
Switch to the debug view.
Click the gear to bring up the languages menu.
Select PHP.
Visual Studio Code will generate the default configuration.
Reload the PHP server.
We have to install another extension called “PHP Server” that makes this simple.
Use the context menu (right-click) to control the PHP server.
It puts the IDE in a state which is ready to attach to Xdebug.
Communications with the debugger happen through a TCP port on the debug server.
Xdebug uses the DBGp protocol through port 9000 by default.
Attaching a debugger: The PHP Debug extension for VS Code generated a launch.json file.
That file goes into a .vscode directory in the root of the project.
{
// Use IntelliSense to learn about possible attributes.
// Hover to view descriptions of existing attributes.
// For more information, visit: https://go.microsoft.com/fwlink/?linkid=830387
"version": "0.2.0",
"configurations": [
{
"name": "Listen for XDebug",
"type": "php",
"request": "launch",
"port": 9000
},
{
"name": "Launch currently open script",
"type": "php",
"request": "launch",
"program": "${file}",
"cwd": "${fileDirname}",
"port": 9000
}
]
}
It’s adding two launch configurations.
Those are available in the debug view.
We can either attach to a running server or launch a new one with the current script.
Since I have phpinfo running already, I will start there by choosing Listen for XDebug to attach to that server.
Once you are attached, you will see the debug toolbar.
Most debuggers have a similar control mechanism which allows to start, stop, step, and restart debugger.
Switching error reporting level: PHP has a few ways to configure error reporting.
You can use the php.ini file and you have to access it.
Otherwise, you might use the htaccess configuration.
If you can’t use configuration files, you have the option of changing the values via a script.
A combination of settings will get the right levels of error logging.
You want to consider the following settings:
error_reporting sets the level of logging.
E_NOTICE is useful during development since it will tell about defects such as unassigned variables.
display_errors is used to display the error messages.
display_startup_errors should only be used when debugging.
log_errors and error_log work together to send errors to a log file.
Do this in production rather than displaying them to end users.
The PHP manual spells out these settings in more detail and provides more information.
JSON_NUMERIC_CHECK
Encodes numeric strings as numbers.
$DATAS = array( array('tel' => '0606060606'), array('tel' => '0707070707') );
echo json_encode($DATAS, JSON_NUMERIC_CHECK);
[{"tel":606060606},{"tel":707070707}]
PHP Tips for Developers
1) Go OOP
If you have not yet entered the realm of Object Oriented Programming, then you are at a disadvantage, and you are falling behind fast.
OOP is essentially a method of programming with the use of classes, or Objects, which tie like things together, remove the need for repetition of
code and perform the basic tasks of production very simply.
Objects are essentially classes that collect a bunch of functions together and wrap them
in a wrapper that can be reused over and over again without the need to rewrite functionality or procedures every time you need to do something.
Procedural Programming works by following a routine from the top to the bottom of each page as the server reads every file on your server.
With OOP,
there could be one or two objects being instantiated, which, in turn could instantiate a few, a hundred or a thousand other objects which could all perform certain
tasks depending on variables passed into the objects.
OOP is faster, simpler, easier to debug, uses less server resources, less code, is faster loading and more logical
to work with once you figure out the basic principles.
Go OOP - It changed my development style forever.
2) Stay Away from Anything Ending With _once()
We all know that include() simply gives us a warning if it fails, while require() kills the script with a fatal error when it fails.
What we don't forget is that include_once()
and require_once() is extremely hard on server resources.
There is nothing we can do about it, it's how PHP is set up.
Just remember that these things kill your server resources,
specially on a huge framework, and if you plan your code properly you won't even need it anyway.
3) Develop With Error Reporting On
The very first thing you do when starting a new project is to turn error reporting to E_ALL, and you should only turn it off ten seconds before going to production mode.
I do this with every project that I build and there is nothing better than running a project in full production mode and not even getting one error.
Besides that, with error reporting
on, you pick up any small errors that will eventually grow up to bite you in the...
well, you get my point.
4) Use A Framework If You Need One
Ok, so Rasmus Lerdorf says you shouldn't use a framework because he could quite conclusively prove that a framework is much slower than normal PHP code when it came to printing
a simple "Hello World" application.
Two things to mention here though: you are not Rasmus Lerdorf and I bet you won't be building a "Hello World" application every time you program
something.
Frameworks that help you do the tedious things can help, although you will have to learn how the frameworks function first in order to make things simple, but that's the only
real trade-off.
Plus you stand less chance of writing bad code when someone else has written most of it for you, but let's pretend I didn't say that.
5) Use PHP's Inbuilt Functions
Ok, you want to count the amount of keys in an array? You can loop through the array and simply increment a value for each iteration, right? Or you can just use the built in PHP
function count(), which does just what it should.
PHP has many built-in functions that can do what you need them to, so check out the manual to make sure you are doing it in the best way possible.
6) Protect Your Database
The best and safest way is to use mysql_real_escape_string() for all database before it is added to the database.
This function makes all strings safe in terms of quotes and other functions
that can harm your database or contain malicious code, so use it to be sure you have taken the first step against protection of your data.
Another thing you can do is validate all POST and GET
strings, never use $_REQUEST, and make sure all form submitted data is of the right type and value before adding it to a database query.
7) Use POST Not GET
Ok, this isn't always possible, but when its really not necessary, don't use GET, use POST.
The reason is simple - GET is simple to emulate, all I need to do is add something to my address
bar and I can hack your project.
Obviously GET is the easy way to do pagination and permalinks, but when using form submission especially, stay with POST, it's safer.
8) Draw Before You Code
A good practice to get into is to wireframe your projects, even if you are just scribbling a few notes on a piece of paper.
It is very important to actually give the mechanics of you application
some thought before sitting down to start coding, because in the process of planning it you will actually iron out the difficulties in your head and avoid the major headache that comes with the
facepalm when you realize that everything you just did is either wrong, not needed, or just silly.
9) Understand Your Project
An artist cannot draw something that he has not seen before.
A singer cannot sing a song that he has not heard before.
You cannot code a project that you do not fully understand.
If you do not understand exactly what it needs to do, and how it needs to it, you cannot build it.
10) Code Code Code
If I could get one thing through to anyone reading this, this is it.
You cannot become a good developer by reading.
You cannot become a good developer by watching someone develop.
The one and only tried and trusted method, is to actually write code.
But - and here is the trick - build real things! Do not go and code something that you have no interest in, or will never use.
Build what you like, and you will be excited and interested by it, and you will learn.
Then, make it awesome, build upon it, and make it better.
Advanced PHP Tips And Tricks
Develop with error reporting enabled
Error reporting feature, an important feature in PHP website, is one of the best Useful PHP trick for Developers. The best thing to cope with errors is to set the system to display errors. To set the settings you have to alter the php.ini file when you develop your site. Include these two lines in the beginning.
error_reporting ( E_ALL ) ;
ini_set ( 'display_errors' , 1 ) ;
error_reporting ( E_ALL ) ;ini_set ( 'display_errors' , 1 ) ;
The following code helps you to see both types of errors whether the fatal errors that produce the dreaded white screen as warnings and notices that may be bugs to fix.
Prevents SQL injection
Security holes are the biggest cause of the bad reputation of PHP but PHP tips for website development are here.
There are many ways to avoid SQL injection but the simplest one escapes any variable that we will use in the database. The code should look like this:
$query_result = mysql_query ( "SELECT * FROM WHERE Ex_table ex_field = \" " . mysql_real_escape_string( $ ex_field ) . " \ " " ) ;
$query_result = mysql_query ( "SELECT * FROM WHERE Ex_table ex_field = \" " . mysql_real_escape_string( $ ex_field ) . " \ " " ) ;
Use the _once() function with caution
PHP developers prefer using include() or function require() to call other files, libraries or classes, but using the include_eleven() and require_eleven(), are the PHP tricks for web developer. Both the functions have the same functionality but the advantage is that it prevent the files, classes or loaded libraries to be loaded again which cause duplication and undesired states in the code.
Learn to handle ternary operators
The best PHP tips and trick for good performance is to use ternary operators as an alternative to simple IF constructions. For instance:
$age = ( !empty ( $ _ GET [ 'age ] ) ? $ _ GET [ 'age' ] : 58 ) ;
$age = ( !empty ( $ _ GET [ 'age ] ) ? $ _ GET [ 'age' ] : 58 ) ;
This would help your code to get lighter and can be nested without problems.
Retire the MySQL driver
This is 2017 and the technology that we are using is advanced now this is the time for PHP7. A high time to retire your MySQL database and start using PDO. A PHP extension that helps you to connect with different other managers databases.
A very important feature of MySQL driver is MySQL Connector/Python that supports almost all features provided by MySQL version 5.7. Designed specifically to MySQL, MySQL Connector/Python lets you translate the parameter’s value between Python and MySQL data types. Obviously, PHP works other than MySQL too. As a PHP web developer, this tip is one of the best PHP tips and tricks for me for website development with PHP. The code to connect with databases is:
try {
$conn = new PDO ( "mysql: host = localhost; dbname = database ' , $ user , $ pass ) ;
$conn -> setAttribute ( PDO :: ATTR_ERRMODE , PDO :: ERRMODE_EXCEPTION ) ;
} Catch ( PDOException $e ) {
Echo "ERROR:" . $e -> getMessage ( ) ;
}
try {$conn = new PDO ( "mysql: host = localhost; dbname = database ' , $ user , $ pass ) ;$conn -> setAttribute ( PDO :: ATTR_ERRMODE , PDO :: ERRMODE_EXCEPTION ) ;} Catch ( PDOException $e ) {Echo "ERROR:" . $e -> getMessage ( ) ;}
Use single quotes rather than double
Single quotes will not parse PHP variables inside of them. Use double quotes to insert a variable in an echo string.
Well here’s a trick for you! Just use single quote (“) other than double (” “).
It saves you a lot of time and the performance of your server.
Clean URLs quickly with .htaccess
The file .htaccess – the best yet simple way to make the URLs more simpler for human eye as well as for SEO. A hidden file that serves a lot with Apache directives. The services that this file provides are performing redirection and clean URLs do not cease to be redirected to after all. One of the best tip and trick for PHP based application improvements.
RewriteEngine On
RewriteRule ^ ( [ a - zA - Z0 - 9 ] + ) $ index . Php? Page = $ 1
RewriteEngine OnRewriteRule ^ ( [ a - zA - Z0 - 9 ] + ) $ index . Php? Page = $ 1
This code is the life saver for many PHP developers that can prevent horrible URLs and make it sleek and simple, phew!
Know all the Problems of isset()
One of the PHP tricks for web developer is to understand what isset() function do. Make sure that you know at what time isset() function returns false and on which time it answers true. This function returns True if the variable is not NULL. Yes you read it not NULL.
Just like so, if NULL can be a valid value of the variable,We surely have a problem sire!
$foo = null ;
if ( isset( $ foo ) ) // returns false
And the solution is: Use get_defined_vars( );
$foo = NULL ;
$vars = get_defined_vars( );
if ( array_key_exists ( 'foo' , $ vars ) ) // returns True
$foo = null ;if ( isset( $ foo ) ) // returns falseAnd the solution is: Use get_defined_vars( );$foo = NULL ;$vars = get_defined_vars( );if ( array_key_exists ( 'foo' , $ vars ) ) // returns True
Use a switch instead of stringing If Statements
The useful PHP trick for Developers- use Switch instead of crazy Ifs. Advantage? The code will execute faster thus performance is increased. The usage of Switch statements allows you to go beyond the use of if-else if-else chains.
switch ($color ) {
case 'white' :
echo "The color is White" ;
break ;
case 'blue' :
echo "The color is Blue" ;
break ;
case 'green' :
echo "The color is Green" ;
break ;
case 'black' :
echo "Color is black" ;
break ;
}
switch ($color ) {case 'white' :echo "The color is White" ;break ;case 'blue' :echo "The color is Blue" ;break ;case 'green' :echo "The color is Green" ;break ;case 'black' :echo "Color is black" ;break ;}
Take up cURL
The method to retrieve a file from another server is to use the powerful way cURL, instead of using file_get_contents() function which is easy to use but come on, it’s like having death on your computer. The following code is the example of the use cURL:
$c = curl_init ( ) ;
curl_setopt ( $c , CURLOPT_URL , $URL ) ;
curl_setopt ( $c , CURLOPT_TIMEOUT , 15 ) ;
curl_setopt ( $c , CURLOPT_RETURNTRANSFER , true ) ;
$content = curl_exec ( $c ) ;
$status = curl_getinfo ( $c , CURLINFO_HTTP_CODE ) ;
curl_close ( $c ) ;
$c = curl_init ( ) ;curl_setopt ( $c , CURLOPT_URL , $URL ) ;curl_setopt ( $c , CURLOPT_TIMEOUT , 15 ) ;curl_setopt ( $c , CURLOPT_RETURNTRANSFER , true ) ;$content = curl_exec ( $c ) ;$status = curl_getinfo ( $c , CURLINFO_HTTP_CODE ) ;curl_close ( $c ) ;
Password Encryption
Often developers ask Tips to improve the website, well here is one, PHP is always on your side and it encrypts your passwords for you. I am talking about the PHP 5.5+ versions, Just store the passwords in your database as.
$enc_pass = password_hash ( $submitted_pass , PASSWORD_DEFAULT ) ;
$enc_pass = password_hash ( $submitted_pass , PASSWORD_DEFAULT ) ;
To check if password is correct or not:
if ( password_verify ( $submitted_pass , $stored_pass ) )
{
// User successfully authenticated
}
if ( password_verify ( $submitted_pass , $stored_pass ) ){ // User successfully authenticated}
Advanced PHP Tips to Improve Your Programming
Typically used for web development, PHP is the server-side scripting language. Invented in 1994 by Rasmus Lerdorf, PHP has done a remarkable job in the technology-based world and made the whole work of web development extremely easy for developers.
There’s little doubt that working knowledge of PHP is too important to sustain in today’s cut-throat technology sphere. Here are the 5 advanced PHP tips to learn PHP programming.
I. Object-Oriented Programming (OOP) is the Rudimentary Requirement
OOP is the basic requirement of PHP that every developer should know. PHP follows object-oriented programming and therefore items and programs link things together for developing a program. Using OOP approaches, you can skip the replication of code and can complete the code in a much simpler way. Objects are demarcated under the programs and then you can reclaim this purpose again and again in the whole programming. OOP is faster, easy to correct, and uses slighter server resources, less code and quicker loading process to evade long events. Going with OOP, you can make your coding style more effective and simpler.
II. Intrinsic Functions of PHP are Extremely Usable
PHP language is extremely easy to learn and adjustable for a developer to develop the best websites. Using the inbuilt advanced PHP techniques, you will get the concealed benefits which are very valuable throughout the coding process. If you are doing a custom PHP development or web development, the need for displays and functions is very significant. For example, if you want to count the numbers then you can use count() and like that PHP has a number of built-in functions that are very beneficial for making the coding procedure easy and quick.
III. Keep the Database Secure
The first thing prior to starting any PHP project is that you should use mysl_real_escape_string() for all the database. Doing this will help you keep all the strings safe from any kind of unwelcome threats that may have some malicious code. This should be your first step to protect your database. The other vital thing is that never use $_REQUEST – instead, go with POST or GET strings for submitting the data into the database query.
IV. Always Use POST and Never GET
A good programmer is well aware of the difference between these two. Get method displays the address in the URL and gives simpler ways for the hacker to totally hack your entire project. Going with POST, you can face a secure journey throughout your coding and development procedure.
V. Make a Copy Before Going for CODE
Before you explore the real platform, just stop for a few minutes and make a coarse draught of your whole coding. This will give you better comprehension and will clear your opinions for developing the website. Also, you will discover the main glitches that you will face in the future journey of the coding.
Wrapping things Up
One of the best programming language to develop websites is PHP, which is open-source. Although it is easy to use it’s normal when it takes the time to learn but if you know all the advanced PHP tips and tricks for good performance and for Website development in PHP then you are a champ!
Whatever it takes you to use PHP based frameworks and CMSs consider, use it over Core PHP, as it can give a better performance, a lightweight website and yes you can develop your website in PHP more faster.
Useful Php tips
1. Do not use relative paths , instead define a ROOT path
Its quite common to see such lines :
require_once('../../lib/some_class.php');
This approach has many drawbacks :
It first searches for directories specified in the include paths of php , then looks from the current directory.
So many directories are checked.
When a script is included by another script in a different directory , its base directory changes to that of the including script.
Another issue , is that when a script is being run from cron , it may not have its parent directory as the working directory.
So its a good idea to have absolute paths :
define('ROOT' , '/var/www/project/');
require_once(ROOT . '../../lib/some_class.php');
//rest of the code
Now this is an absolute path and will always stay constant. But we can improve this further. The directory /var/www/project can change , so do we change it everytime ? No instead we make it portable using magic constants like __FILE__ . Take a closer look :
//suppose your script is /var/www/project/index.php
//Then __FILE__ will always have that full path.
define('ROOT' , pathinfo(__FILE__, PATHINFO_DIRNAME));
require_once(ROOT . '../../lib/some_class.php');
//rest of the code
So now even if you shift your project to a different directory , like moving it to an online server , the same code will run without any changes.
2. Dont use require , include , require_once or include_once
Your script could be including various files on top , like class libraries , files for utility and helper functions etc like this :
require_once('lib/Database.php');
require_once('lib/Mail.php');
require_once('helpers/utitlity_functions.php');
This is rather primitive. The code needs to be more flexible. Write up helper functions to include things more easily. Lets take an example :
function load_class($class_name)
{
//path to the class file
$path = ROOT . '/lib/' . $class_name . '.php');
require_once( $path );
}
load_class('Database');
load_class('Mail');
See any difference ? You must. It does not need any more explanation.
You can improve this further if you wish to like this :
function load_class($class_name)
{
//path to the class file
$path = ROOT . '/lib/' . $class_name . '.php');
if(file_exists($path))
{
require_once( $path );
}
}
There are a lot of things that can be done with this :
Search multiple directories for the same class file.
Change the directory containing class files easily , without breaking the code anywhere.
Use similar functions for loading files that contain helper functions , html content etc.
3. Maintain debugging environment in your application
During development we echo database queries , dump variables which are creating problems , and then once the problem is solved , we comment them or erase them. But its a good idea to let everything stay and help in the long run
On your development machine you can do this :
define('ENVIRONMENT' , 'development');
if(! $db->query( $query )
{
if(ENVIRONMENT == 'development')
{
echo "$query failed";
}
else
{
echo "Database error. Please contact administrator";
}
}
And on the server you can do this :
define('ENVIRONMENT' , 'production');
if(! $db->query( $query )
{
if(ENVIRONMENT == 'development')
{
echo "$query failed";
}
else
{
echo "Database error. Please contact administrator";
}
}
4. Propagate status messages via session
Status messages are those messages that are generated after doing a task.
<?php
if($wrong_username || $wrong_password)
{
$msg = 'Invalid username or password';
}
?>
<html>
<body>
<?php echo $msg; ?>
<form>
...
</form>
</body>
</html>
Code like that is common. Using variables to show status messages has limitations. They cannot be send via redirects (unless you propagate them as GET variables to the next script , which is very silly). In large scripts there might be multiple messages etc.
Best way is to use session to propagate them (even if on same page). For this there has to be a session_start on every page.
function set_flash($msg)
{
$_SESSION['message'] = $msg;
}
function get_flash()
{
$msg = $_SESSION['message'];
unset($_SESSION['message']);
return $msg;
}
and in your script :
<?php
if($wrong_username || $wrong_password)
{
set_flash('Invalid username or password');
}
?>
<html>
<body>
Status is : <?php echo get_flash(); ?>
<form>
...
</form>
</body>
</html>
5. Make your functions flexible
function add_to_cart($item_id , $qty)
{
$_SESSION['cart'][$item_id] = $qty;
}
add_to_cart( 'IPHONE3' , 2 );
When adding a single item you use the above function. When adding multiple items , will you create another function ? NO. Just make the function flexible enough to take different kinds of parameters. Have a closer look :
function add_to_cart($item_id , $qty)
{
if(!is_array($item_id))
{
$_SESSION['cart'][$item_id] = $qty;
}
else
{
foreach($item_id as $i_id => $qty)
{
$_SESSION['cart'][$i_id] = $qty;
}
}
}
add_to_cart( 'IPHONE3' , 2 );
add_to_cart( array('IPHONE3' => 2 , 'IPAD' => 5) );
So now the same function can accept different kinds of output. The above can be applied in lots of places to make your code more agile.
6. Omit the closing php tag if it is the last thing in a script
I wonder why this tip is omitted from so many blog posts on php tips.
<?php
echo "Hello";
//Now dont close this tag
This will save you lots of problem. Lets take an example :
A class file super_class.php
<?php
class super_class
{
function super_function()
{
//super code
}
}
?>
//super extra character after the closing tag
Now index.php
require_once('super_class.php');
//echo an image or pdf , or set the cookies or session data
And you will get Headers already send error. Why ? because the "super extra character" has been echoed , and all headers went along with that. Now you start debugging. You may have to waste many hours to find the super extra space.
Hence make it a habit to omit the closing tag :
<?php
class super_class
{
function super_function()
{
//super code
}
}
//No closing tag
Thats better.
7. Collect all output at one place , and output at one shot to the browser
This is called output buffering. Lets say you have been echoing content from different functions like this :
function print_header()
{
echo "<div id='header'>Site Log and Login links</div>";
}
function print_footer()
{
echo "<div id='footer'>Site was made by me</div>";
}
print_header();
for($i = 0 ; $i < 100; $i++)
{
echo "I is : $i <br />';
}
print_footer();
Instead of doing like that , first collect all output in one place. You can either store it inside variables in the functions or use ob_start and ob_end_clean. So now it should look like
function print_header()
{
$o = "<div id='header'>Site Log and Login links</div>";
return $o;
}
function print_footer()
{
$o = "<div id='footer'>Site was made by me</div>";
return $o;
}
echo print_header();
for($i = 0 ; $i < 100; $i++)
{
echo "I is : $i <br />';
}
echo print_footer();
So why should you do output buffering :
You can change the output just before sending it to browser if you need to. Think about doing some str_replaces , or may be preg_replaces or may be adding some extra html at the end like profiler/debugger output
Its a bad idea to send output to browser and do php processing at the same time. Have you ever seen a website where there is a Fatal error in the sidebar or in a box in the middle of the screen. You know why that happens ? Because processing and output are being mixed.
8. Send correct mime types via header when outputting non-html content
Lets echo some xml.
$xml = '<?xml version="1.0" encoding="utf-8" standalone="yes"?>';
$xml = "<response>
<code>0</code>
</response>";
//Send xml data
echo $xml;
Works fine. But it needs some improvement.
$xml = '<?xml version="1.0" encoding="utf-8" standalone="yes"?>';
$xml = "<response>
<code>0</code>
</response>";
//Send xml data
header("content-type: text/xml");
echo $xml;
Note that header line. That line tells the browser that the content is xml content. So the browser can handle it correctly. Many javascript libraries also rely on header information.
Similarly for javascript , css , jpg image , png image :
Javascript
header("content-type: application/x-javascript");
echo "var a = 10";
CSS
header("content-type: text/css");
echo "#div id { background:#000; }";
9. Set the correct character encoding for a mysql connection
Ever faced a problem that unicode/utf-8 characters are stored in mysql table correctly , phpmyadmin also shows them correct , but when you fetch them and echo on your page they do not show up correctly. The secret is mysql connection collation.
$host = 'localhost';
$username = 'root';
$password = 'super_secret';
//Attempt to connect to database
$c = mysqli_connect($host , $username, $password);
//Check connection validity
if (!$c)
{
die ("Could not connect to the database host: <br />". mysqli_connect_error());
}
//Set the character set of the connection
if(!mysqli_set_charset ( $c , 'UTF8' ))
{
die('mysqli_set_charset() failed');
}
Once you connect to the database , its a good idea to set the connections characterset. This is a must when you are working with multiple languages in your application.
Otherwise what will happen ? You will see lots of boxes and ???????? in non english text.
10. Use htmlentities with the correct characterset option
Prior to php 5.4 the default character encoding used is ISO-8859-1 which cannot display characters like À â etc.
$value = htmlentities($this->value , ENT_QUOTES , 'UTF-8');
Php 5.4 onwards the default encoding will be UTF-8 which will solve most problems , but still better be aware about it if your application is multilingual.
11. Do not gzip output in your application , make apache do that
Thinking of using ob_gzhandler ? No dont do that. It doesnt make sense. Php is supposed to write your application. Dont worry about how to optimise data transfer between server and browser inside Php.
Use apache mod_gzip/mod_deflate to compress content via the .htaccess file.
12. Use json_encode when echoing javascript code from php
There are times when some javascript code is generated dynamically from php.
$images = array(
'myself.png' , 'friends.png' , 'colleagues.png'
);
$js_code = '';
foreach($images as $image)
{
$js_code .= "'$image' ,";
}
$js_code = 'var images = [' . $js_code . ']; ';
echo $js_code;
//Output is var images = ['myself.png' ,'friends.png' ,'colleagues.png' ,];
Be smart. use json_encode :
$images = array(
'myself.png' , 'friends.png' , 'colleagues.png'
);
$js_code = 'var images = ' . json_encode($images);
echo $js_code;
//Output is : var images = ["myself.png","friends.png","colleagues.png"]
Isn't that neat ?
13. Check if directory is writable before writing any files
Before writing or saving any file , make sure you check that the directory is writable or not , and flash an error message if it is not. This will save you a lot of "debugging" time. When you are working on a linux , permissions have to be dealt with and there would be many many permission issues when directories would not be writable , files would not be readable and so on.
Make sure that your application is as intelligent as possible and reports the most important information in the shortest time.
$contents = "All the content";
$file_path = "/var/www/project/content.txt";
file_put_contents($file_path , $contents);
That is totally correct. But has some indirect problems. The file_put_contents may fail for a number of reasons :
Parent directory does not exist
Directory exists , but is not writable
File locked for writing ?
So its better to make everything clear before writing out to a file.
$contents = "All the content";
$dir = '/var/www/project';
$file_path = $dir . "/content.txt";
if(is_writable($dir))
{
file_put_contents($file_path , $contents);
}
else
{
die("Directory $dir is not writable, or does not exist. Please check");
}
By doing this you get the accurate information that where is a file write failing and why
14. Change permission of files that your application creates
When working in linux environment , permission handling can waste a lot of your time. Hence whenever your php application creates some files do a chmod over them to ensure they are "accessible" outside. Otherwise for example the files may be created by "php" user and you are working as a different user and the system wont let you access or open the file , and then you have to struggle to get root privileges , change the permissions of the file and so on.
// Read and write for owner, read for everybody else
chmod("/somedir/somefile", 0644);
// Everything for owner, read and execute for others
chmod("/somedir/somefile", 0755);
15. Don't check submit button value to check form submission
if($_POST['submit'] == 'Save')
{
//Save the things
}
The above is mostly correct , except when your application is multi-lingual. Then the 'Save' can be many different things. How would you compare then. So do not rely on the value of submit button. Instead use this :
if( $_SERVER['REQUEST_METHOD'] == 'POST' and isset($_POST['submit']) )
{
//Save the things
}
Now you are free from the value the submit button
16. Use static variables in function where they always have same value
//Delay for some time
function delay()
{
$sync_delay = get_option('sync_delay');
echo "<br />Delaying for $sync_delay seconds...";
sleep($sync_delay);
echo "Done <br />";
}
Instead use static variables as :
//Delay for some time
function delay()
{
static $sync_delay = null;
if($sync_delay == null)
{
$sync_delay = get_option('sync_delay');
}
echo "<br />Delaying for $sync_delay seconds...";
sleep($sync_delay);
echo "Done <br />";
}
17. Don't use the $_SESSION variable directly
Some simple examples are :
$_SESSION['username'] = $username;
$username = $_SESSION['username'];
But this has a problem. If you are running multiple applications on the same domain , the session variables my conflict. 2 different applications may set the same key name in the session variable. Take for example , a frontend portal , and the backend management application , on the same domain.
Hence use application specific keys with wrapper functions :
define('APP_ID' , 'abc_corp_ecommerce');
//Function to get a session variable
function session_get($key)
{
$k = APP_ID . '.' . $key;
if(isset($_SESSION[$k]))
{
return $_SESSION[$k];
}
return false;
}
//Function set the session variable
function session_set($key , $value)
{
$k = APP_ID . '.' . $key;
$_SESSION[$k] = $value;
return true;
}
18. Wrap utility helper functions into a class
So you have a lot of utility functions in a file like :
function utility_a()
{
//This function does a utility thing like string processing
}
function utility_b()
{
//This function does nother utility thing like database processing
}
function utility_c()
{
//This function is ...
}
And you use the function throughout your application freely. You may want to wrap them into a class as static functions :
class Utility
{
public static function utility_a()
{
}
public static function utility_b()
{
}
public static function utility_c()
{
}
}
//and call them as
$a = Utility::utility_a();
$b = Utility::utility_b();
One clear benefit you get here is if php has inbuilt functions with similar names , then names will not conflict.
Another perspective , though little advanced is that you can maintain multiple versions of the same class in the same application without any conflict. Its basically encapsulation , nothing else.
19. Bunch of silly tips
Use echo instead of print
Use str_replace instead of preg_replace , unless you need it absolutely
Do not use short tags
Use single quotes instead of double quotes for simple strings
Always remember to do an exit after a header redirect
Never put a function call in a for loop control line.
isset is faster than strlen
Format your code correctly and consistently
Do not drop the brackets of loops or if-else blocks.
Do not code like this :
if($a == true) $a_count++;
Its absolutely a WASTE.
Write
if($a == true)
{
$a_count++;
}
Dont try to make your code shorter by eating up syntax. Rather make your logic shorter.
Use a proper text editor which has code highlighting. Code highlighting helps to create lesser errors.
20. Process arrays quickly with array_map
Lets say you want to trim all elements of an array. Newbies do it like this :
foreach($arr as $c => $v)
{
$arr[$c] = trim($v);
}
But it can more cleaner with array_map :
$arr = array_map('trim' , $arr);
This will apply trim on all elements of the array $arr. Another similar function is array_walk. Check out the
documentation on these to know more.
21. Validate data with php filters
Have you been using to regex to validate values like email , ip address etc. Yes everybody had been doing that. Now lets
try something different, called filters.
The php filter extension provides simple way to validate or check values as being a valid 'something'.
22. Force type checking
$amount = intval( $_GET['amount'] );
$rate = (int) $_GET['rate'];
Its a good habit.
23. Write Php errors to file using set_error_handler()
set_error_handler() can be used to set a custom error handler. A good idea would be write some important errors in a file for logging purpose
24. Handle large arrays carefully
Large arrays or strings , if a variable is holding something very large in size then handle with care. Common mistake is to create a copy and then run out of memory and get a Fatal Error of Memory size exceeded :
$db_records_in_array_format; //This is a big array holding 1000 rows from a table each having 20 columns , every row is atleast 100 bytes , so total 1000 * 20 * 100 = 2MB
$cc = $db_records_in_array_format; //2MB more
some_function($cc); //Another 2MB ?
The above thing is common when importing a csv file or exporting table to a csv file
Doing things like above can crashs scripts quite often due to memory limits. For small sized variables its not a problem , but must be avoided when handling large arrays.
Consider passing them by reference , or storing them in a class variable :
$a = get_large_array();
pass_to_function(&$a);
by doing this the same variable (and not its copy) will be available to the function. Check documentation
class A
{
function first()
{
$this->a = get_large_array();
$this->pass_to_function();
}
function pass_to_function()
{
//process $this->a
}
}
unset them as soon as possible , so that memory is freed and rest of the script can relax.
Here is a simple demonstration of how assign by reference can save memory in some cases
<?php
ini_set('display_errors' , true);
error_reporting(E_ALL);
$a = array();
for($i = 0; $i < 100000 ; $i++)
{
$a[$i] = 'A'.$i;
}
echo 'Memory usage in MB : '. memory_get_usage() / 1000000 . '<br />';
$b = $a;
$b[0] = 'B';
echo 'Memory usage in MB after 1st copy : '. memory_get_usage() / 1000000 . '<br />';
$c = $a;
$c[0] = 'B';
echo 'Memory usage in MB after 2st copy : '. memory_get_usage() / 1000000 . '<br />';
$d =& $a;
$d[0] = 'B';
echo 'Memory usage in MB after 3st copy (reference) : '. memory_get_usage() / 1000000 . '<br />';
The output on a typical php 5.4 machine is :
Memory usage in MB : 18.08208
Memory usage in MB after 1st copy : 27.930944
Memory usage in MB after 2st copy : 37.779808
Memory usage in MB after 3st copy (reference) : 37.779864
So it can be seen that in the 3rd copy which was by reference memory was saved. Otherwise in all plain copies memory is used up more and more.
25. Use a single database connection, throughout the script
Make sure that you use a single connection to your database throughout your script. Open a connection right in the beginning and use it till the end , and close it at the end. Do not open connections inside functions like this :
function add_to_cart()
{
$db = new Database();
$db->query("INSERT INTO cart .....");
}
function empty_cart()
{
$db = new Database();
$db->query("DELETE FROM cart .....");
}
Having multiple connections is a bad idea and moreover they slow down the execution since every connection takes time to create and uses more memory.
Use the singleton pattern for special cases like database connection.
26. Avoid direct SQL query , abstract it
$query = "INSERT INTO users(name , email , address , phone) VALUES('$name' , '$email' , '$address' , '$phone')";
$db->query($query); //call to mysqli_query()
The above is the simplest way way of writing sql queries and interacting with databases for operations like INSERT, UPDATE, DELETE etc. But it has few drawbacks like:
All values have to be escaped everytime manually
Manually verify the sql syntax everytime.
Wrong queries may go undetected for a long time (unless if else checking done everytime)
Difficult to maintain large queries like that
Solution: ActiveRecord
It involves writing simple functions that abstract the generation of sql queries, hence avoid writing of direct sql queries.
A very simple example of an activerecord insert function can be like this :
function insert_record($table_name , $data)
{
foreach($data as $key => $value)
{
//mysqli_real_escape_string
$data[$key] = $db->mres($value);
}
$fields = implode(',' , array_keys($data));
$values = "'" . implode("','" , array_values($data)) . "'";
//Final query
$query = "INSERT INTO {$table}($fields) VALUES($values)";
return $db->query($query);
}
//data to be inserted in database
$data = array('name' => $name , 'email' => $email , 'address' => $address , 'phone' => $phone);
//perform the INSERT query
insert_record('users' , $data);
The above example shows how to insert data in a database, without actually having to write INSERT statements. The function insert_record takes care of escaping data as well. A big advantage here is that since the data is being prepared as a php array, any syntax mistake is caught instantly (by the php interpreter ofcourse).
This function can be part of a database class, and callable like this $db->insert_record(). Similar functions can be written for update, select, delete as well. Should be a good practise.
27. Cache database generated content to static files
Pages that are generated by fetching content from the database like cms etc, can be cached. It means that once generated, a copy of it can be writted to file. Next time the same page is requested, then fetch it from the cache directory, dont query the database again.
Benefits :
Save php processing to generate the page , hence faster execution
Lesser database queries means lesser load on mysql database
28. Store sessions in database
File based sessions have many limitation. Applications using file based sessions cannot scale to multiple servers, since files are stored on a single server. But database can be access from multiple servers hence the the problem is solved there. Also on shared hosting, the session files reside in the tmp directory, which is readable by other accounts. This can be a security issue.
Storing session in database makes many other things easier like:
Restrict concurrent logins from same username. Same username cannot log in from 2 different places at same time
Check online status of users more accurately
29. Avoid using globals
Use defines/constants
Get value using a function
Use Class and access via $this
30. Use base url in head tag
Quick example :
[html]
<head>
<base href="http://www.domain.com/store/">
</head>
<body>
<img src="happy.jpg" />
</body>
</html>
[/html]
The base tag is like a 'ROOT' url for all relative urls in the html body. Its useful when static content files are organised into directories and subdirectories.
Lets take an example
www.domain.com/store/home.php
www.domain.com/store/products/ipad.php
In home.php the following can be written :
[html]
<a href="home.php">Home</a>
<a href="products/ipad.php">Ipad</a>
[/html]
But in ipad.php the links have to be like this :
[html]
<a href="../home.php">Home</a>
<a href="ipad.php">Ipad</a>
[/html]
This is because of different directories. For this multiple versions of the navigation html code has to be maintained. So the quick solution is base tag.
[html]
<head>
<base href="http://www.domain.com/store/">
</head>
<body>
<a href="home.php">Home</a>
<a href="products/ipad.php">Ipad</a>
</body>
</html>
[/html]
Now this particular code will work the same way in the home directory as well as the product directory. The base href value is used to form the full url for home.php and products/ipad.php
31. Manage error reporting
error_reporting is the function to use to set the necessary level of error reporting required.
On a development machine notices and strict messages may be disabled by doing.
ini_set('display_errors', 1);
error_reporting(~E_NOTICE & ~E_STRICT);
On production , the display should be disabled.
ini_set('display_errors', 0);
error_reporting(~E_WARNING & ~E_NOTICE & ~E_STRICT);
It is important to note that error_reporting should never be set to 0 on production machines. Atleast E_FATALs have to be known. Just switch off the display using the display_errors directive. If error_reporting is set to 0, errors wont be raised at all keeping all problems in the dark.
After the display is switched off, the errors should be logged to a file for later analysis. This can be done inside the script using init_set.
ini_set('log_errors' , '1');
ini_set('error_log' , '/path/to/errors.txt');
ini_set('display_errors' , 0);
error_reporting(~E_WARNING & ~E_NOTICE & ~E_STRICT);
Note :
1. The path '/path/to/errors.txt' should be writable by the web server for errors to be logged there.
2. A separate error file is specified , otherwise all logs would go inside the apache/web server error log and get mixed up with other apache errors.
3. Also since it is being setup in the current application , the error log will contain the errors of only the current application (there may be other applications running on the webserver).
4. The path can be somewhere inside the directory of the current application as well , so that the system directories like /var/log dont have to searched.
5. Dont set error_reporting to 0. It will not log anything then.
Alternatively set_error_handler should be used to set a custom user written function as the error handler. That particular function, for example can log all errors to a file.
Set 'display_errors=On' in php.ini on development machine
On development machine its important to enable display_errors right in the php.ini (and not rely on ini_set)
This is because any compile time fatal errors will now allow ini_set to execute , hence no error display
and a blank WHITE page.
Similarly when they are On in php.ini , switching it off in a script that has fatal errors will not work.
Set 'display_errors=Off' in php.ini on production machine
Do not rely on init_set('display_errors' , 0); simply because it will not get executed if any compile time fatal errors come in the script , and errors will be displayed right away.
32. Be aware of platform architecture
The length of integers is different on 32 and 64 bit architectures. So functions like strtotime give different results.
On a 64 bit machine you can see such output.
$ php -a
Interactive shell
php > echo strtotime("0000-00-00 00:00:00");
-62170005200
php > echo strtotime('1000-01-30');
-30607739600
php > echo strtotime('2100-01-30');
4104930600
But on a 32 bit machine all of them would give bool(false). Check here for more.
What would happen if an integer is left shifted more than 32 bits ? the result would be different on different machines.
33. Dont rely on set_time_limit too much
If you are limiting the maximum run-time of a script , by doing this :
set_time_limit(30);
//Rest of the code
It may not always work. Any execution that happens outside the script via system calls/os functions like socket operations, database operations etc. will not be under control of set_time_limit.
So if a database operation takes lot of time or "hangs" then the script will not stop. Dont be surprised then. Make better strategies to handle the run-time.
34. Make a portable function for executing shell commands
system , exec , passthru , shell_exec are the 4 functions that are available to execute system commands. Each has a slightly different behaviour. But the problem is that when you are working on shared hosting environments some of the functions are selectively disabled. Most newbie programmers tend to first find out which function is enabled and then use it.
A better solution :
/**
Method to execute a command in the terminal
Uses :
1. system
2. passthru
3. exec
4. shell_exec
*/
function terminal($command)
{
//system
if(function_exists('system'))
{
ob_start();
system($command , $return_var);
$output = ob_get_contents();
ob_end_clean();
}
//passthru
else if(function_exists('passthru'))
{
ob_start();
passthru($command , $return_var);
$output = ob_get_contents();
ob_end_clean();
}
//exec
else if(function_exists('exec'))
{
exec($command , $output , $return_var);
$output = implode("n" , $output);
}
//shell_exec
else if(function_exists('shell_exec'))
{
$output = shell_exec($command) ;
}
else
{
$output = 'Command execution not possible on this system';
$return_var = 1;
}
return array('output' => $output , 'status' => $return_var);
}
terminal('ls');
The above function will execute the shell command using whichever function is available , keeping your code consistent.
35. Localize your application
Localise your php application. Format dates and numbers with commas and decimals. Show the time according to timezone of the user.
36. Use a profiler like xdebug if you need to
Profilers are used to generate reports that show the time is taken by different parts of the code to execute. When writing large application where lots of libraries and other resources are working to do a cetain task, speed might be an important aspect to optimise.
Use profilers to check how your code is performing in terms of speed. Check out xdebug and webgrind.
37. Use plenty of external libraries
An application often needs more than what can be coded with basic php. Like generating pdf files, processing images, sending emails, generating graphs and documents etc. And there are lots of libraries out there for doing these things quickly and easily.
Few popular libraries are :
mPDF - Generate pdf documents, by converting html to pdf beautifully.
PHPExcel - Read and write Excel files
PhpMailer - Send html emails with attachments easily
pChart - Generate graphs in php
38. Have a look at phpbench for some micro-optimisation stats
If you really want to achieve optimisation at the level of microtime then check phpbench ... it has some benchmarks for various syntax variations that can create significant difference.
39. Use an MVC framework
Its time to start using an MVC (Model view controller) framework like codeigniter. MVC does not make your code object oriented rightaway. The first thing they do is separate the php code from html code.
Clean separation of php and html code. Good for team work, when designers and coders are working together.
Functions and functionalities are organised in classes making maintenance easy.
Inbuilt libraries for various needs like email, string processing, image processing, file uploads etc.
Is a must when writing big applications
Lots of tips, techniques, hacks are already implemented in the framework
40. Read the comments on the php documentation website
The php documentation website has entries for each function, class and their methods. All those individual pages have got lots of user comments below them that contain a whole lot of valuable information from the community.
They contain user feedback, expert advice and useful code snippets. So check them out.
41. Go to the IRC channel to ask
The irc channel #php is the best place online to ask about php related things. Although there are lots of blogs, forums out there and even more coming up everyday, still when a specific problem arises the solution might not be available there. Then irc is the place to ask. And its totally free!!
42. Read open source code
Reading other open source applications is always a good idea to improve own skills if you have not already. Things to learn are techniques, coding style, comment style, organisation and naming of files etc.
The first open source thing that I read was the codeigniter framework. Its easy to developers to use, as well as easy to look inside. Here are a few more
1. Codeigniter
2. WordPress
3. Joomla CMS
43. Develop on Linux
If you are already developing on windows, then you might give Linux a try. My favorite is ubuntu. Although this is just an opinion but still I strongly feel that for development linux is a much better environment.
Php applications are mostly deployed on linux (LAMP) environments. Therefore, developing in a similar environment helps to produce a robust application faster.
Most of the development tools can be very easily installed from synaptic package manager in Ubuntu. Plus they need very little configuration to setup and run. And the best thing is, that they all are free.
Modulo reminder and Quotient in php
Use type casting:
$quotient = (int)(10/3)
$remainder = $a % $b;
or intdiv()
6 Ways to Read Files In PHP (Into String, Array, And More)
$contents = file_get_contents($file) will read everything into a string.
$array = file($file) will read into an array.
Use cURL to fetch a file at a remote location.
$stream = fopen($file,”r”) will open a file stream, then we use while(($line=fgets($handle))!==false) to fetch data line-by-line.
readfile($file) will simply read and output it.
include $file or require $file
<?php
// FETCH CONTENTS FROM FILE
$contents = file_get_contents('/folder/some/file.txt');
// OR FETCH CONTENTS FROM A URL
$contents = file_get_contents('http://www.site.com/');
?> <?php
$text = file_get_contents('/folder/some/file.txt');
// THIS WILL TURN LINE BREAKS INTO <BR>
$text = nl2br($text);
?> <?php
$contents = file_get_contents('http://www.site.com/');
// THIS WILL STRIP ALL HTML TAGS
$text = strip_tags($text);
// AND YOU CAN SPECIFY WHICH TAGS TO KEEP
$text = strip_tags($text, "<br><p>");
?> <?php
// FETCH FROM FILE
$array = file('/folder/some/file.txt');
// $array = ["Line One", "Hellow World", "", "Another Line"];
// YOU CAN ALSO PUT IN THE OPTION TO SKIP EMPTY LINES
$array = file('/folder/some/file.txt', FILE_SKIP_EMPTY_LINES);
// $array = ["Line One", "Hellow World", "Another Line"];
?> <?php
$curl = curl_init("http://site.com/");
curl_setopt($curl, CURLOPT_RETURNTRANSFER, 1);
$data = curl_exec($curl);
curl_close($curl);
echo $data;
?> <?php
$handle = fopen("dummy.txt", "r");
if ($handle) {
// READ LINE BY LINE
while (($line = fgets($handle)) !== false) {
echo $line;
}
fclose($handle);
} else {
// ERROR
echo "Error reading file!";
}
?> <?php
/* SERVE FILE HEADERS */
// Start output buffer
ob_start();
// All these will be collected into buffer first
header('Content-Type: application/octet-stream');
header('Content-Disposition: attachment; filename="dummy.txt"');
header('Expires: 0');
header('Cache-Control: must-revalidate');
header('Pragma: public');
header('Content-Length: '.filesize('dummy.txt'));
// Output all the headers & stop buffering
ob_end_flush();
/* READ AND OUTPUT FILE */
readfile('dummy.txt');
die();
?> <?php
require "dummy.html";
include "dummy.txt";
?>
</body>
</html>
Matrix
Class that wraps PHP arrays to mathematical matrix.
Creation
To create Matrix use simple arrays:
$matrix = new Matrix([
[3, 3, 3],
[4, 2, 1],
[5, 6, 7],
]);
You can also create Matrix (one dimension) from flat array:
$flatArray = [1, 2, 3, 4];
$matrix = Matrix::fromFlatArray($flatArray);
Matrix data
Methods for reading data from Matrix:
$matrix->toArray(); // cast matrix to PHP array
$matrix->getRows(); // rows count
$matrix->getColumns(); // columns count
$matrix->getColumnValues($column=4); // get values from given column
Determinant
Read more about matrix determinant.
$matrix = new Matrix([
[3, 3, 3],
[4, 2, 1],
[5, 6, 7],
]);
$matrix->getDeterminant();
// return -3
Transpose
Read more about matrix transpose.
$matrix->transpose();
// return new Matrix
Multiply
Multiply Matrix by another Matrix.
$matrix1 = new Matrix([
[1, 2, 3],
[4, 5, 6],
]);
$matrix2 = new Matrix([
[7, 8],
[9, 10],
[11, 12],
]);
$matrix1->multiply($matrix2);
// result $product = [
// [58, 64],
// [139, 154],
//];
Divide by scalar
You can divide Matrix by scalar value.
$matrix->divideByScalar(2);
Inverse
Read more about invertible matrix
$matrix = new Matrix([
[3, 4, 2],
[4, 5, 5],
[1, 1, 1],
]);
$matrix->inverse();
// result $inverseMatrix = [
// [0, -1, 5],
// [1 / 2, 1 / 2, -7 / 2],
// [-1 / 2, 1 / 2, -1 / 2],
//];
Cross out
Cross out given row and column from Matrix.
$matrix = new Matrix([
[3, 4, 2],
[4, 5, 5],
[1, 1, 1],
]);
$matrix->crossOut(1, 1)
// result $crossOuted = [
// [3, 2],
// [1, 1],
//];
Array Operators
Union $a + $b Union of $a and $b.
Equality $a == $b TRUE if $a and $b have the same key/value pairs.
Identity $a === $b TRUE if $a and $b have the same key/value pairs in the same order and of the same types.
Inequality $a != $b TRUE if $a is not equal to $b.
Inequality $a <> $b TRUE if $a is not equal to $b.
Non-identity $a !== $b TRUE if $a is not identical to $b.
The + operator returns the right-hand array appended to the left-hand array;
for keys that exist in both arrays, the elements from the left-hand array will be used, and the matching elements from the right-hand array will be ignored.
Array Functions
array_change_key_case — Changes the case of all keys in an array
array_chunk — Split an array into chunks
array_column — Return the values from a single column in the input array
array_combine — Creates an array by using one array for keys and another for its values
array_count_values — Counts all the values of an array
array_diff_assoc — Computes the difference of arrays with additional index check
array_diff_key — Computes the difference of arrays using keys for comparison
array_diff_uassoc — Computes the difference of arrays with additional index check which is performed by a user supplied callback function
array_diff_ukey — Computes the difference of arrays using a callback function on the keys for comparison
array_diff — Computes the difference of arrays
array_fill_keys — Fill an array with values, specifying keys
array_fill — Fill an array with values
array_filter — Filters elements of an array using a callback function
array_flip — Exchanges all keys with their associated values in an array
array_intersect_assoc — Computes the intersection of arrays with additional index check
array_intersect_key — Computes the intersection of arrays using keys for comparison
array_intersect_uassoc — Computes the intersection of arrays with additional index check, compares indexes by a callback function
array_intersect_ukey — Computes the intersection of arrays using a callback function on the keys for comparison
array_intersect — Computes the intersection of arrays
array_key_exists — Checks if the given key or index exists in the array
array_key_first — Gets the first key of an array
array_key_last — Gets the last key of an array
array_keys — Return all the keys or a subset of the keys of an array
array_map — Applies the callback to the elements of the given arrays
array_merge_recursive — Merge one or more arrays recursively
array_merge — Merge one or more arrays
array_multisort — Sort multiple or multi-dimensional arrays
array_pad — Pad array to the specified length with a value
array_pop — Pop the element off the end of array
array_product — Calculate the product of values in an array
array_push — Push one or more elements onto the end of array
array_rand — Pick one or more random keys out of an array
array_reduce — Iteratively reduce the array to a single value using a callback function
array_replace_recursive — Replaces elements from passed arrays into the first array recursively
array_replace — Replaces elements from passed arrays into the first array
array_reverse — Return an array with elements in reverse order
array_search — Searches the array for a given value and returns the first corresponding key if successful
array_shift — Shift an element off the beginning of array
array_slice — Extract a slice of the array
array_splice — Remove a portion of the array and replace it with something else
array_sum — Calculate the sum of values in an array
array_udiff_assoc — Computes the difference of arrays with additional index check, compares data by a callback function
array_udiff_uassoc — Computes the difference of arrays with additional index check, compares data and indexes by a callback function
array_udiff — Computes the difference of arrays by using a callback function for data comparison
array_uintersect_assoc — Computes the intersection of arrays with additional index check, compares data by a callback function
array_uintersect_uassoc — Computes the intersection of arrays with additional index check, compares data and indexes by separate callback functions
array_uintersect — Computes the intersection of arrays, compares data by a callback function
array_unique — Removes duplicate values from an array
array_unshift — Prepend one or more elements to the beginning of an array
array_values — Return all the values of an array
array_walk_recursive — Apply a user function recursively to every member of an array
array_walk — Apply a user supplied function to every member of an array
array — Create an array
arsort — Sort an array in reverse order and maintain index association
asort — Sort an array and maintain index association
compact — Create array containing variables and their values
count — Count all elements in an array, or something in an object
current — Return the current element in an array
each — Return the current key and value pair from an array and advance the array cursor
end — Set the internal pointer of an array to its last element
extract — Import variables into the current symbol table from an array
in_array — Checks if a value exists in an array
key_exists — Alias of array_key_exists
key — Fetch a key from an array
krsort — Sort an array by key in reverse order
ksort — Sort an array by key
list — Assign variables as if they were an array
natcasesort — Sort an array using a case insensitive "natural order" algorithm
natsort — Sort an array using a "natural order" algorithm
next — Advance the internal pointer of an array
pos — Alias of current
prev — Rewind the internal array pointer
range — Create an array containing a range of elements
reset — Set the internal pointer of an array to its first element
rsort — Sort an array in reverse order
shuffle — Shuffle an array
sizeof — Alias of count
sort — Sort an array
uasort — Sort an array with a user-defined comparison function and maintain index association
uksort — Sort an array by keys using a user-defined comparison function
usort — Sort an array by values using a user-defined comparison function
input data from browser side
HTML Forms (GET and POST)
<form action="foo.php" method="post">
Name: <input type="text" name="username" /><br />
Email: <input type="text" name="email" /><br />
<input type="submit" name="submit" value="Submit me!" />
</form>
Accessing data from a simple POST HTML form
<?php
echo $_POST['username'];
echo $_REQUEST['username'];
?>
Capturing Form Data with PHP
To access the value of a particular form field, you can use the following superglobal variables.
These variables are available in all scopes throughout a script.
Superglobal Description
$_GET Contains a list of all the field names and values sent by a form using the get method (i.e. via the URL parameters).
$_POST Contains a list of all the field names and values sent by a form using the post method (data will not visible in the URL).
$_REQUEST Contains the values of both the $_GET and $_POST variables as well as the values of the $_COOKIE superglobal variable.
When a user submit the form through clicking the submit button, the form data is sent to the url file indicated int the form, for the server processing.
Determining variable types
gettype(), is_array(), is_float(), is_int(), is_object(), and is_string()
$_GET["var1"] will contain the string "null" and $_GET["var2"], the string "123".
/index.php?var1=null&var2=123
PHP Tip - Automatic Copyright Year
Use the date() function to automatically update the copyright year on your website:
Example
© 2010-<?php echo date("Y");?>
load file and split lines by tab char
$wordArray = file("EnglishWordListTest.txt");
$wordArray = str_replace("\r\n","",$wordArray); // strips linefeed character
for($i=0; $i<count($wordArray); $i++){
$wordArray[$i] = explode("\t", $wordArray[$i]);
}
php redirect function
if (condition)
{
header('Location: url');
}
class and method
class animals { function eat() { echo ("I eat food\n"); } }
$lion = new animals;
$lion->characteristic= "King of the jungle";
echo "Lion Characteristic: " . $lion->characteristic . "\n";
$lion->eat();
$mouse = new animals;
$mouse->characteristic= "small rat";
PHP server on local machine
https://stackoverflow.com/questions/1678010/php-server-on-local-machine
PHP 5.4 and later have a built-in web server these days.
You simply run the command from the terminal:
cd path/to/your/app
php -S 127.0.0.1:8000
Then in your browser go to http://127.0.0.1:8000 and boom, your system should be up and running. (There must be an index.php or index.html file for this to work.)
You could also add a simple Router
<?php
// router.php
if (preg_match('/\.(?:png|jpg|jpeg|gif)$/', $_SERVER["REQUEST_URI"])) {
return false; // serve the requested resource as-is.
} else {
require_once('resolver.php');
}
?>
php run python script
echo shell_exec("python test.py 'parameter1'");
passing the parameter to python create a python as test.py:
import sys
input=sys.argv[1]
print(input)
print the parameter passed by PHP.
Get center point from an array of like geopoints
/**
* Get a center latitude,longitude from an array of like geopoints
*
* @param array data 2 dimensional array of latitudes and longitudes
* For Example:
* $data = array
* (
* 0 = > array(45.849382, 76.322333),
* 1 = > array(45.843543, 75.324143),
* 2 = > array(45.765744, 76.543223),
* 3 = > array(45.784234, 74.542335)
* );
*/
function GetCenterFromDegrees($data)
{
if (!is_array($data)) return FALSE;
$num_coords = count($data);
$X = 0.0;
$Y = 0.0;
$Z = 0.0;
foreach ($data as $coord)
{
$lat = $coord[0] * pi() / 180;
$lon = $coord[1] * pi() / 180;
$a = cos($lat) * cos($lon);
$b = cos($lat) * sin($lon);
$c = sin($lat);
$X += $a;
$Y += $b;
$Z += $c;
}
$X /= $num_coords;
$Y /= $num_coords;
$Z /= $num_coords;
$lon = atan2($Y, $X);
$hyp = sqrt($X * $X + $Y * $Y);
$lat = atan2($Z, $hyp);
return array($lat * 180 / pi(), $lon * 180 / pi());
}
imagecreatefromjpeg
https://www.php.net/manual/en/function.imagecreatefromjpeg.php
imagecreatefromjpeg — Create a new image from file or URL
use php server to redirect image
1. Open an image file as a binary type.
2. Get the file contents.
3. Change content type to image accordingly.
4. echo contents.
<?php
$filename = "/path/to/your/file.jpg";
$handle = fopen($filename, "rb");
$contents = fread($handle, filesize($filename));
fclose($handle);
header("content-type: image/jpeg");
echo $contents;
?>
<?php
$imgUrl = "myimage.jpg";
?>
<img src="<?= $imgUrl; ?> "/>
<?php
header('content-type: image/png');
$theImage = "myimage.png";//the real image url.
echo file_get_contents($theImage);
?>
<?php
header('content-type: image/png');
$theImage = "myimage.png";//the real image url.
echo file_get_contents($theImage);
?>
exec() Execute Commands and Programs
PHP provides the exec() method in order to execute or run commands, programs, or scripts.
This exec() method can simply execute external commands in the operating system.
For example, the whoami command of Linux can be executed for the current user, and returned username can be used in PHP applications.
Syntax
exec(string $command, array &$output, int &$result_code)
$command is a string type which is the command string representation.
&$output is a array variable where the executed command result is stored.
&$result_code is an int which stores the command result code as integer.
example
$output = null;
$code = null;
exec("whoami",$output,$code);
print_r($output)
$command = "ls";
exec($command,$output,$code);
print_r($output);
$command = "ls -l /var/log";
exec($command,$output,$code);
print_r($output);
system() - Execute an external program and display the output
passthru() - Execute an external program and display raw output
escapeshellcmd() - Escape shell metacharacters
pcntl_exec() - Executes specified program in current process space
backtick operator
shell_exec() vs exec() Function
The shell_exec() function is an inbuilt function in PHP which is used to execute the commands via shell and return the complete output as a string.
The shell_exec is an alias for the backtick operator, for those used to *nix.
If the command fails return NULL and the values are not reliable for error checking.
Syntax:
string shell_exec( $cmd )
Parameters: This function accepts single parameter $cmd which is used to hold the command that will be executed.
Return Value: This function returns the executed command or NULL if an error occurred.
Note: This function is disabled when PHP is running in safe mode.
Example:
// Use ls command to shell_exec
// function
$output = shell_exec('ls');
// Display the list of all file
// and directory
echo "$output
";
Output:
gfg.php
index.html
geeks.php
exec() Function
The exec() function is an inbuilt function in PHP which is used to execute an external program and returns the last line of the output.
It also returns NULL if no command run properly.
Syntax:
string exec( $command, $output, $return_var )
Parameters: This function accepts three parameters as mentioned above and described below:
$command: This parameter is used to hold the command which will be executed.
$output: This parameter is used to specify the array which will be filled with every line of output from the command.
$return_var: The $return_var parameter is present along with the output argument, then it returns the status of the executed command will be written to this variable.
Return Value: This function returns the executed command, be sure to set and use the output parameter.
Example:
// (on a system with the "iamexecfunction" executable in the path)
echo exec('iamexecfunction');
Output:
geeks.php
Communication between two server
Just call a website URL using fopen("http://www.somesite.com/script.php?p1=val1&p2=val2").
The other website can then parse the params using the $_GET, and can reply (for example in XML).
You can then parse the response.
If you want more options, Curl and its libraries can do much more.
If talking about web-services take the php build in soap extension.
If only to receive the content of another website try fsockopen, curl
or the php pear extension HTTP_Request2
$options = array('http' => array('header' => "Content-type: application/x-www-form-urlencoded\r\n",'method' => 'POST','content' => http_build_query($yourData)));
$context = stream_context_create($options);
$result = file_get_contents("www.abc.com", false, $context);
PHP Import Excel File Data into MySQL Database
Create Database Table
Excel File Format
PhpSpreadsheet Library
Database Configuration (dbConfig.php)
Excel File Upload (index.php)
Import Excel Data to Database (importData.php)
There are 2 types of Excel file formats available to import data in PHP, CSV (.csv) and Spreadsheet (.xlsx).
In our previous tutorial, we have already discussed how to import CSV file data into database with PHP.
Here we will discuss the 2nd file format to import Excel file data into MySQL database using PHP.
In this example script, we will import members' data from an Excel file in the database using PHP and MySQL.
Upload Excel file with HTML and PHP.
Read and parse data from Excel files with PHP.
Insert data in the database with PHP and MySQL.
Create Database Table
To store the member's data, a table is required in the database.
The following SQL creates a members table with some basic fields in the MySQL database.
CREATE TABLE `members` (
`id` int(11) NOT NULL AUTO_INCREMENT,
`first_name` varchar(50) COLLATE utf8_unicode_ci NOT NULL,
`last_name` varchar(50) COLLATE utf8_unicode_ci NOT NULL,
`email` varchar(50) COLLATE utf8_unicode_ci NOT NULL,
`phone` varchar(15) COLLATE utf8_unicode_ci DEFAULT NULL,
`created` datetime NOT NULL,
`modified` datetime NOT NULL,
`status` enum('Active','Inactive') COLLATE utf8_unicode_ci NOT NULL DEFAULT 'Active',
PRIMARY KEY (`id`)
)
ENGINE=InnoDB DEFAULT CHARSET=utf8 COLLATE=utf8_unicode_ci;
Excel File Format
Based on the database table structure, the Excel file should have these fields -- First Name, Last Name, Email, Phone, and Status.
To import the data from Excel file, the data format should be similar to the following screen.
![]()
PhpSpreadsheet Library
We will use the PhpSpreadsheet library to read Excel files and parse data.
The PhpSpreadsheet is a PHP library that helps to parse data from spreadsheet file formats (.xls, .xlsx, etc).
Use composer to install PhpSpreadsheet in the script folder.
composer require phpoffice/phpspreadsheet
Alternatively, you can use our source code to install PhpSpreadsheet without composer.
Note that: All the required files including the PhpSpreadsheet library are included in our source code, you do not require to install it separately.
Before getting started, look at the file structure of the Excel data import in PHP script.
import_excel_data_with_php/
├── dbConnect.php
├── index.php
├── importData.php
├── vendor/
├── assets/
└── css/
├── bootstrap.min.css
└── style.css
Database Configuration (dbConfig.php)
The dbConfig.php is used to connect and select the database.
Specify the database host ($dbHost ), username ($dbUsername ), password ($dbPassword ), and name ($dbName ) as per your MySQL database credentials.
<?php
// Database configuration
$dbHost = "localhost";
$dbUsername = "root";
$dbPassword = "root";
$dbName = "codexworld_db";
// Create database connection
$db = new mysqli($dbHost, $dbUsername, $dbPassword, $dbName);
// Check connection
if ($db->connect_error) {
die("Connection failed: " . $db->connect_error);
}
?>
Excel File Upload (index.php)
Initially, the existing member's data is listed with the Excel file import option.
Existing members' data are fetched from the database and listed on the webpage.
An Import Excel button is placed at the top of the list.
By clicking the Import button, an HTML form appears to select and upload an Excel file.
On submission, the form is submitted to the server-side script (importData.php) to process the Excel data import functionality.
formToggle() -- It is a JavaScript function that helps to Show/Hide the Excel file upload form.
This function is triggered on the click event of the Import button.
If the form is already submitted, The status message is retrieved from the URL and the import status is displayed on the web page.
<?php
// Load the database configuration file
include_once 'dbConfig.php';
// Get status message
if(!empty($_GET['status'])){
switch($_GET['status']){
case 'succ':
$statusType = 'alert-success';
$statusMsg = 'Member data has been imported successfully.';
break;
case 'err':
$statusType = 'alert-danger';
$statusMsg = 'Something went wrong, please try again.';
break;
case 'invalid_file':
$statusType = 'alert-danger';
$statusMsg = 'Please upload a valid Excel file.';
break;
default:
$statusType = '';
$statusMsg = '';
}
}
?>
<!DOCTYPE html>
<html lang="en">
<head>
<meta charset="utf-8">
<title>Import Excel File Data with PHP</title>
<!-- Bootstrap library -->
<link rel="stylesheet" href="assets/css/bootstrap.min.css">
<!-- Stylesheet file -->
<link rel="stylesheet" href="assets/css/style.css">
<!-- Show/hide Excel file upload form -->
<script>
function formToggle(ID){
var element = document.getElementById(ID);
if(element.style.display === "none"){
element.style.display = "block";
}else{
element.style.display = "none";
}
}
</script>
</head>
<body>
<!-- Display status message -->
<?php if(!empty($statusMsg)){ ?>
<div class="col-xs-12 p-3">
<div class="alert <?php echo $statusType; ?>"> ;<?php echo $statusMsg; ?>< ;/div>
</div>
<?php } ?>
<div class="row p-3">
<!-- Import link -->
<div class="col-md-12 head">
<div class="float-end">
<a href="javascript:void(0);" class="btn btn-success" onclick="formToggle('importFrm');"><i class="plus"></i> Import Excel</a>
</div>
</div>
<!-- Excel file upload form -->
<div class="col-md-12" id="importFrm" style="display: none;">
<form class="row g-3" action="importData.php" method="post" enctype="multipart/form-data">
<div class="col-auto">
<label for="fileInput" class="visually-hidden">File</label>
<input type="file" class="form-control" name="file" id="fileInput" />
</div>
<div class="col-auto">
<input type="submit" class="btn btn-primary mb-3" name="importSubmit" value="Import">
</div>
</form>
</div>
<!-- Data list table -->
<table class="table table-striped table-bordered">
<thead class="table-dark">
<tr>
<th>#</th>
<th>First Name</th>
<th>Last Name</th>
<th>Email</th>
<th>Phone</th>
<th>Status</th>
<th>Created</th>
</tr>
</thead>
<tbody>
<?php
// Get member rows
$result = $db->query("SELECT * FROM members ORDER BY id DESC");
if($result->num_rows > 0){ $i=0;
while($row = $result->fetch_assoc()){ $i++;
?>
<tr>
<td><?php echo $i; ?>< ;/td>
<td><?php echo $row['first_name']; ?>< ;/td>
<td><?php echo $row['last_name']; ?>< ;/td>
<td><?php echo $row['email']; ?>< ;/td>
<td><?php echo $row['phone']; ?>< ;/td>
<td><?php echo $row['status']; ?>< ;/td>
<td><?php echo $row['created']; ?>< ;/td>
</tr>
<?php } }else{ ?>
<tr><td colspan="7">No member(s) found...</td></tr>
<?php } ?>
</tbody>
</table>
</div>
</body>
</html>
Import Excel Data to Database (importData.php)
The importData.php file handles the file upload and Excel data import operations using PHP and MySQL.
Include PhpSpreadsheet library autoloader and specify Xlsx namespace from PhpSpreadsheet\Reader .
Validate the selected file format to check whether it is a valid Excel file (.xlsx).
Check whether the Excel file is uploaded using the PHP is_uploaded_file() function.
Retrieve row data from Excel file with PhpSpreadsheet using PHP.
Initialize the Xlsx() class of the PhpSpreadsheet library.
Load the Excel file using the load() method of Xlsx class.
Parse data from the spreadsheet using the getActiveSheet() method.
Convert Excel file data into an array using the toArray() method.
Insert/Update member data in the database based on the email address.
Redirect to the listing page with the import status code.
<?php
// Load the database configuration file
include_once 'dbConfig.php';
// Include PhpSpreadsheet library autoloader
require_once 'vendor/autoload.php';
use PhpOffice\PhpSpreadsheet\Reader\Xlsx;
if(isset($_POST['importSubmit'])){
// Allowed mime types
$excelMimes = array('text/xls', 'text/xlsx', 'application/excel', 'application/vnd.msexcel', 'application/vnd.ms-excel', 'application/vnd.openxmlformats-officedocument.spreadsheetml.sheet');
// Validate whether selected file is a Excel file
if(!empty($_FILES['file']['name']) && in_array($_FILES['file']['type'], $excelMimes)){
// If the file is uploaded
if(is_uploaded_file($_FILES['file']['tmp_name'])){
$reader = new Xlsx();
$spreadsheet = $reader->load($_FILES['file']['tmp_name']);
$worksheet = $spreadsheet->getActiveSheet();
$worksheet_arr = $worksheet->toArray();
// Remove header row
unset($worksheet_arr[0]);
foreach($worksheet_arr as $row){
$first_name = $row[0];
$last_name = $row[1];
$email = $row[2];
$phone = $row[3];
$status = $row[4];
// Check whether member already exists in the database with the same email
$prevQuery = "SELECT id FROM members WHERE email = '".$email."'";
$prevResult = $db->query($prevQuery);
if($prevResult->num_rows > 0){
// Update member data in the database
$db->query("UPDATE members SET first_name = '".$first_name."', last_name = '".$last_name."', email = '".$email."', phone = '".$phone."', status = '".$status."', modified = NOW() WHERE email = '".$email."'");
}else{
// Insert member data in the database
$db->query("INSERT INTO members (first_name, last_name, email, phone, status, created, modified) VALUES ('".$first_name."', '".$last_name."', '".$email."', '".$phone."', '".$status."', NOW(), NOW())");
}
}
$qstring = '?status=succ';
}else{
$qstring = '?status=err';
}
}else{
$qstring = '?status=invalid_file';
}
}
// Redirect to the listing page
header("Location: index.php".$qstring);
?>
Import and Export CSV File using PHP and MySQL
PHP Import CSV Data into MySQL Database
Create Database Table
CSV File Format
Database Configuration (dbConfig.php)
CSV File Upload (index.php)
Import CSV Data to Database (importData.php)
Create Database Table
To store the member's data, a table needs to be created in the database.
The following SQL creates a members table with some basic fields in the MySQL database.
CREATE TABLE `members` (
`id` int(11) NOT NULL AUTO_INCREMENT,
`name` varchar(50) COLLATE utf8_unicode_ci NOT NULL,
`email` varchar(50) COLLATE utf8_unicode_ci NOT NULL,
`phone` varchar(15) COLLATE utf8_unicode_ci NOT NULL,
`created` datetime NOT NULL,
`modified` datetime NOT NULL,
`status` enum('Active','Inactive') COLLATE utf8_unicode_ci NOT NULL DEFAULT 'Active',
PRIMARY KEY (`id`)
) ENGINE=InnoDB DEFAULT CHARSET=utf8 COLLATE=utf8_unicode_ci;
CSV File Format
Based on the database table structure, the CSV file should have these fields -- Name, Email, Phone, and Status.
To import the data from CSV file, the format will similar the following screen.
![]()
Database Configuration (dbConfig.php)
The dbConfig.php is used to connect the database.
Specify the database host ($dbHost ), username ($dbUsername ), password ($dbPassword ), and name ($dbName ) as per your MySQL database credentials.
<?php
// Database configuration
$dbHost = "localhost";
$dbUsername = "root";
$dbPassword = "root";
$dbName = "codexworld";
// Create database connection
$db = new mysqli($dbHost, $dbUsername, $dbPassword, $dbName);
// Check connection
if ($db->connect_error) {
die("Connection failed: " . $db->connect_error);
}
CSV File Upload (index.php)
Initially, the members data is listed with CSV file import option.
Existing members data are fetched from the database and listed on the webpage.
An Import button is placed at the top of the list.
By clicking the Import button, an HTML form is appeared to select and upload a CSV file.
On submission, the form is submitted to the importData.php file for importing the CSV data to the database.
formToggle() -- It is a JavaScript function that helps to Show/Hide the CSV upload form.
This function is triggered on click event of the Import button.
If the form is already submitted, the status message is retrieved from the URL and the import status is displayed on the web page.
<?php
// Load the database configuration file
include_once 'dbConfig.php';
// Get status message
if(!empty($_GET['status'])){
switch($_GET['status']){
case 'succ':
$statusType = 'alert-success';
$statusMsg = 'Members data has been imported successfully.';
break;
case 'err':
$statusType = 'alert-danger';
$statusMsg = 'Some problem occurred, please try again.';
break;
case 'invalid_file':
$statusType = 'alert-danger';
$statusMsg = 'Please upload a valid CSV file.';
break;
default:
$statusType = '';
$statusMsg = '';
}
}
?>
<!-- Display status message -->
<?php if(!empty($statusMsg)){ ?>
<div class="col-xs-12">
<div class="alert <?php echo $statusType; ?> "><?php echo $statusMsg; ?> </div>
</div>
<?php } ?>
<div class="row">
<!-- Import link -->
<div class="col-md-12 head">
<div class="float-right">
<a href="javascript:void(0);" class="btn btn-success" onclick="formToggle('importFrm');"><i class="plus"></i> Import</a>
</div>
</div>
<!-- CSV file upload form -->
<div class="col-md-12" id="importFrm" style="display: none;">
<form action="importData.php" method="post" enctype="multipart/form-data">
<input type="file" name="file" />
<input type="submit" class="btn btn-primary" name="importSubmit" value="IMPORT">
</form>
</div>
<!-- Data list table -->
<table class="table table-striped table-bordered">
<thead class="thead-dark">
<tr>
<th>#ID</th>
<th>Name</th>
<th>Email</th>
<th>Phone</th>
<th>Status</th>
</tr>
</thead>
<tbody>
<?php
// Get member rows
$result = $db->query("SELECT * FROM members ORDER BY id DESC");
if($result->num_rows > 0){
while($row = $result->fetch_assoc()){
?>
<tr>
<td><?php echo $row['id']; ?> </td>
<td><?php echo $row['name']; ?> </td>
<td><?php echo $row['email']; ?> </td>
<td><?php echo $row['phone']; ?> </td>
<td><?php echo $row['status']; ?> </td>
</tr>
<?php } }else{ ?>
<tr><td colspan="5">No member(s) found...</td></tr>
<?php } ?>
</tbody>
</table>
</div>
<!-- Show/hide CSV upload form -->
<script>
function formToggle(ID){
var element = document.getElementById(ID);
if(element.style.display === "none"){
element.style.display = "block";
}else{
element.style.display = "none";
}
}
</script>
The Bootstrap library is used to styling the Table, Form, and Buttons.
So, include the Bootstrap 4 library file and custom stylesheet file (if any).
If you don't want to use Bootstrap structure, omit to include this library file.
<!-- Bootstrap library -->
<link rel="stylesheet" href="assets/bootstrap/bootstrap.min.css">
<!-- Stylesheet file -->
<link rel="stylesheet" href="assets/css/style.css">
Import CSV Data to Database (importData.php)
The importData.php file handles the file upload and CSV data import process using PHP and MySQL.
Validate the posted file whether it is a valid .csv file.
Check whether the CSV file is uploaded using is_uploaded_file() function.
Open the CSV file in read-only mode using fopen() function.
Read and Parse data from the opened CSV file using fgetcsv() function.
Retrieve the CSV data line by line.
Insert/Update member data in the database based on the email address.
Redirect to the listing page with import status code.
<?php
// Load the database configuration file
include_once 'dbConfig.php';
if(isset($_POST['importSubmit'])){
// Allowed mime types
$csvMimes = array('text/x-comma-separated-values', 'text/comma-separated-values', 'application/octet-stream', 'application/vnd.ms-excel', 'application/x-csv', 'text/x-csv', 'text/csv', 'application/csv', 'application/excel', 'application/vnd.msexcel', 'text/plain');
// Validate whether selected file is a CSV file
if(!empty($_FILES['file']['name']) && in_array($_FILES['file']['type'], $csvMimes)){
// If the file is uploaded
if(is_uploaded_file($_FILES['file']['tmp_name'])){
// Open uploaded CSV file with read-only mode
$csvFile = fopen($_FILES['file']['tmp_name'], 'r');
// Skip the first line
fgetcsv($csvFile);
// Parse data from CSV file line by line
while(($line = fgetcsv($csvFile)) !== FALSE){
// Get row data
$name = $line[0];
$email = $line[1];
$phone = $line[2];
$status = $line[3];
// Check whether member already exists in the database with the same email
$prevQuery = "SELECT id FROM members WHERE email = '".$line[1]."'";
$prevResult = $db->query($prevQuery);
if($prevResult->num_rows > 0){
// Update member data in the database
$db->query("UPDATE members SET name = '".$name."', phone = '".$phone."', status = '".$status."', modified = NOW() WHERE email = '".$email."'");
}else{
// Insert member data in the database
$db->query("INSERT INTO members (name, email, phone, created, modified, status) VALUES ('".$name."', '".$email."', '".$phone."', NOW(), NOW(), '".$status."')");
}
}
// Close opened CSV file
fclose($csvFile);
$qstring = '?status=succ';
}else{
$qstring = '?status=err';
}
}else{
$qstring = '?status=invalid_file';
}
}
// Redirect to the listing page
header("Location: index.php".$qstring);
Export Data to CSV File using PHP and MySQL
call a PHP function onclick
https://stackoverflow.com/questions/20738329/how-to-call-a-php-function-on-the-click-of-a-button
PHP executes on the server.
You can't run PHP functions on the click of a button.
Button clicks are client side whereas PHP is executed server side, but you can achieve this by using Ajax.
You can do it in Javascript, however.
Because the PHP code is not in the HTML.
Most server side scripting languages work (including PHP, JSP, and ASP).
That code only exists on the server, and it is no reachable from the client (the browser) without a remote call of some sort.
If you ask your browser to show the source code of the page.
You will not see the PHP code, that is because the PHP code is not send to the client, therefore it cannot be executed from the client.
That's why you need to do a remote call to be able to have the client trigger the execution of PHP code.
If you don't use a form, you can do that remote call from JavaScript with a little thing called Ajax.
You may also want to consider if what you want to do in PHP can be done directly in JavaScript.
jQuery:
$(document).ready(function(){
$('.button').click(function(){
var clickBtnValue = $(this).val();
var ajaxurl = 'ajax.php',
data = {'action': clickBtnValue};
$.post(ajaxurl, data, function (response) {
// Response div goes here.
alert("action performed successfully");
});
});
});
In ajax.php
<?php
if (isset($_POST['action'])) {
switch ($_POST['action']) {
case 'insert':
insert();
break;
case 'select':
select();
break;
}
}
function select() {
echo "The select function is called.";
exit;
}
function insert() {
echo "The insert function is called.";
exit;
}
?>
using Ajax:
$('.button').click(function() {
$.ajax({
type: "POST",
url: "some.php",
data: { name: "John" }
}).done(function( msg ) {
alert( "Data Saved: " + msg );
});
});
PHP file:
<?php
function abc($name){
// Your code here
}
?>
some snippet
<?php
if ($_GET) {
if (isset($_GET['insert'])) {
insert();
} elseif (isset($_GET['select'])) {
select();
}
}
function select()
{ echo "The select function is called."; }
To show $message in your input:
<?php
if(isset($_POST['insert'])){
$message= "The insert function is called.";
}
if(isset($_POST['select'])){
$message="The select function is called.";
}
?>
<form method="post">
<input type="text" name="txt" value="<?php if(isset($message)){ echo $message;}?>" >
<input type="submit" name="insert" value="insert">
<input type="submit" name="select" value="select" >
</form>
function insert()
{ echo "The insert function is called."; }
?>
Try this:
if($_POST['select'] and $_SERVER['REQUEST_METHOD'] == "POST"){
select();
}
if($_POST['insert'] and $_SERVER['REQUEST_METHOD'] == "POST"){
insert();
}
$('#btn').click(function(){
$.ajax({
url:'test.php?call=true',
type:'GET',
success:function(data){
body.append(data);
}
});
})
<script src="https://ajax.googleapis.com/ajax/libs/jquery/2.0.1/jquery.min.js"></script>
<form method='get' >
<input type="button" id="btn" value="click">
</form>
<?php
if(isset($_GET['call'])){
function anyfunction(){ echo "added";
// Your funtion code
}
}
?>
PHP Examples
Syntax
Comments
Variables
Echo and Print
Data Types
Strings
Numbers
Math
Constants
Operators
If...Else and Switch Statements
While and For Loops
Functions
Arrays
Multidimensional Arrays
Sorting Arrays
Superglobals
Regular Expressions
Form Validation
Date and Time
Include Files
File Handling
File Open/Read/Close
Cookies
Sessions
Filters
JSON
Exceptions
Classes/Objects
Select Data From MySQL
SimpleXML Parser
XML Expat Parser
Syntax
Write text to the output using PHP
Keywords, classes, functions, and user-defined functions ARE NOT case-sensitive
Variable names ARE case-sensitive
Syntax explained
Comments
Syntax for single-line comments
Syntax for multi-line comments
Using comments to leave out parts of the code
Comments explained
Variables
Create different variables
Test global scope (variable outside function)
Test local scope (variable inside function)
Use the global keyword to access a global variable from within a function
Use the $GLOBALS[] array to access a global variable from within a function
Use the static keyword to let a local variable not be deleted after execution of function
Variables explained
Echo and Print
Display strings with the echo command
Display strings and variables with the echo command
Display strings with the print command
Display strings and variables with the print command
Echo and Print explained
Data Types
PHP string
PHP integer
PHP float
PHP array
PHP object
PHP NULL value
Data Types explained
Strings
Get the length of a string - strlen()
Count the number of words in a string - str_word_count()
Reverse a string - strrev()
Search for a specific text within a string - strpos()
Replace text within a string - str_replace()
Strings explained
Numbers
Check if the type of a variable is integer
Check if the type of a variable is float
Check if a numeric value is finite or infinite
Invalid calculation will return a NaN value
Check if a variable is numeric
Cast float and string to integer
Numbers explained
Math
Find the value of PI
Find the lowest and highest value in a list of arguments
Find the absolute (positive) value of a number
Find the square root of a number
Round a floating-point number to its nearest integer
Generate a random number
Generate a random number between 10 and 100
Math explained
Constants
Case-sensitive constant name
Case-insensitive constant name
Create a Array constant with define()
Use a constant inside a function (when it is defined outside the function)
Constants explained
Operators
Arithmetic operator: Addition (+)
Arithmetic operator: Subtraction (-)
Arithmetic operator: Multiplication (*)
Arithmetic operator: Division (/)
Arithmetic operator: Modulus (%)
Assignment operator: x = y
Assignment operator: x += y
Assignment operator: x -= y
Assignment operator: x *= y
Assignment operator: x /= y
Assignment operator: x %= y
Comparison operator: Equal (==)
Comparison operator: Identical (===)
Comparison operator: Not equal (!=)
Comparison operator: Not equal (<>)
Comparison operator: Not identical (!==)
Comparison operator: Greater than (>)
Comparison operator: Less than (<)
Comparison operator: Greater than or equal (>=)
Comparison operator: Less than or equal (<=)
Comparison operator: Spaceship (<=>)
Increment operator: ++$x
Increment operator: $x++
Decrement operator: --$x
Decrement operator: $x--
Logical operator: and
Logical operator: or
Logical operator: xor
Logical operator: && (and)
Logical operator: || (or)
Logical operator: not
String operator: Concatenation of $txt1 and $txt2
String operator: Appends $txt2 to $txt1
Array operator: Union (+)
Array operator: Equality (==)
Array operator: Identity (===)
Array operator: Inequality (!=)
Array operator: Inequality (<>)
Array operator: Non-identity (!==)
Conditional assignment operator: Ternary (?:)
Conditional assignment: Null coalescing (??)
Operators explained
If...Else and Switch Statements
The if statement
The if...else statement
The if...elseif...else statement
The switch statement
Conditions explained
While and For Loops
The while loop
The do...while loop
Another do...while loop
The for loop
The foreach loop
The break statement in a loop
The continue statement in a loop
Loops explained
Functions
Create a function
Function with one argument
Function with two arguments
Function with default argument value
Function that returns a value
Return type declarations
Passing arguments by reference
Functions explained
Arrays
Indexed arrays
count() - Return the length of an array
Loop through an indexed array
Associative arrays
Loop through an associative array
Arrays explained
Multidimensional Arrays
Output elements from a multidimensional array
Loop through a multidimensional array
Multidimensional Arrays explained
Sorting Arrays
sort() - Sort array in ascending alphabetical order
sort() - Sort array in ascending numerical order
rsort() - Sort array in descending alphabetical order
rsort() - Sort array in descending numerical order
asort() - Sort array in ascending order, according to value
ksort() - Sort array in ascending order, according to key
arsort() - Sort array in descending order, according to value
krsort() - Sort array in descending order, according to key
Sorting Arrays explained
Superglobals
$GLOBAL - Used to access global variables from anywhere in the PHP script
$_SERVER - Holds information about headers, paths, and script locations
$_REQUEST - Used to collect data after submitting an HTML form
$_POST - Used to collect form data after submitting an HTML form. Also used to pass variables
$_GET - Collect data sent in the URL
Superglobals explained
Regular Expressions
Do a case-insensitive search for "w3schools" in a string
Do a case-insensitive count of the number of occurrences of "ain" in a string
Replace "Microsoft" with "W3Schools" in a string
Regular Expressions explained
Form Validation
PHP Form Validation
Form Validation explained
Date and Time
Format today's date in several ways
Automatically update the copyright year on your website
Output the current time (server time)
Set timezone, then output current time
Create a date and time from a number of parameters in mktime()
Create a date and time from the strtotime() function
Create more dates/times from strtotime()
Output the dates for the next six Saturdays
Output the number of days until 4th of July
Date and Time explained
Include Files
Use include to include "footer.php" in a page
Use include to include "menu.php" in a page
Use include to include "vars.php" in a page
Use include to include a non-existing file
Use require to include a non-existing file
Include Files explained
File Handling
Use readfile() to read a file and write it to the output buffer
File Handling explained
File Open/Read/Close
Use fopen(), fread(), and fclose() to open, read, and close a file
Use fgets() to read a single line from a file
Use feof() to read through a file, line by line, until end-of-file is reached
Use fgetc() to read a single character from a file
File Open/Read/Close explained
Cookies
Create and retrieve a cookie
Modify a cookie value
Delete a cookie
Check if cookies are enabled
Cookies explained
Sessions
Start a session
Get session variable values
Get all session variable values
Modify a session variable
Destroy a session
Sessions explained
Filters
Use filter_list() to list what the PHP filter extension offers
Sanitize a string
Validate an integer
Validate an integer that is 0
Validate an IP address
Sanitize and validate an email address
Sanitize and validate a URL
Filters explained
JSON
Encode an associative array into a JSON object
Decode JSON data into a PHP object
Access the values from a PHP object
Loop through the values of a PHP object
PHP JSON explained
Exceptions
Throw an Exception
Use try..catch to show a message when an exception is thrown
Use finally
Output information about an exception that was thrown
PHP Exceptions explained
Classes/Objects
Define a class and an object
Using the $this keyword
Using the instanceof keyword
Creating a constructor
Creating a destructor
Inheritance
Class constants
Abstract classes
Traits
Static method
Static property
PHP OOP (Classes/Objects) explained
Select Data From MySQL
Select data with MySQLi (Object-oriented)
Select data with MySQLi (Procedural)
Put the resut in an HTML table (Object-oriented)
Select data with PDO (+ Prepared statements)
Select Data From MySQL explained
SimpleXML Parser
Use simplexml_load_string() to read XML data from a string
Use simplexml_load_file() to read XML data from a file
Get node values
Get node values of specific elements
Get node values - loop
Get attribute values
Get attribute values - loop
SimpleXML Parser explained
XML Expat Parser
Initialize an XML Expat parser, define some handlers, then parse an XML file
XML Expat Parser explained
AJAX PHP Example
AJAX is used to create more interactive applications.
The following example will demonstrate how a web page can communicate with a
web server while a user type characters in an input field:
Example Explained
Example, when a user types a character in the input field, a function
called "showHint()" is executed.
The function is triggered by the onkeyup event.
Here is the HTML code:
Example
<html>
<head>
<script>
function showHint(str) {
if (str.length == 0) {
document.getElementById("txtHint").innerHTML = "";
return;
} else {
var xmlhttp = new XMLHttpRequest();
xmlhttp.onreadystatechange = function() {
if (this.readyState == 4 && this.status == 200) {
document.getElementById("txtHint").innerHTML = this.responseText;
}
};
xmlhttp.open("GET", "gethint.php?q=" + str, true);
xmlhttp.send();
}
}
</script>
</head>
<body>
<p><b>Start typing a name in the input field below:</b></p>
<form action="">
<label for="fname">First name:</label>
<input type="text" id="fname" name="fname" onkeyup="showHint(this.value)">
</form>
<p>Suggestions: <span id="txtHint"></span></p>
</body>
</html>
Run example »
Code explanation:
First, check if the input field is empty (str.length == 0). If it is, clear the
content of the txtHint placeholder and exit the function.
However, if the input field is not empty, do the following:
Create an XMLHttpRequest object
Create the function to be executed when the server response is ready
Send the request off to a PHP file (gethint.php) on the server
Notice that q parameter is added to the url (gethint.php?q="+str)
And the str variable holds the content of the input field
The PHP File - "gethint.php"
The PHP file checks an array of names, and returns the corresponding name(s) to the
browser:
<?php
// Array with names
$a[] = "Anna";
$a[] = "Brittany";
$a[] = "Cinderella";
$a[] = "Diana";
$a[] = "Eva";
$a[] = "Fiona";
$a[] = "Gunda";
$a[] = "Hege";
$a[] = "Inga";
$a[] = "Johanna";
$a[] = "Kitty";
$a[] = "Linda";
$a[] = "Nina";
$a[] = "Ophelia";
$a[] = "Petunia";
$a[] = "Amanda";
$a[] = "Raquel";
$a[] = "Cindy";
$a[] = "Doris";
$a[] = "Eve";
$a[] = "Evita";
$a[] = "Sunniva";
$a[] = "Tove";
$a[] = "Unni";
$a[] = "Violet";
$a[] = "Liza";
$a[] = "Elizabeth";
$a[] = "Ellen";
$a[] = "Wenche";
$a[] = "Vicky";
// get the q parameter from URL
$q = $_REQUEST["q"];
$hint = "";
// lookup all hints from array if $q is different from ""
if ($q !== "") {
$q = strtolower($q);
$len=strlen($q);
foreach($a as $name) {
if (stristr($q, substr($name, 0, $len))) {
if ($hint === "") {
$hint = $name;
} else {
$hint .= ", $name";
}
}
}
}
// Output "no suggestion" if no hint was found or output correct values
echo $hint === "" ? "no suggestion" : $hint;
?>
AJAX and MySQL Database Example
AJAX can be used for interactive communication with a database.
The following example will demonstrate how a web page can fetch information from a database with AJAX:
Person info will be listed here...
Example Explained - The MySQL Database
The database table we use in the example above looks like this:
id FirstName LastName Age Hometown Job 1 Peter Griffin 41 Quahog Brewery 2 Lois Griffin 40 Newport Piano Teacher 3 Joseph Swanson 39 Quahog Police Officer 4 Glenn Quagmire 41 Quahog Pilot
Example Explained
In the example above, when a user selects a person in the dropdown list
above, a function called "showUser()" is executed.
The function is triggered by the onchange event.
Here is the HTML code:
Example
<html>
<head>
<script>
function showUser(str) {
if (str == "") {
document.getElementById("txtHint").innerHTML = "";
return;
} else {
var xmlhttp = new XMLHttpRequest();
xmlhttp.onreadystatechange = function() {
if (this.readyState == 4 && this.status == 200) {
document.getElementById("txtHint").innerHTML = this.responseText;
}
};
xmlhttp.open("GET","getuser.php?q="+str,true);
xmlhttp.send();
}
}
</script>
</head>
<body>
<form>
<select name="users" onchange="showUser(this.value)">
<option value="">Select a person:</option>
<option value="1">Peter Griffin</option>
<option value="2">Lois Griffin</option>
<option value="3">Joseph Swanson</option>
<option value="4">Glenn Quagmire</option>
</select>
</form>
<br>
<div id="txtHint"><b>Person info will be listed here...</b></div>
</body>
</html>
Run example »
Code explanation:
First, check if person is selected. If no person is selected (str == ""), clear the
content of txtHint and exit the function. If a person is selected, do the following:
- Create an XMLHttpRequest object
- Create the function to be executed when the server response is ready
- Send the request off to a file on the server
- Notice that a parameter (q) is added to the URL (with the content of the dropdown list)
The PHP File
The page on the server called by the JavaScript above is a PHP file called "getuser.php".
The source code in "getuser.php" runs a query against a MySQL database, and returns the result in an HTML
table:
<!DOCTYPE html>
<html>
<head>
<style>
table {
width: 100%;
border-collapse: collapse;
}
table, td, th {
border: 1px solid black;
padding: 5px;
}
th {text-align: left;}
</style>
</head>
<body>
<?php
$q = intval($_GET['q']);
$con = mysqli_connect('localhost','peter','abc123');
if (!$con) {
die('Could not connect: ' . mysqli_error($con));
}
mysqli_select_db($con,"ajax_demo");
$sql="SELECT * FROM user WHERE id = '".$q."'";
$result = mysqli_query($con,$sql);
echo "<table>
<tr>
<th>Firstname</th>
<th>Lastname</th>
<th>Age</th>
<th>Hometown</th>
<th>Job</th>
</tr>";
while($row = mysqli_fetch_array($result)) {
echo "<tr>";
echo "<td>" . $row['FirstName'] . "</td>";
echo "<td>" . $row['LastName'] . "</td>";
echo "<td>" . $row['Age'] . "</td>";
echo "<td>" . $row['Hometown'] . "</td>";
echo "<td>" . $row['Job'] . "</td>";
echo "</tr>";
}
echo "</table>";
mysqli_close($con);
?>
</body>
</html>
Explanation: When the query is sent from the JavaScript to the PHP file, the following happens:
- PHP opens a connection to a MySQL server
- The correct person is found
- An HTML table is created, filled with data, and sent back to the "txtHint" placeholder
PHP event listener simple example
<?php
// Used in https://github.com/im4aLL/roolith-event
class Event {
private static $events = [];
public static function listen($name, $callback) {
self::$events[$name][] = $callback;
}
public static function trigger($name, $argument = null) {
foreach (self::$events[$name] as $event => $callback) {
if($argument && is_array($argument)) {
call_user_func_array($callback, $argument);
}
elseif ($argument && !is_array($argument)) {
call_user_func($callback, $argument);
}
else {
call_user_func($callback);
}
}
}
}
class User {
public function login() {
return true;
}
public function logout() {
return true;
}
public function updated() {
return true;
}
}
// Usage
// ==================================
Event::listen('login', function(){
echo 'Event user login fired! <br>';
});
$user = new User();
if($user->login()) {
Event::trigger('login');
}
// Usage with param
// ==================================
Event::listen('logout', function($param){
echo 'Event '. $param .' logout fired! <br>';
});
if($user->logout()) {
Event::trigger('logout', 'user');
}
// Usage with param as array
// ==================================
Event::listen('updated', function($param1, $param2){
echo 'Event ('. $param1 .', '. $param2 .') updated fired! <br>';
});
if($user->updated()) {
Event::trigger('updated', ['param1', 'param2']);
}
call PHP functions by JavaScript
PHP functions is run on server side, so to call php functions through ajax call.
jQuery.ajax({
type: "POST",
url: 'your_functions_address.php',
dataType: 'json',
data: {functionname: 'add', arguments: [1, 2]},
success: function (obj, textstatus) {
if( !('error' in obj) ) {
yourVariable = obj.result;
}
else {
console.log(obj.error);
}
}
});
your_functions_address.php
<?php
header('Content-Type: application/json');
$aResult = array();
if( !isset($_POST['functionname']) ) { $aResult['error'] = 'No function name!'; }
if( !isset($_POST['arguments']) ) { $aResult['error'] = 'No function arguments!'; }
if( !isset($aResult['error']) ) {
switch($_POST['functionname']) {
case 'add':
if( !is_array($_POST['arguments']) || (count($_POST['arguments']) < 2) ) {
$aResult['error'] = 'Error in arguments!';
}
else {
$aResult['result'] = add(floatval($_POST['arguments'][0]), floatval($_POST['arguments'][1]));
}
break;
default:
$aResult['error'] = 'Not found function '.$_POST['functionname'].'!';
break;
}
}
php applications
A curated list of amazingly awesome PHP libraries, resources and shiny things.
A reviewed list of useful PHP static analysis tools
An advanced and complete PHP 7 eCommerce website along with MySQL database and Admin interface.
pugdebug is a standalone debugging client for PHP applications that uses XDebug as the debugging engine.
Protect your PHP code with obfuscation and encryption
Multi OTP Spam Amp/Paralell threads
Easy HotSpot is a super easy WiFi hotspot user management utility for Mikrotik RouterOS based Router devices. Voucher printing in 6 ready made templates are available. Can be installed in any PHP/MySql enabled servers locally or in Internet web servers. Uses the PHP PEAR2 API Client by boenrobot.
Rapid development engine that is minimalistic and ergonomic in design.
A library for managing context-based configuration for PHP applications
URL Shortener using Php and MySQL
Allows nanogallery2 to access Google Photos content.
Base for PHP application - Nginx, PHP7-FPM, MariaDB and phpMyAdmin 🐳
Executor de teste de mesa para scripts PHP
A PHP / folder based photo gallery script - No Database used
Easily control access to the Internet’s most popular services
Standardized console commands for managing PHP applications.
A curated list of amazingly awesome PHP libraries, resources and shiny things. With repository stars⭐ and forks🍴
Find nearest places like restaurants ,ATM,doctors, hospitals, etc ,virtually anything around you or anywhere in seconds. 🎉
This web application was built during W.A.R :p ( Weekend Application Rumble ), a 72-hr. hackathon organized by Programmer's Hub, VIT Pune.
A simple and basic Quiz written in PHP
A boilerplate for php webapps, without the need to go object orientated for every single step (using f.e. smarty , gettext i18n , bootstrap 4 , jQuery Validation )
PHP Admin panel finder
Docker containers that contains Phing, a build tool for PHP Applications
A services implementation for PHP applications.
A lightweight, simple alternative to symfony/console, designed for easy PHP applications development.
The replacement for the city's current interactive map.
Database Interface for PHP Applications
A website to generate and validate your password.
Calculator web-app implement with PHP and JS.
[Active] 🐘 Utilty scripts for PHP.
Simple phone book web-app implement with PHP and JS.
Pequeña clase para manejar los archivos que subidos
This is a simple Task Manager API for CRUD operations. (Get tasks, Add task, edit task, delete task)
Piggy bank is a simple application that allows to deposit money into a virtual piggy bank. Playing around with Zend Expressive mostly.
CRUD app
PHP implementation of JSON-REST server application.
Dedicated for PHP Based Web Services. Building MVC on top of Slim.
Php platform that aim to dynamicly change database schematic on demand to be able to keep up with world business demand today.
search database
Complete Code:- phpsearch.php
<?php
include 'connect_test_db.php';
$searchErr = '';
$employee_details='';
if(isset($_POST['save']))
{
if(!empty($_POST['search']))
{
$search = $_POST['search'];
$stmt = $con->prepare("select * from employee_info where department like '%$search%' or name like '%$search%'");
$stmt->execute();
$employee_details = $stmt->fetchAll(PDO::FETCH_ASSOC);
//print_r($employee_details);
}
else
{
$searchErr = "Please enter the information";
}
}
?>
<h3>search database</h3>
<form action="#" method="post">
<label for="email">Search Employee Information::</label>
<input type="text" name="search" placeholder="search here">
<button type="submit" name="save" class="btn">Submit</button>
<?php echo $searchErr;?>
</form>
<h3><u>Search Result</u></h3><br/>
<table class="table">
<thead><tr><th>#</th><th>Employee Name</th><th>Phone No</th><th>Age</th><th>Department</th></tr></thead>
<tbody>
<?php
if(!$employee_details)
{
echo '<tr>No data found</tr>';
}
else{
foreach($employee_details as $key=>$value)
{
?>
<tr>
<td><?php echo $key+1;?></td>
<td><?php echo $value['name'];?></td>
<td><?php echo $value['phone_no'];?></td>
<td><?php echo $value['age'];?></td>
<td><?php echo $value['department'];?></td>
</tr>
<?php
}
}
?>
</tbody>
</table>
NOTE *
Download the bootstrap CSS and js files from google and include the path of the files in the href attribute of link tag and src attribute of the script tag respectively.
PHP MySQL ajax search autocomplete
MAKE SEARCH IN MYSQL
You can add % in your array value.
Change your model code like below:
public function getSearchResult($query){
$params = [':query'=>'%'.$query.'%', // change this line
];
// Prepare statement
$search = $this->db->row("SELECT id, p_name FROM product WHERE p_name LIKE :query", $params);
return $search;
}
Fetch Data from Mysql using OOPS
database.php
<?php
//database.php
class Databases{
public $con;
public function __construct()
{
$this->con = mysqli_connect("localhost", "root", "", "testing");
if(!$this->con)
{
echo 'Database Connection Error ' . mysqli_connect_error($this->con);
}
}
public function insert($table_name, $data)
{
$string = "INSERT INTO ".$table_name." (";
$string .= implode(",", array_keys($data)) . ') VALUES (';
$string .= "'" . implode("','", array_values($data)) . "')";
if(mysqli_query($this->con, $string))
{
return true;
}
else
{
echo mysqli_error($this->con);
}
}
public function select($table_name)
{
$array = array();
$query = "SELECT * FROM ".$table_name."";
$result = mysqli_query($this->con, $query);
while($row = mysqli_fetch_assoc($result))
{
$array[] = $row;
}
return $array;
}
}
?>
test_class.php
<?php
//test_class.php
include 'database.php';
$data = new Databases;
$success_message = '';
if(isset($_POST["submit"]))
{
$insert_data = array(
'post_title' => mysqli_real_escape_string($data->con, $_POST['post_title']),
'post_desc' => mysqli_real_escape_string($data->con, $_POST['post_desc'])
);
if($data->insert('tbl_posts', $insert_data))
{
$success_message = 'Post Inserted';
}
}
?>
<!DOCTYPE html>
<html>
<head>
<title>Webslesson Tutorial | Select or Fetch Data from Mysql Table using OOPS in PHP</title>
<link rel="stylesheet" href="https://maxcdn.bootstrapcdn.com/bootstrap/3.3.6/css/bootstrap.min.css" />
<script src="https://maxcdn.bootstrapcdn.com/bootstrap/3.3.6/js/bootstrap.min.js"></script>
<script src="https://ajax.googleapis.com/ajax/libs/jquery/2.2.0/jquery.min.js"></script>
</head>
<body>
<br /><br />
<div class="container" style="width:700px;">
<form method="post">
<label>Post Title</label>
<input type="text" name="post_title" class="form-control" />
<br />
<label>Post Description</label>
<textarea name="post_desc" class="form-control"></textarea>
<br />
<input type="submit" name="submit" class="btn btn-info" value="Submit" />
<span class="text-success">
<?php
if(isset($success_message))
{
echo $success_message;
}
?>
</span>
</form>
<br />
<div class="table-responsive">
<table class="table table-bordered">
<tr>
<td width="30%">Post Name</td>
<td width="50">Post Description</td>
<td width="10%">Edit</td>
<td width="10%">Delete</td>
</tr>
<?php
$post_data = $data->select('tbl_posts');
foreach($post_data as $post)
{
?>
<tr>
<td><?php echo $post["post_title"]; ?></td>
<td><?php echo substr($post["post_desc"], 0, 200); ?></td>
<td><a href="test_class.php?edit=1&post_id=<?php echo $post["post_id"]; ?>">Edit</a></td>
<td><a href="#" id="<?php echo $post["post_id"]; ?>" class="delete">Delete</a></td>
</tr>
<?php
}
?>
</table>
</div>
</div>
</body>
</html>
MYSQL query using OOP
$db = 'oodb';
$host = 'localhost';
$username = 'root';
$password = '';
$dsn = sprintf('mysql:dbname=%s;host=%s', $db, $host);
$pdo = new PDO($dsn, $username, $password);
$statement = $pdo->prepare('INSERT INTO signup(name) VALUES(:name)');
$statement->execute(array(
'name' => $name,
));
Here's your code adapted to run using this simple example:
<?php
// configuration parameters
$db = 'oodb';
$host = 'localhost';
$username = 'root';
$password = '';
$dsn = sprintf('mysql:dbname=%s;host=%s', $db, $host);
// classes
class SignUp
{
/**
* @var PDO
*/
protected $pdo;
public function __construct(PDO $pdo)
{
$this->pdo = $pdo;
}
public function insert($name)
{
$statement = $pdo->prepare('INSERT INTO signup(name) VALUES(:name)');
$statement->execute(array( 'name' => $name, ));
}
}
// actual program flow
$pdo = new PDO($dsn, $username, $password);
$signUp = new SignUp($pdo);
if (array_key_exists('id', $_POST)) {
$signUp->insert($_POST['id']);
echo 'inserted';
exit;
}
?>
<form name="form1" method="post">
<input type="text" name="id">
<input type="submit" name="sub">
</form>
If isset $_POST
<form name="new user" method="post" action="step2_check.php">
<input type="text" name="mail"/>
<input type="password" name="password"/>
<input type="submit" value="continue"/>
</form>
step2_check.php:
if (isset($_POST["mail"])) {
echo "Yes, mail is set";
} else {
echo "N0, mail is not set";
}
Use !empty instead of isset.
isset return true for $_POST because $_POST array is superglobal and always exists (set).
Or better use $_SERVER['REQUEST_METHOD'] == 'POST'
PHP Code to Import SQL
It extracts the file contents into an array of lines by using PHP file().
The line array is iterated in a foreach loop to construct the query by omitting comment and empty lines.
The condition checks if the line contains symbols used as comment line delimiters like (-, /*, //).
If so, the loop skips the current iteration and continue with the next iteration.
In this way, it repeats the same until the 'end of query' statement.
Once, the end of query character is found then the query will be executed.
Then the query variable will be reset before starting next iteration.
<?php
$conn =new mysqli('localhost', 'root', '' , 'blog_samples');
$query = '';
$sqlScript = file('database-script.sql');
foreach ($sqlScript as $line) {
$startWith = substr(trim($line), 0 ,2);
$endWith = substr(trim($line), -1 ,1);
if (empty($line) || $startWith == '--' || $startWith == '/*' || $startWith == '//') {
continue;
}
$query = $query .$line;
if ($endWith == ';') {
mysqli_query($conn,$query) or die('<div>Problem in executing the SQL query <b>'.$query.'</b></div>');
$query= '';
}
}
echo '<div>SQL file imported successfully</div>';
?>
Download
search using mysqli query()
<?php
$mysqli = new mysqli("localhost","my_user","my_password","my_db");
// Check connection
if ($mysqli -> connect_errno) {
echo "Failed to connect to MySQL: " . $mysqli -> connect_error;
exit();
}
// Perform query
if ($result = $mysqli -> query("SELECT * FROM Persons")) {
echo "Returned rows are: " . $result -> num_rows;
// Free result set
$result -> free_result();
}
$mysqli -> close();
?>
Example - Procedural style query against a database:
<?php
$con = mysqli_connect("localhost","my_user","my_password","my_db");
if (mysqli_connect_errno()) {
echo "Failed to connect to MySQL: " . mysqli_connect_error();
exit();
}
// Perform query
if ($result = mysqli_query($con, "SELECT * FROM Persons")) {
echo "Returned rows are: " . mysqli_num_rows($result);
// Free result set
mysqli_free_result($result);
}
mysqli_close($con);
?>
If output multiple rows
if (isset($_POST['0'])) {
$sql = "SELECT email FROM CommercialEmails WHERE articleid = '$_POST[article]' AND dripid = 1 AND sent='a'";
$resultsd1 = mysqli_query($conn, $sql);
while ($row = mysqli_fetch_assoc($resultsd1))
{
echo $row['email'];
}
}
If only 1 row
if (isset($_POST['0'])){
$sql = "SELECT email FROM CommercialEmails WHERE articleid = '$_POST[article]' AND dripid = 1 AND sent='a' LIMIT 1";
$resultsd1 = mysqli_query($conn, $sql);
$row = mysqli_fetch_assoc($resultsd1);
echo $row['email'];
}
$result = mysqli_query($conn, 'SELECT ...');
foreach($result as $row) {
print_r($row);
// do something with each row
}
// or
$result = $conn->('SELECT ...')->fetch_all(MYSQLI_ASSOC);
foreach($result as $row) {
print_r($row);
// do something with each row
}
$_SERVER['PHP_SELF']
PHP_SELF is the name of the currently executing script.
When you use $_SERVER[’PHP_SELF’], it returns the file name typed in the URL.
When variables are appended at the end, they were truncated.
The only version that produced a different result has directories appended after the file name.
In that case, it returned those directories.
simplified example of an ERP system
some information on each of the modules:
Finance and Accounting:
The Finance and Accounting module of an ERP system handles financial transactions, manages financial records, and provides financial reporting. It includes functionalities such as:
General Ledger: Manages the company's financial accounts and tracks transactions.
Accounts Payable: Handles vendor invoices, manages payments, and tracks outstanding liabilities.
Accounts Receivable: Manages customer invoices, tracks incoming payments, and handles collections.
Fixed Assets: Tracks and manages the company's fixed assets, including depreciation calculations.
Financial Reporting: Generates financial statements, such as balance sheets, income statements, and cash flow statements.
Budgeting and Forecasting: Helps in planning and managing the company's budget and financial forecasts.
Human Resources:
The Human Resources (HR) module of an ERP system manages employee-related information, payroll, benefits, and other HR processes. It typically includes functionalities such as:
Employee Management: Maintains employee records, including personal information, employment history, and performance evaluations.
Payroll Management: Calculates employee salaries, deductions, and taxes, and facilitates payroll processing.
Benefits Administration: Manages employee benefits programs, such as health insurance, retirement plans, and vacation accruals.
Time and Attendance: Tracks employee attendance, manages leave requests, and calculates hours worked for payroll purposes.
Performance Management: Facilitates employee performance evaluations, goal setting, and performance tracking.
Training and Development: Manages employee training programs and tracks employee skills and certifications.
Customer Relationship Management (CRM):
The Customer Relationship Management module focuses on managing customer interactions, sales processes, and customer-related data. It typically includes functionalities such as:
Lead Management: Tracks and manages potential customer leads, from initial contact to conversion.
Sales Force Automation: Automates sales processes, such as opportunity management, quote generation, and order processing.
Contact and Account Management: Maintains customer contact information, account details, and communication history.
Marketing Automation: Helps in managing marketing campaigns, lead nurturing, and customer segmentation.
Customer Service and Support: Handles customer inquiries, complaints, and support requests, ensuring timely resolution.
Analytics and Reporting: Provides insights into customer behavior, sales performance, and marketing effectiveness.
Production Planning:
The Production Planning module assists in managing and optimizing the production process, including capacity planning, material requirements, and scheduling.
Key functionalities include:
Bill of Materials (BOM): Defines the components and raw materials required for manufacturing a product.
Material Requirements Planning (MRP): Calculates the materials needed based on production schedules and inventory levels.
Capacity Planning: Determines the resources, including labor and machines, needed for production.
Production Scheduling: Creates a detailed production schedule, considering factors such as order priorities and resource availability.
Shop Floor Control: Monitors and tracks the progress of production orders on the shop floor.
Quality Control: Manages quality inspections, testing, and ensures adherence to quality standards.
These are just some examples of modules that can be part of an ERP system. The specific features and functionalities may vary depending on the ERP software and the needs of the organization.
<?php
// Database connection parameters
$servername = "localhost";
$username = "your_username";
$password = "your_password";
$dbname = "your_database";
// Establish database connection
$conn = new mysqli($servername, $username, $password, $dbname);
if ($conn->connect_error) {
die("Connection failed: " . $conn->connect_error);
}
// Function to add a new customer to the system
function addCustomer($name, $email, $phone)
{
global $conn;
$sql = "INSERT INTO customers (name, email, phone) VALUES ('$name', '$email', '$phone')";
if ($conn->query($sql) === TRUE) {
echo "Customer added successfully.";
} else {
echo "Error adding customer: " . $conn->error;
}
}
// Function to retrieve all customers from the system
function getCustomers()
{
global $conn;
$sql = "SELECT * FROM customers";
$result = $conn->query($sql);
if ($result->num_rows > 0) {
while ($row = $result->fetch_assoc()) {
echo "Customer ID: " . $row["id"] . "<br>";
echo "Name: " . $row["name"] . "<br>";
echo "Email: " . $row["email"] . "<br>";
echo "Phone: " . $row["phone"] . "<br><br>";
}
} else {
echo "No customers found.";
}
}
// Example usage
addCustomer("John Doe", "john@example.com", "1234567890");
addCustomer("Jane Smith", "jane@example.com", "9876543210");
getCustomers();
// Close the database connection
$conn->close();
?>
In this example, we have a simple ERP system that focuses on managing customers.
The addCustomer function is used to add a new customer to the system by inserting the customer's information into a customers table in the database.
The getCustomers function retrieves all customers from the database and displays their details.
Inventory Management:
// Function to add a new product to the inventory
function addProduct($name, $quantity, $price)
{
global $conn;
$sql = "INSERT INTO products (name, quantity, price) VALUES ('$name', '$quantity', '$price')";
if ($conn->query($sql) === TRUE) {
echo "Product added successfully.";
} else {
echo "Error adding product: " . $conn->error;
}
}
// Function to retrieve all products from the inventory
function getProducts()
{
global $conn;
$sql = "SELECT * FROM products";
$result = $conn->query($sql);
if ($result->num_rows > 0) {
while ($row = $result->fetch_assoc()) {
echo "Product ID: " . $row["id"] . "<br>";
echo "Name: " . $row["name"] . "<br>";
echo "Quantity: " . $row["quantity"] . "<br>";
echo "Price: " . $row["price"] . "<br><br>";
}
} else {
echo "No products found.";
}
}
Sales and Orders Management:
// Function to place an order for a customer
function placeOrder($customerId, $productId, $quantity)
{
global $conn;
// Check if the product is available in the inventory
$productSql = "SELECT * FROM products WHERE id = '$productId'";
$productResult = $conn->query($productSql);
if ($productResult->num_rows > 0) {
$product = $productResult->fetch_assoc();
// Check if there is enough quantity in stock
if ($product["quantity"] >= $quantity) {
// Reduce the quantity in stock
$newQuantity = $product["quantity"] - $quantity;
$updateProductSql = "UPDATE products SET quantity = '$newQuantity' WHERE id = '$productId'";
$conn->query($updateProductSql);
// Insert the order into the orders table
$insertOrderSql = "INSERT INTO orders (customer_id, product_id, quantity) VALUES ('$customerId', '$productId', '$quantity')";
if ($conn->query($insertOrderSql) === TRUE) {
echo "Order placed successfully.";
} else {
echo "Error placing order: " . $conn->error;
}
} else {
echo "Insufficient quantity in stock.";
}
} else {
echo "Product not found.";
}
}
// Function to retrieve all orders
function getOrders()
{
global $conn;
$sql = "SELECT * FROM orders";
$result = $conn->query($sql);
if ($result->num_rows > 0) {
while ($row = $result->fetch_assoc()) {
echo "Order ID: " . $row["id"] . "<br>";
echo "Customer ID: " . $row["customer_id"] . "<br>";
echo "Product ID: " . $row["product_id"] . "<br>";
echo "Quantity: " . $row["quantity"] . "<br><br>";
}
} else {
echo "No orders found.";
}
}
Finance and Accounting:
// Function to record a financial transaction
function recordTransaction($type, $amount, $description)
{
global $conn;
$sql = "INSERT INTO transactions (type, amount, description) VALUES ('$type', '$amount', '$description')";
if ($conn->query($sql) === TRUE) {
echo "Transaction recorded successfully.";
} else {
echo "Error recording transaction: " . $conn->error;
}
}
// Function to retrieve all transactions
function getTransactions()
{
global $conn;
$sql = "SELECT * FROM transactions";
$result = $conn->query($sql);
if ($result->num_rows > 0) {
while ($row = $result->fetch_assoc()) {
echo "Transaction ID: " . $row["id"] . "<br>";
echo "Type: " . $row["type"] . "<br>";
echo "Amount: " . $row["amount"] . "<br>";
echo "Description: " . $row["description"] . "<br><br>";
}
} else {
echo "No transactions found.";
}
}
Human Resources:
// Function to add a new employee
function addEmployee($name, $position, $salary)
{
global $conn;
$sql = "INSERT INTO employees (name, position, salary) VALUES ('$name', '$position', '$salary')";
if ($conn->query($sql) === TRUE) {
echo "Employee added successfully.";
} else {
echo "Error adding employee: " . $conn->error;
}
}
// Function to retrieve all employees
function getEmployees()
{
global $conn;
$sql = "SELECT * FROM employees";
$result = $conn->query($sql);
if ($result->num_rows > 0) {
while ($row = $result->fetch_assoc()) {
echo "Employee ID: " . $row["id"] . "<br>";
echo "Name: " . $row["name"] . "<br>";
echo "Position: " . $row["position"] . "<br>";
echo "Salary: " . $row["salary"] . "<br><br>";
}
} else {
echo "No employees found.";
}
}
Customer Relationship Management (CRM):
// Function to add a new customer contact
function addContact($customerId, $name, $email, $phone)
{
global $conn;
$sql = "INSERT INTO contacts (customer_id, name, email, phone) VALUES ('$customerId', '$name', '$email', '$phone')";
if ($conn->query($sql) === TRUE) {
echo "Contact added successfully.";
} else {
echo "Error adding contact: " . $conn->error;
}
}
// Function to retrieve all contacts for a customer
function getContacts($customerId)
{
global $conn;
$sql = "SELECT * FROM contacts WHERE customer_id = '$customerId'";
$result = $conn->query($sql);
if ($result->num_rows > 0) {
while ($row = $result->fetch_assoc()) {
echo "Contact ID: " . $row["id"] . "<br>";
echo "Name: " . $row["name"] . "<br>";
echo "Email: " . $row["email"] . "<br>";
echo "Phone: " . $row["phone"] . "<br><br>";
}
} else {
echo "No contacts found for this customer.";
}
}
Production Planning:
// Function to create a production order
function createProductionOrder($productId, $quantity)
{
global $conn;
// Check if the product is available in the inventory
$productSql = "SELECT * FROM products WHERE id = '$productId'";
$productResult = $conn->query($productSql);
if ($productResult->num_rows > 0) {
$product = $productResult->fetch_assoc();
// Insert the production order into the orders table
$insertOrderSql = "INSERT INTO production_orders (product_id, quantity) VALUES ('$productId', '$quantity')";
if ($conn->query($insertOrderSql) === TRUE) {
echo "Production order created successfully.";
} else {
echo "Error creating production order: " . $conn->error;
}
} else {
echo "Product not found.";
}
}
// Function to retrieve all production orders
function getProductionOrders()
{
global $conn;
$sql = "SELECT * FROM production_orders";
$result = $conn->query($sql);
if ($result->num_rows >
Finance and Accounting:
// Function to record a financial transaction
function recordTransaction($type, $amount, $description)
{
global $conn;
$sql = "INSERT INTO transactions (type, amount, description) VALUES ('$type', '$amount', '$description')";
if ($conn->query($sql) === TRUE) {
echo "Transaction recorded successfully.";
} else {
echo "Error recording transaction: " . $conn->error;
}
}
// Function to retrieve all transactions
function getTransactions()
{
global $conn;
$sql = "SELECT * FROM transactions";
$result = $conn->query($sql);
if ($result->num_rows > 0) {
while ($row = $result->fetch_assoc()) {
echo "Transaction ID: " . $row["id"] . "<br>";
echo "Type: " . $row["type"] . "<br>";
echo "Amount: " . $row["amount"] . "<br>";
echo "Description: " . $row["description"] . "<br><br>";
}
} else {
echo "No transactions found.";
}
}
Human Resources:
// Function to add a new employee
function addEmployee($name, $position, $salary)
{
global $conn;
$sql = "INSERT INTO employees (name, position, salary) VALUES ('$name', '$position', '$salary')";
if ($conn->query($sql) === TRUE) {
echo "Employee added successfully.";
} else {
echo "Error adding employee: " . $conn->error;
}
}
// Function to retrieve all employees
function getEmployees()
{
global $conn;
$sql = "SELECT * FROM employees";
$result = $conn->query($sql);
if ($result->num_rows > 0) {
while ($row = $result->fetch_assoc()) {
echo "Employee ID: " . $row["id"] . "<br>";
echo "Name: " . $row["name"] . "<br>";
echo "Position: " . $row["position"] . "<br>";
echo "Salary: " . $row["salary"] . "<br><br>";
}
} else {
echo "No employees found.";
}
}
Customer Relationship Management (CRM):
// Function to add a new customer contact
function addContact($customerId, $name, $email, $phone)
{
global $conn;
$sql = "INSERT INTO contacts (customer_id, name, email, phone) VALUES ('$customerId', '$name', '$email', '$phone')";
if ($conn->query($sql) === TRUE) {
echo "Contact added successfully.";
} else {
echo "Error adding contact: " . $conn->error;
}
}
// Function to retrieve all contacts for a customer
function getContacts($customerId)
{
global $conn;
$sql = "SELECT * FROM contacts WHERE customer_id = '$customerId'";
$result = $conn->query($sql);
if ($result->num_rows > 0) {
while ($row = $result->fetch_assoc()) {
echo "Contact ID: " . $row["id"] . "<br>";
echo "Name: " . $row["name"] . "<br>";
echo "Email: " . $row["email"] . "<br>";
echo "Phone: " . $row["phone"] . "<br><br>";
}
} else {
echo "No contacts found for this customer.";
}
}
Production Planning:
// Function to create a production order
function createProductionOrder($productId, $quantity)
{
global $conn;
// Check if the product is available in the inventory
$productSql = "SELECT * FROM products WHERE id = '$productId'";
$productResult = $conn->query($productSql);
if ($productResult->num_rows > 0) {
$product = $productResult->fetch_assoc();
// Insert the production order into the orders table
$insertOrderSql = "INSERT INTO production_orders (product_id, quantity) VALUES ('$productId', '$quantity')";
if ($conn->query($insertOrderSql) === TRUE) {
echo "Production order created successfully.";
} else {
echo "Error creating production order: " . $conn->error;
}
} else {
echo "Product not found.";
}
}
// Function to retrieve all production orders
function getProductionOrders() {
// Connect to the ERP system database or API
$connection = new PDO('mysql:host=localhost;dbname=erp_database', 'username', 'password');
// Execute a query to retrieve production orders
$query = "SELECT * FROM production_orders";
$statement = $connection->prepare($query);
$statement->execute();
// Process the retrieved data
$productionOrders = $statement->fetchAll(PDO::FETCH_ASSOC);
// Return the list of production orders
return $productionOrders;
}
// Usage example
$allProductionOrders = getProductionOrders();
foreach ($allProductionOrders as $productionOrder) {
echo "Order ID: " . $productionOrder['order_id'] . ", Product: " . $productionOrder['product_name'] . "\n";
}
To create a basic Payroll Management system
manages employee salaries, deductions, taxes, and facilitates payroll processing:
Set up the Database:
Create a database to store employee information, salary details, deductions, and tax information.
Design the necessary tables, such as employees, salaries, deductions, and taxes, with appropriate fields.
Create the PHP Files:
Create a config.php file to establish a database connection using PHP's PDO or MySQLi.
Create an index.php file as the main entry point for the Payroll Management system.
Employee Management:
Create a form to add and manage employee information, including name, position, salary details, and tax information.
Implement functions to add, update, delete, and retrieve employee details from the database.
Salary Management:
Create a form to manage employee salaries, including basic salary, allowances, and overtime pay.
Implement functions to calculate and update employee salaries.
Store salary details in the salaries table in the database.
Deduction Management:
Create a form to manage deductions, such as taxes, insurance, and loan deductions.
Implement functions to calculate and update employee deductions.
Store deduction details in the deductions table in the database.
Tax Management:
Create a form to manage tax information, including tax rates and tax brackets.
Implement functions to calculate employee taxes based on their salary and tax brackets.
Store tax details in the taxes table in the database.
Payroll Processing:
Implement a function to process payroll, which calculates net salaries for all employees.
Retrieve necessary salary, deduction, and tax information from the database.
Calculate gross salary, deduct applicable taxes and deductions, and calculate net salary.
Update the salaries table with the net salary information.
Reporting:
Create reports to display employee salary details, deductions, and tax information.
Generate reports for payroll processing results, such as net salary summaries.
Remember to properly validate user input, handle errors, and ensure data security throughout the application.
an example of actual implementation for managing employee salaries, deductions, taxes, and payroll processing
config.php - Establishes a database connection using PDO:
<?php
$host = 'localhost';
$db_name = 'payroll_system';
$username = 'root';
$password = '';
try {
$conn = new PDO("mysql:host=$host;dbname=$db_name", $username, $password);
$conn->setAttribute(PDO::ATTR_ERRMODE, PDO::ERRMODE_EXCEPTION);
} catch(PDOException $e) {
echo "Connection failed: " . $e->getMessage();
}
index.php - Main entry point for the Payroll Management system:
<?php
include 'config.php';
// Add or update employee
if(isset($_POST['submit'])) {
$employee_id = $_POST['employee_id'];
$name = $_POST['name'];
$position = $_POST['position'];
$basic_salary = $_POST['basic_salary'];
// ... additional employee details
if(empty($employee_id)) {
// Insert new employee
$sql = "INSERT INTO employees (name, position, basic_salary) VALUES (?, ?, ?)";
$stmt = $conn->prepare($sql);
$stmt->execute([$name, $position, $basic_salary]);
} else {
// Update existing employee
$sql = "UPDATE employees SET name = ?, position = ?, basic_salary = ? WHERE employee_id = ?";
$stmt = $conn->prepare($sql);
$stmt->execute([$name, $position, $basic_salary, $employee_id]);
}
}
// Retrieve all employees
$sql = "SELECT * FROM employees";
$stmt = $conn->prepare($sql);
$stmt->execute();
$employees = $stmt->fetchAll(PDO::FETCH_ASSOC);
?>
<!DOCTYPE html>
<html>
<head>
<title>Payroll Management System</title>
</head>
<body>
<!-- Employee Management Form -->
<h2>Employee Management</h2>
<form method="POST" action="index.php">
<input type="hidden" name="employee_id" value="">
<label>Name:</label>
<input type="text" name="name" value=""><br>
<label>Position:</label>
<input type="text" name="position" value=""><br>
<label>Basic Salary:</label>
<input type="text" name="basic_salary" value=""><br>
<!-- ... additional employee fields -->
<input type="submit" name="submit" value="Submit">
</form>
<!-- Display Employee List -->
<h2>Employee List</h2>
<table>
<tr>
<th>Name</th>
<th>Position</th>
<th>Basic Salary</th>
<!-- ... additional employee fields -->
</tr>
<?php foreach ($employees as $employee) { ?>
<tr>
<td><?php echo $employee['name']; ?></td>
<td><?php echo $employee['position']; ?></td>
<td><?php echo $employee['basic_salary']; ?></td>
<!-- ... additional employee fields -->
</tr>
<?php } ?>
</table>
</body>
</html>
You can expand upon this codebase by adding additional functionality for salary management, deduction management, tax management, and payroll processing, as mentioned in the previous steps.
make a proxy using a php
make a proxy using a php script
1. Suggest using a SSH SOCKS proxy, since it'll be easier and will be running through an encrypted tunnel to the VPS.
2. Use Apache with mod_proxy and mod_proxy_http.
3. use tor proxy, here is the script:
<?php
function tor_new_identity($tor_ip='127.0.0.1', $control_port='9051',$auth_code='saad'){
$fp = fsockopen($tor_ip, $control_port, $errno, $errstr, 30);
if (!$fp) return false; //can't connect to the control port
fputs($fp, "AUTHENTICATE $auth_code\r\n");
$response = fread($fp, 1024);
list($code, $text) = explode(' ', $response, 2);
if ($code != '250') return false; //authentication failed
//send the request to for new identity
fputs($fp, "signal NEWNYM\r\n");
$response = fread($fp, 1024);
list($code, $text) = explode(' ', $response, 2);
if ($code != '250') return false; //signal failed
fclose($fp);
return true;
}
?>
Call the function "if (tor_new_identity('127.0.0.01', '9051')) {//do stuffs here}" But you must install the tor system in the VPS 1st.
4. There are at least 4 more PHP's proxy developments.
1- GlypeProxy, the most known PHP proxy.
Does cURL.
2- Poxy, i discover it recently, love. Uses client/server sockets.
3- php-proxy, but there are few ones that shares that name // too basics
But in fact, no one will let you connect your browser with it, because you need to implement the tcp wrapper for the connection.
This is the way you got usually an http interface with cURL or direct raw socket.
You need an SO app, not an script.
I would recommend you Squid proxy for Linux (handy and clean manual
http://es.kioskea.net/faq/613-instalar-un-servidor-proxy-http-squid
I would recommend you to not use Windows (even if i do), but the FreeProxy is awesome.
(download at http://www.softpedia.com/get/Internet/Servers/Proxy-Servers/FreeProxy.shtml)
On the other hand of the proxy, you got the VPN.
It's better and easier to install and connect to a VPN, a private SSH protected private network to your VPS.
That will bypass ALL the traffic from your computer through a encrypted connection to/from the VPS.
You will have the VPS's IP, and "local" connectivity to your VPS/Desktop from both sides. (example, web servers with no need of open ports except the VPN one)